
There is something quietly comforting about holding a warm, perfectly shaped rice ball in your hands. The soft grains, gently seasoned, wrapped in a strip of crisp nori, and hiding a creamy tuna filling inside, it just feels right. Tuna Mayo Onigiri is simple, satisfying, and honestly one of those things that proves you do not need complicated ingredients to create something special. Trust me, you’re going to love this.
Disclosure: This post contains affiliate links.If you click and make a purchase, I may earn a small commission at no extra cost to you.


Why This Little Rice Ball Wins Every Time
Some recipes impress with complexity, others win with heart. This one does both in its own humble way. The fluffy rice contrasts beautifully with the rich, creamy tuna center, and that slight salty snap from the nori brings everything together. It is portable, comforting, and somehow feels both homemade and store bought in the best possible way. This one’s a total game changer when you want something quick but still crave something thoughtfully made.
A Bite of Japanese Tradition
Onigiri has been part of Japanese food culture for centuries. Traditionally filled with preserved ingredients like salted salmon or pickled plum, these rice balls were made to travel, easy to carry and satisfying to eat on the go.
Over time, modern fillings like tuna mixed with mayonnaise became incredibly popular, especially in convenience stores across Japan. The creamy filling is now a classic variation, blending Japanese technique with a slightly Western twist. Let me tell you, it is worth every bite.
Why You Can Always Count on This Recipe
Before we get our hands into the rice, let’s talk about why this recipe works so well in real life.
Versatile: You can enjoy it warm, at room temperature, or packed for lunch. It fits into busy days effortlessly.
Budget-Friendly: Canned tuna and rice are affordable pantry staples, which makes this a smart and economical choice.
Quick and Easy: Once the rice is cooked, assembly is straightforward and surprisingly fun.
Customizable: You can adjust the seasoning, add a little spice, or tweak the filling to match your taste.
Crowd-Pleasing: Kids love it, adults appreciate it, and it disappears fast at gatherings.
Make-Ahead Friendly: You can prepare them a few hours in advance, perfect for meal prep.
Great for Leftovers: Extra rice and tuna can easily be transformed into more onigiri the next day.
Chef Secrets for Perfect Onigiri
Making great onigiri is simple, but a few insider tips make all the difference.
- Use freshly cooked short grain rice, it holds together much better than long grain varieties.
- Wet your hands lightly with salted water before shaping, this prevents sticking and adds subtle seasoning.
- Do not overfill, a tablespoon of filling is usually perfect.
- Press firmly but gently, you want compact rice without crushing the grains.
Tools That Make It Easier
Before we move into ingredients, let’s quickly cover what you will need in your kitchen.
Rice Cooker or Pot: For perfectly cooked, fluffy short grain rice.
Mixing Bowl: To combine the tuna and mayonnaise evenly.
Small Bowl of Salted Water: For moistening your hands during shaping.
Sharp Knife or Kitchen Scissors: To cut nori sheets cleanly.
Ingredients You Will Need For Tuna Mayo Onigiri
Now let’s gather everything. Each ingredient plays a small but important role in building that perfect bite.
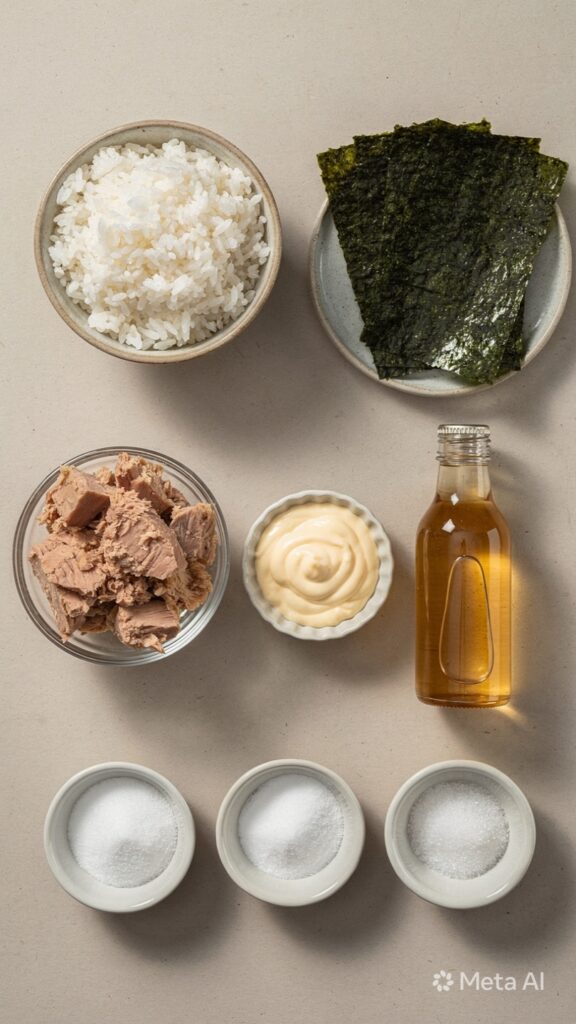
- Short Grain Sushi Rice: 2 cups uncooked, yields about 6 cups cooked. This sticky rice is essential for shaping and holding everything together.
- Water: 2 1/4 cups for cooking the rice, ensures tender and fluffy grains.
- Rice Vinegar: 2 tablespoons, adds gentle tang and brightness.
- Sugar: 1 tablespoon, balances the vinegar with subtle sweetness.
- Salt: 1 teaspoon, enhances flavor throughout the rice.
- Canned Tuna: 1 can, about 5 ounces, drained well. Provides savory protein and texture.
- Mayonnaise: 3 tablespoons, creates the creamy, rich filling.
- Nori Sheets: 3 sheets, cut into strips. Adds structure and that signature ocean flavor.
Easy Swaps If You Need Them
Sometimes you work with what you have, and that is completely fine.
Short Grain Rice: Medium grain rice can work in a pinch.
Mayonnaise: Greek yogurt for a lighter filling.
Tuna: Cooked shredded chicken if you prefer a different protein.
Nori Sheets: Leave them off if unavailable, though they do add flavor and structure.
Spotlight on Two Key Ingredients
A couple of components truly define this dish.
Short Grain Sushi Rice: Its natural stickiness is what makes shaping possible. Without it, the rice would fall apart.
Nori Sheets: They provide contrast in texture, slightly crisp at first bite, then softening against the warm rice.
Let’s Shape These Beautiful Rice Balls
Now the fun begins. Take your time and enjoy the process.
- Preheat Your Equipment: Cook the rice using 2 cups short grain rice and 2 1/4 cups water. Once done, let it steam covered for 10 minutes.
- Combine Ingredients: In a small bowl, mix drained tuna with 3 tablespoons mayonnaise until creamy and smooth.
- Prepare Your Cooking Vessel: In a separate small bowl, mix rice vinegar, sugar, and salt. Gently fold this mixture into the warm rice without smashing the grains.
- Assemble the Dish: Wet your hands with salted water. Place about 1/2 cup rice in your palm, create a small indent, add about 1 tablespoon tuna filling, then cover with a little more rice.
- Cook to Perfection: Gently shape into a triangle by pressing lightly between your palms and fingers until firm but not compressed.
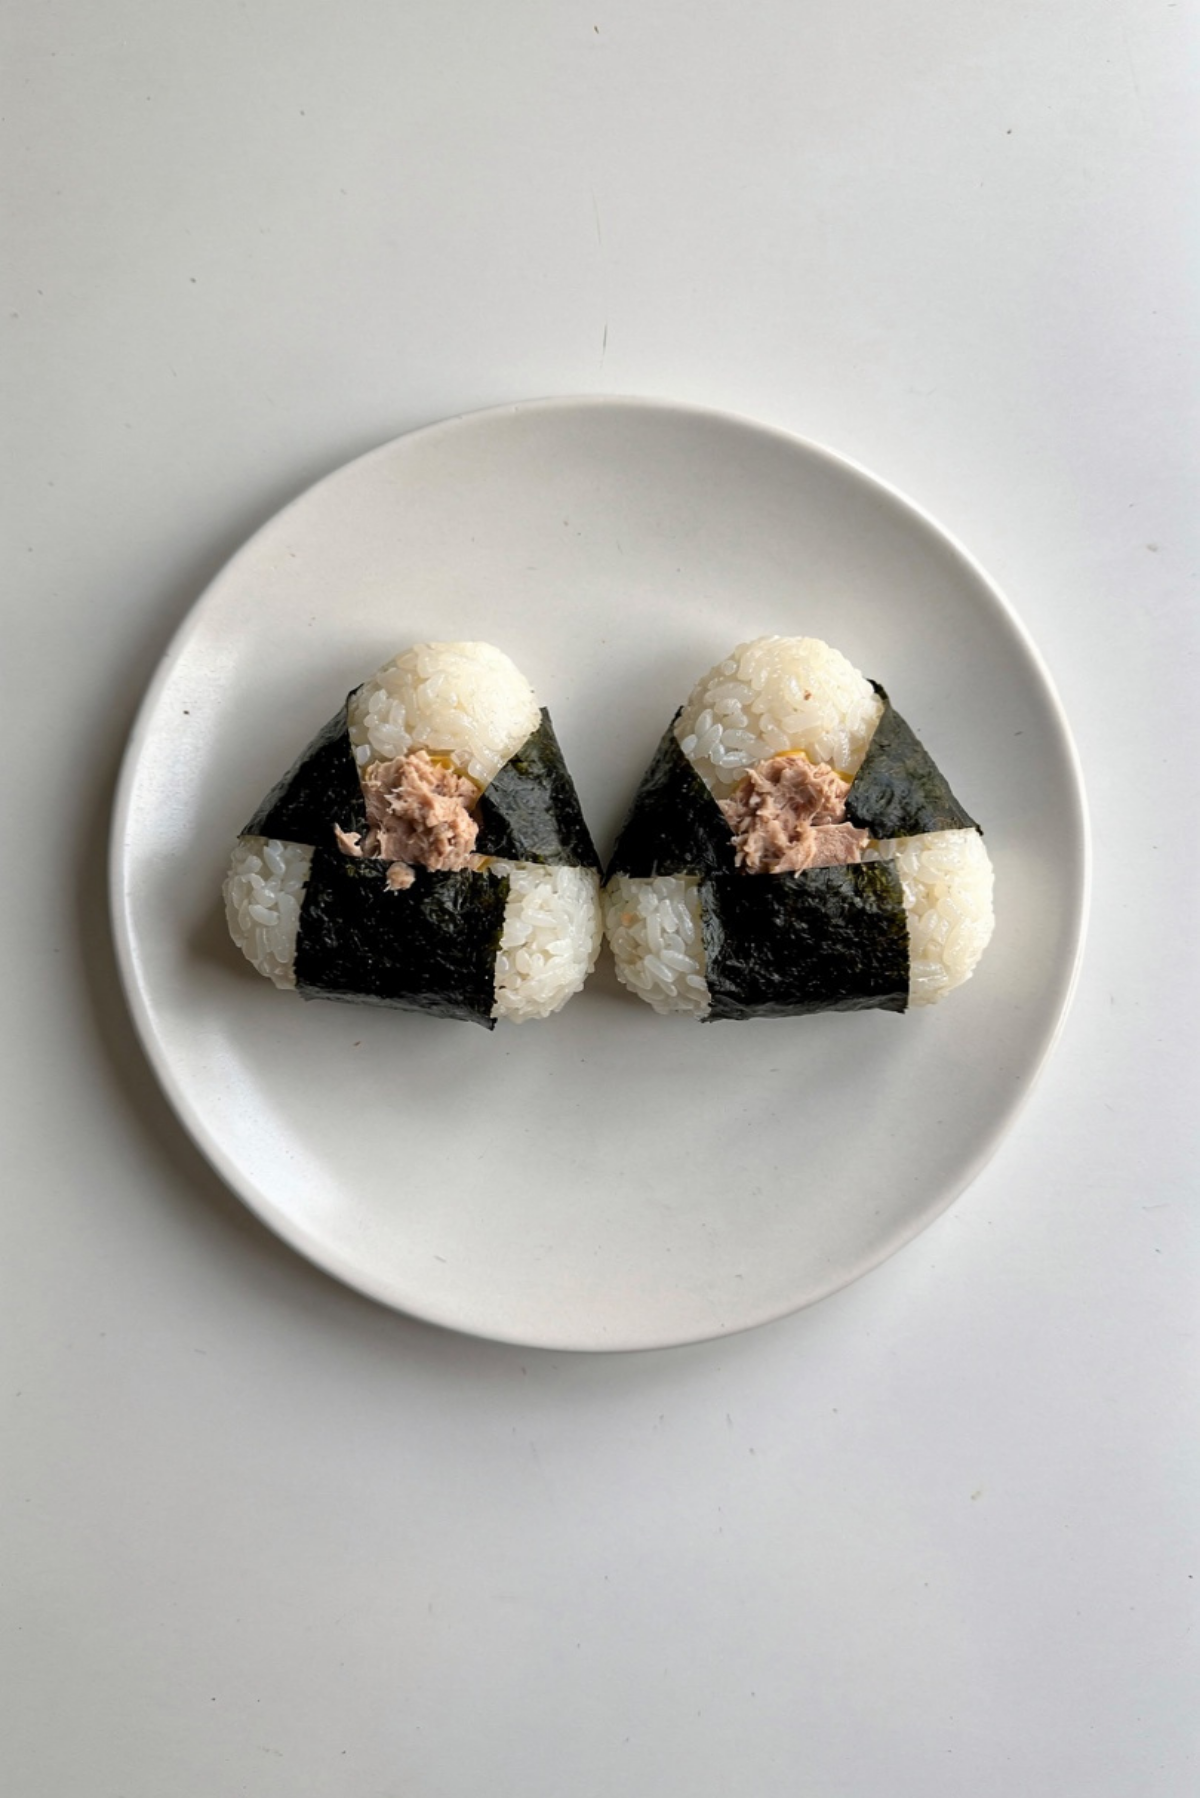
- Finishing Touches: Wrap a strip of nori around the base of each rice ball.
- Serve and Enjoy: Serve slightly warm or at room temperature. That first bite, creamy center meeting fluffy rice, is pure comfort.
Texture and Flavor Harmony
What makes this so satisfying is the contrast. The rice is soft and tender, slightly tangy from the vinegar. The tuna filling is creamy and savory, rich without being heavy. The nori adds a delicate saltiness and subtle crispness. As you chew, everything blends into a balanced, comforting bite.
Helpful Tips for Success
A few small adjustments can elevate your results.
- Let the rice cool slightly before shaping, too hot and it becomes sticky and hard to handle.
- Drain the tuna very well to avoid soggy filling.
- Shape with confident but gentle pressure for clean edges.
Mistakes to Avoid for Perfect Results
Even simple dishes have little traps.
- Overfilling the center, which can cause breakage. Stick to about one tablespoon.
- Using cold rice, which does not stick properly.
- Skipping salted water on your hands, which prevents sticking and seasons lightly.
Nutrition Snapshot
Servings: 6 onigiri
Calories per serving: Approximately 220
Note: These are approximate values.
Time Breakdown at a Glance
Prep Time: 15 minutes
Cook Time: 20 minutes
Total Time: 35 minutes
Make Ahead and Storage Guide
You can prepare these a few hours in advance and store them wrapped tightly in plastic wrap at room temperature if eating the same day. For refrigeration, keep them airtight, though rice may firm up slightly. Avoid freezing, as the texture changes significantly. Reheat gently in the microwave for a few seconds if needed, and add the nori just before serving for best texture.
Serving Ideas to Complete the Meal
Serve alongside miso soup, a crisp cucumber salad, or fresh fruit for a balanced lunch. They also work beautifully in a bento box, paired with pickled vegetables or edamame.
Creative Ways to Use Leftovers
Leftover tuna mixture can be spread on toast or stuffed into wraps. Extra rice can become fried rice the next day. You can even crumble an onigiri over a salad for a playful twist.
Extra Tips for Even Better Flavor
Add a tiny splash of soy sauce to the tuna mixture for depth. Sprinkle toasted sesame seeds into the rice for subtle nuttiness. Work with warm rice, not hot and not cold, for the easiest shaping.
Make It Look Truly Special
Shape the triangles evenly and smooth the surfaces gently with your palms. Cut the nori into uniform strips for a clean presentation. Arrange them neatly on a simple plate, spacing them evenly for a minimalist, elegant look.
Variations to Try Next Time
- Add finely chopped scallions to the tuna for freshness.
- Mix in a little sriracha with the mayonnaise for gentle heat.
- Include tiny diced cucumber for crunch.
- Try adding a small cube of cream cheese for extra richness.
- Sprinkle furikake seasoning into the rice for added flavor.
FAQ’s
1. Can I make these without vinegar?
Yes, but the rice will taste less balanced. The vinegar adds gentle brightness.
2. How do I keep them from falling apart?
Use short grain rice and shape while it is still slightly warm.
3. Can I make them the night before?
Yes, but wrap tightly and store properly. Add nori just before serving.
4. Are they eaten hot or cold?
Usually at room temperature, though slightly warm is lovely too.
5. Can I use light mayonnaise?
Absolutely, it will just be slightly less rich.
6. How do I pack them for lunch?
Wrap individually in plastic wrap and keep cool until ready to eat.
7. Can I freeze them?
Freezing is not recommended because rice texture changes.
8. What rice works best?
Short grain sushi rice is ideal for proper stickiness.
9. Can I make smaller portions?
Yes, simply reduce the rice and filling amounts per piece.
10. Is this kid friendly?
Very much so. The mild creamy flavor is usually a big hit.
Conclusion
There is something deeply satisfying about making Tuna Mayo Onigiri from scratch. It is simple, comforting, and quietly impressive. Once you shape your first triangle and take that first creamy, savory bite, you will understand why this humble rice ball has stayed loved for generations. Give it a try, and let it become part of your kitchen story too.
Print
Tuna Mayo Onigiri
- Prep Time: 15 minutes
- Cook Time: 20 minutes
- Total Time: 35 minutes
- Yield: 6 onigiri 1x
- Category: Lunch
- Method: Hand Shaping
- Cuisine: Japanese
- Diet: Low Lactose
Description
Soft and fluffy short grain rice wrapped around a creamy tuna and mayonnaise filling, shaped into classic handheld rice balls and finished with crisp nori. Perfect for lunch, meal prep, or a satisfying snack.
Ingredients
- 2 cups short grain sushi rice (uncooked)
- 2 1/4 cups water
- 2 tablespoons rice vinegar
- 1 tablespoon sugar
- 1 teaspoon salt
- 1 can (5 ounces) canned tuna, drained well
- 3 tablespoons mayonnaise
- 3 nori sheets, cut into strips
Instructions
- Rinse the sushi rice under cold water until the water runs clear. Combine rice and 2 1/4 cups water in a rice cooker or pot and cook according to package instructions. Let the rice steam covered for 10 minutes after cooking.
- In a small bowl, mix the drained tuna with mayonnaise until smooth and creamy.
- In another small bowl, combine rice vinegar, sugar, and salt. Gently fold this mixture into the warm rice without smashing the grains.
- Lightly wet your hands with salted water. Place about 1/2 cup of rice in your palm and flatten slightly to create a small indent.
- Add about 1 tablespoon of the tuna mixture into the center of the rice.
- Cover with a little more rice and gently shape into a compact triangle, pressing firmly but not crushing the grains.
- Wrap a strip of nori around the base of each rice ball. Serve slightly warm or at room temperature.
Notes
- Drain the tuna thoroughly to prevent a soggy filling.
- Always use short grain rice for proper stickiness and structure.
- Add the nori just before serving to keep it from becoming too soft.
- Wet your hands with salted water before shaping to prevent sticking and lightly season the rice.
Nutrition
- Serving Size: 1 onigiri
- Calories: 220
- Sugar: 2g
- Sodium: 320mg
- Fat: 8g
- Saturated Fat: 1.5g
- Unsaturated Fat: 6g
- Trans Fat: 0g
- Carbohydrates: 28g
- Fiber: 1g
- Protein: 8g
- Cholesterol: 10mg
Solid analysis! Seeing more localized platforms like pagtaya legit emerge is great for regional players. Reliable access & security are key – exciting to see innovation in this space!