
There is something instantly comforting about the smell of warm cookies drifting through the kitchen. The butter turns rich and toasty, the vanilla wraps around everything, and those little pockets of chocolate melt into the dough in the most irresistible way. Trust me, you’re going to love this, because every bite brings that perfect mix of soft center, lightly crisp edges, and gooey chocolate that makes a simple afternoon feel extra special.
Disclosure: This post contains affiliate links.If you click and make a purchase, I may earn a small commission at no extra cost to you.


Why These Cookies Always Hit the Spot
Some desserts are beautiful, some are nostalgic, and some are the kind you make once and keep coming back to forever. These cookies are firmly in that last category. They are cozy, familiar, and somehow still exciting every single time they come out of the oven.
What makes them stand out is the balance. The centers stay tender, the edges turn lightly golden, and the chocolate melts into sweet little pools that make each cookie feel like a tiny reward. This one’s a total game-changer when you want something homemade that feels easy but tastes bakery-level good.
The Sweet Story Behind This Classic Favorite
Before we get into the mixing bowl, it helps to appreciate why this dessert became such a household legend. Chocolate chip cookies are one of those baked treats that feel timeless, and for good reason.
They are widely connected to American home baking and became popular in the 20th century, when bakers discovered that chopped chocolate folded into buttery dough created a treat that was both simple and unforgettable. Over time, they moved from family kitchens to bakeries, lunchboxes, holiday trays, and just about every dessert table you can imagine. And honestly, it is easy to see why they never went out of style.
What Makes These So Dependable and Delicious
Once you know a cookie dough that works, it becomes the kind of thing you turn to again and again. And now let’s dive into exactly why this version deserves a permanent spot in your baking routine.
Versatile: These cookies fit almost any moment, from after-school snacks to holiday platters and late-night cravings. They are simple enough for everyday baking but satisfying enough to share with guests.
Budget-Friendly: Most of the ingredients are pantry staples, which means you can bake a full batch without needing anything fancy. That makes them practical, comforting, and easy on the grocery list.
Quick and Easy: The dough comes together without much fuss, and the baking time is short. You can go from craving to warm cookies in a very manageable amount of time.
Customizable: You can adjust the chocolate, the size, or even the texture depending on what you love most. A little tweak here and there can make the batch feel brand new.
Crowd-Pleasing: Few homemade treats disappear faster than a plate of warm chocolate chip cookies. Let me tell you, it’s worth every bite, and everyone usually reaches for a second one.
Make-Ahead Friendly: The dough holds up beautifully in the fridge or freezer. That means fresh cookies are never far away when you want them.
Great for Leftovers: If you somehow have extras, they stay delicious for days and can be repurposed into ice cream sandwiches or cookie crumbles for other desserts.
Smart Baker Secrets for Better Results
Good cookies do not just happen by luck, even though they can look effortless when done right. A few little details make all the difference here.
- Use room temperature butter: Soft butter creams more evenly with the sugars, which helps create a smoother dough and a more even texture.
- Do not overmix after adding flour: Stir just until the dry streaks disappear. This keeps the cookies tender instead of dense.
- Chill the dough if your kitchen is warm: Even 20 to 30 minutes can help the cookies bake thicker and keep them from spreading too much.
- Slightly underbake for soft centers: Pull them out when the edges are set and the centers still look a little soft. They will finish settling on the baking sheet.
- Use a cookie scoop for even sizing: Uniform dough balls bake more evenly, which means every cookie turns out beautifully.
Kitchen Tools That Make Baking Easier
A great batch starts with a few reliable tools. Nothing too complicated, just the basics that help everything move smoothly from bowl to oven.
Mixing bowls: You will want one large bowl for the dough and a smaller one if you prefer to whisk the dry ingredients separately.
Hand mixer or stand mixer: This helps cream the butter and sugars until light and fluffy, which gives the dough a better start.
Measuring cups and spoons: Accurate measuring matters, especially in baking, where small differences can affect texture.
Rubber spatula: Perfect for scraping down the bowl and folding in the chocolate without overworking the dough.
Baking sheet: A sturdy baking sheet helps the cookies bake evenly and develop those lightly golden bottoms.
Parchment paper: This keeps cleanup easy and helps prevent sticking.
Cookie scoop: Useful for making evenly sized cookies that bake at the same pace.
Cooling rack: Letting the cookies cool on a rack keeps the bottoms from getting too soft.
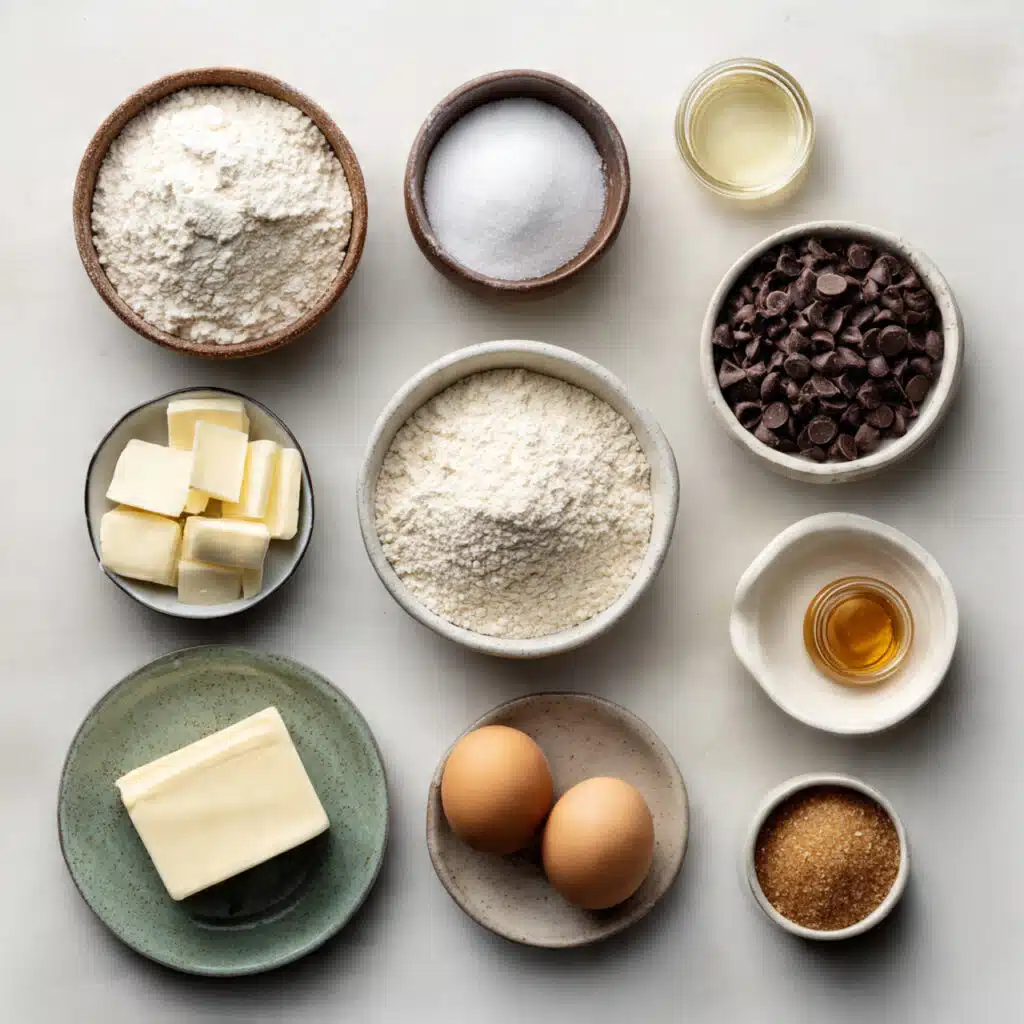
Everything You Need for the Perfect Batch
Now we are at the part where the magic really begins. Each ingredient has a job to do, and together they create that classic balance of buttery sweetness, chewy texture, and rich chocolate in every bite.
- All-purpose flour: 2 1/4 cups, this gives the dough structure and helps the cookies hold their shape while staying tender.
- Baking soda: 1 teaspoon, this encourages lift and spread so the cookies bake up with soft centers and lightly crisp edges.
- Fine salt: 1 teaspoon, this sharpens the sweetness and deepens the chocolate flavor.
- Unsalted butter: 1 cup, softened, this adds richness, moisture, and that classic buttery flavor.
- Brown sugar: 3/4 cup, packed, this brings moisture and a deeper caramel-like sweetness that keeps the cookies chewy.
- Granulated sugar: 3/4 cup, this helps create lightly crisp edges and balances the brown sugar.
- Large eggs: 2, these bind the dough and add richness.
- Vanilla extract: 2 teaspoons, this rounds out the sweetness and adds warm aroma.
- Semi-sweet chocolate chips: 2 cups, these melt into gooey pockets throughout the dough and give the cookies their signature flavor.
Easy Ingredient Swaps That Still Taste Amazing
Sometimes you need a little flexibility, and thankfully this dough is very forgiving. A few thoughtful swaps can still lead you to a delicious tray of cookies.
Unsalted butter: Salted butter works too, just reduce the added salt slightly.
Brown sugar: Dark brown sugar gives a deeper, richer flavor and a slightly chewier texture.
Semi-sweet chocolate chips: Chopped dark chocolate or milk chocolate chips can be used for a different sweetness level.
Vanilla extract: Vanilla bean paste is a lovely substitute if you want an even more fragrant flavor.
All-purpose flour: A good cup-for-cup gluten-free baking blend can work if needed, though the texture may vary slightly.
The Ingredients That Truly Steal the Show
Some ingredients quietly support the dough, and others are the stars everyone remembers. Here are the ones that really define the final bite.
Brown Sugar: This is what gives the cookies their soft, chewy personality and that subtle caramel warmth that makes them feel extra cozy.
Semi-Sweet Chocolate Chips: These bring just the right amount of rich chocolate flavor without making the cookies overly sweet. When they melt into the warm dough, they create those glossy little pockets everyone looks for first.
Let’s Bake a Batch Together
And now let’s dive into the best part, which is turning a few humble ingredients into something that smells incredible and disappears fast. The process is simple, satisfying, and honestly kind of therapeutic.
- Preheat Your Equipment: Preheat your oven to 350°F. Line 2 baking sheets with parchment paper so the cookies bake evenly and release easily.
- Combine Ingredients: In a medium bowl, whisk together the flour, baking soda, and salt. In a large bowl, beat the softened butter, brown sugar, and granulated sugar until light and creamy. Add the eggs one at a time, then mix in the vanilla. Gradually add the dry ingredients and mix just until combined. Fold in the chocolate chips.
- Prepare Your Cooking Vessel: Make sure your lined baking sheets are ready and spaced for good airflow. This helps the cookies bake with even color and texture.
- Assemble the Dish: Scoop the dough into portions of about 1 1/2 tablespoons each and place them on the prepared baking sheets, leaving about 2 inches between each one.
- Cook to Perfection: Bake for 10 to 12 minutes, until the edges are lightly golden and the centers still look a touch soft. Rotate the pan halfway through if your oven bakes unevenly.
- Finishing Touches: Let the cookies rest on the baking sheet for 5 minutes so they can finish setting. Transfer them to a wire rack to cool completely, or enjoy them while still warm if you love that gooey chocolate moment.
- Serve and Enjoy: Serve with a glass of cold milk, hot coffee, or simply on their own while they are still soft and fragrant. They are comforting, classic, and completely satisfying.
What Makes the Texture and Flavor So Good
The real beauty of these cookies is in the contrast. The edges bake into a delicate golden ring that gives just a little crispness, while the centers stay soft and tender. Then you bite into the melted chocolate, and suddenly you get that rich, silky sweetness against the buttery dough.
As they bake, the sugars caramelize gently, the vanilla blooms, and the butter creates that warm bakery-style aroma that fills the whole room. It is not just sweet, it is layered. You get butter, caramel notes, a touch of salt, and deep chocolate flavor all at once.
Helpful Tricks for Cookie Success
Even an easy bake gets better with a few little pointers. These are the kind of tips that make the process smoother and the results even tastier.
- Chill the dough for thicker cookies if your kitchen is warm or your butter feels very soft.
- Press a few extra chocolate chips on top of each dough ball before baking for a prettier finish.
- Bake one test cookie first if you want to check spread and timing before committing the whole tray.
- Let the baking sheet cool between batches so the next round does not spread too quickly.
Mistakes to Skip for the Best Batch
A few common baking habits can throw off the texture, but they are easy to avoid once you know what to watch for.
- Using butter that is too melted can make the cookies spread too much and turn thin.
- Packing too much flour into the measuring cup can make the dough dry and the cookies heavy.
- Overbaking takes away that soft center, so pull them out when they still look slightly underdone in the middle.
- Placing dough on a hot baking sheet can cause uneven spreading, so always start with a cool pan.
A Quick Look at the Nutrition
Before you bake another batch, here is a simple snapshot of what to expect per serving.
Servings: 24 cookies
Calories per serving: 210
Note: These are approximate values.
Time You’ll Want to Set Aside
One of the nicest things about these cookies is how manageable they are. You do not need an entire afternoon to make something delicious.
Prep Time: 15 minutes
Cook Time: 12 minutes
Total Time: 27 minutes
Make-Ahead and Storage Tips
If you like planning ahead, this dough is wonderfully convenient. You can mix it in advance and keep it chilled for a day or two before baking. In fact, a little rest in the fridge can deepen the flavor and help the cookies bake a little thicker.
Baked cookies can be stored in an airtight container at room temperature for up to 5 days. For longer storage, freeze the dough in scooped portions and bake straight from frozen, adding 1 to 2 extra minutes to the bake time. You can also freeze fully baked cookies and warm them gently in the microwave for a softer, just-baked feel.
Delicious Ways to Serve Them
A warm cookie is already a treat on its own, but there are so many fun ways to make it feel even more special. Serve them with cold milk for a classic pairing, or alongside coffee for an afternoon pick-me-up. They are also lovely on a dessert board with fruit and a few squares of dark chocolate.
For parties, stack them on a cake stand or arrange them in a basket lined with a soft napkin. They look inviting, smell amazing, and instantly make the table feel more welcoming.
Fun Ideas for Leftover Cookies
If there are a few cookies left the next day, that is actually good news. There are plenty of ways to turn them into something new.
Crumble them over vanilla yogurt for a sweet breakfast-style treat. Sandwich softened ice cream between two cookies for an easy dessert. Chop them up and fold them into whipped cream for a quick parfait layer. You can even warm a cookie and top it with a scoop of ice cream for a simple cookie sundae.
A Few More Tips Before You Bake Again
Sometimes the smallest details make the biggest difference, especially with something as beloved as cookies.
Use good-quality chocolate if you can, because it really shows in the final flavor. Measure flour carefully by spooning it into the cup and leveling it off. And if you love bakery-style looks, save a handful of chocolate chips to place on top right before baking. It gives every cookie a more polished finish while keeping that homemade charm.
Make Them Look Bakery Beautiful
Presentation matters, even for something as comforting as a homemade cookie. A few little touches can make the batch feel extra special.
Bake the cookies until just golden at the edges so they keep that soft, appealing center. Press a few chocolate chips on top after scooping the dough so the tops look full and glossy. Let them cool just enough to hold their shape, then stack them casually on a plate or cooling rack for that warm, fresh-from-the-oven look everyone loves.
Fun Variations to Try Next Time
Once you have the base down, there is plenty of room to play. And now let’s dive into a few ideas that keep things interesting without losing that classic comfort.
- Dark Chocolate Version: Swap the semi-sweet chips for chopped dark chocolate for a richer, more intense flavor.
- Sea Salt Finish: Sprinkle a tiny pinch of flaky salt on top right after baking to highlight the sweetness and deepen the chocolate notes.
- Double Chocolate Style: Replace 1/4 cup of the flour with unsweetened cocoa powder for a deeper chocolate cookie base.
- Nutty Crunch: Add 3/4 cup chopped walnuts or pecans if you like a little extra texture.
- Mini Cookie Batch: Scoop smaller portions and reduce the baking time slightly for bite-sized treats that are great for sharing.
FAQ’s
1. Can I chill the dough overnight?
Yes, absolutely. Chilling overnight can deepen the flavor and help the cookies bake a bit thicker.
2. Why did my cookies spread too much?
This usually happens when the butter is too soft or melted, or when the baking sheet is warm before the dough goes on.
3. Can I freeze the dough?
Yes. Scoop the dough into portions, freeze them on a tray, then store them in a freezer-safe container or bag.
4. Can I use milk chocolate chips instead?
Yes, you can. The cookies will be sweeter, but still delicious.
5. How do I keep them soft after baking?
Store them in an airtight container once fully cooled. Slight underbaking also helps keep the centers tender.
6. Can I make them larger?
Yes. Just increase the dough size and add a minute or two to the baking time, while watching the edges closely.
7. Do I need a mixer?
No, though it helps. You can mix by hand with a sturdy spoon if the butter is properly softened.
8. Can I use salted butter?
Yes, just reduce the added salt slightly so the flavor stays balanced.
9. Why do my cookies taste dry?
Too much flour or overbaking are the most common reasons. Measure carefully and pull them out when the centers still look a little soft.
10. What is the best way to reheat them?
A few seconds in the microwave makes them warm and soft again, with the chocolate getting melty and glossy.
Conclusion
Chocolate Chip Cookies are one of those simple pleasures that never get old. They are warm, sweet, familiar, and packed with that perfect mix of buttery dough and melted chocolate that makes everyone linger in the kitchen a little longer. Whether you bake them for sharing or keep the whole batch close for yourself, this is the kind of treat that always feels worth making. Trust me, once you smell them in the oven, you will already be thinking about the next batch.
Print
Chocolate Chip Cookies
- Prep Time: 15 minutes
- Cook Time: 12 minutes
- Total Time: 27 minutes
- Yield: 24 cookies 1x
- Category: Dessert
- Method: Baking
- Cuisine: American
- Diet: Vegetarian
Description
Soft in the center, lightly crisp around the edges, and filled with gooey chocolate in every bite, these homemade chocolate chip cookies are the kind of classic treat that never disappoints.
Ingredients
- 2 1/4 cups all-purpose flour
- 1 teaspoon baking soda
- 1 teaspoon fine salt
- 1 cup unsalted butter, softened
- 3/4 cup brown sugar, packed
- 3/4 cup granulated sugar
- 2 large eggs
- 2 teaspoons vanilla extract
- 2 cups semi-sweet chocolate chips
Instructions
- Preheat the oven to 350°F and line 2 baking sheets with parchment paper.
- In a medium bowl, whisk together the flour, baking soda, and salt.
- In a large bowl, beat the softened butter, brown sugar, and granulated sugar until light and creamy.
- Add the eggs one at a time, then mix in the vanilla extract.
- Gradually add the dry ingredients and mix just until combined.
- Fold in the chocolate chips.
- Scoop the dough into portions of about 1 1/2 tablespoons each and place them 2 inches apart on the prepared baking sheets.
- Bake for 10 to 12 minutes, until the edges are lightly golden and the centers still look slightly soft.
- Let the cookies rest on the baking sheet for 5 minutes, then transfer them to a wire rack to cool.
Notes
- For thicker cookies, chill the dough for 20 to 30 minutes before baking.
- Do not overbake if you want a soft center.
- Press a few extra chocolate chips on top before baking for a prettier finish.
- Store in an airtight container at room temperature for up to 5 days.
Nutrition
- Serving Size: 1 cookie
- Calories: 210
- Sugar: 16g
- Sodium: 135mg
- Fat: 11g
- Saturated Fat: 7g
- Unsaturated Fat: 3g
- Trans Fat: 0g
- Carbohydrates: 27g
- Fiber: 1g
- Protein: 2g
- Cholesterol: 28mg