
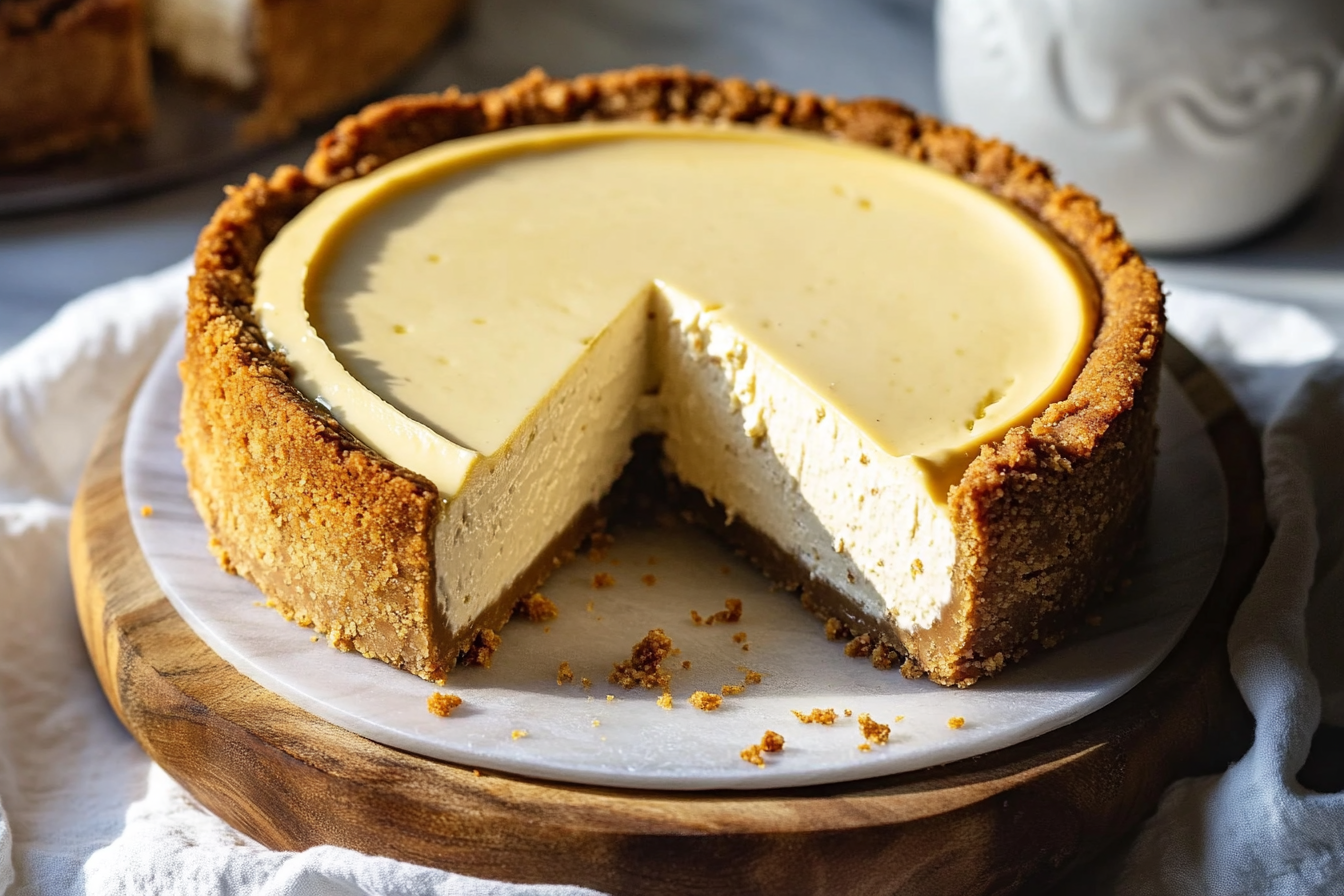
Okay, friend—get ready, because we are about to dive into a dessert that’s pure magic. I’m talking about a cheesecake that’s silky-smooth, rich without being too heavy, and packed with the deep, toasty flavor of brown butter and sweet flecks of real vanilla bean. It’s elegant enough to wow at a dinner party but cozy enough for a “just because” treat on a Tuesday night. Trust me, this one’s a game-changer.
Disclosure: This post contains affiliate links.If you click and make a purchase, I may earn a small commission at no extra cost to you.


The first time I made this, it was love at first bite. The nutty aroma of brown butter filled my kitchen, and when that luscious vanilla bean cheesecake hit the oven, it was chef’s kiss perfection. Whether you’re a seasoned baker or just dipping your toes into cheesecake land, this recipe is straightforward, forgiving, and wildly impressive. So, go ahead—grab your springform pan and let’s make some magic.
Why You’ll Love Vanilla Bean Brown Butter Dream Cheesecake
This recipe isn’t just about the ingredients—it’s about creating moments. Whether you’re cooking for a casual family dinner, hosting a get-together with friends, or simply indulging in some comforting flavors for yourself, this dish is versatile enough to fit the occasion. Here’s why it’s a favorite:
Versatile: Perfect for busy weeknights or as a standout dish at gatherings. Imagine coming home after a long day, knowing you can whip up something delicious and comforting in no time. Or envision serving this at a party, where guests ask for the recipe before the night ends.
Budget-Friendly: Uses ingredients you likely already have in your kitchen. No need for exotic items; this dish proves that simple ingredients can create extraordinary flavors. It’s perfect for when you’re trying to stick to a budget but still want something hearty and satisfying.
Quick and Easy: Straightforward steps that even beginners can follow. If you’re someone who usually avoids complex recipes, this one is for you. It’s designed to be foolproof, so you can enjoy cooking without stress.
Customizable: Easy to tweak with different flavors to suit your preferences. For example, if you love bold flavors, add a pinch of cayenne or smoked paprika. Prefer something milder? You can adjust the seasoning to make it kid-friendly.
Crowd-Pleasing: A guaranteed hit with both kids and adults. It’s always a win when a single dish can satisfy everyone at the table. This recipe strikes the perfect balance of flavor and comfort, making it a universal favorite.
Ingredients in Vanilla Bean Brown Butter Dream Cheesecake
Here’s where the magic begins. This cheesecake blends cozy, rich, and aromatic ingredients into one heavenly bite. Let’s break it down:
Graham Cracker Crumbs: The classic base. Crunchy, buttery, and the perfect contrast to that creamy filling.
Brown Butter: The secret weapon. Browning the butter adds a nutty, almost caramel-like depth that regular butter just can’t match.
Cream Cheese: The heart and soul of any good cheesecake. It gives that luscious, smooth texture we all love.
Sour Cream: Adds a gentle tang and helps balance out the sweetness for a more complex flavor.
Eggs: The structure-holders. They help bind everything together while keeping the texture velvety and rich.
Vanilla Bean Paste: The star of the show. Those little black specks? Pure gold. They give a beautifully intense vanilla flavor that’s totally irresistible.
Granulated Sugar: Sweetens the deal and brings everything into delicious harmony.
Cornstarch: A little insurance for a crack-free cheesecake. It helps thicken the filling just enough without making it dense.
(Note: the full ingredients list, including measurements, is provided in the recipe card directly below.)
Instructions
Let’s dive into the steps to create this flavorful masterpiece:
Preheat Your Equipment: Start by preheating your oven to the right temperature. This ensures even cooking and gives your cheesecake the right texture. Preheating is a small but essential step that sets the stage for success.
Brown the Butter: In a small saucepan, melt your butter over medium heat until it turns golden and smells delightfully nutty. Stir frequently and keep a close eye—brown butter turns quickly! Once done, remove from heat and let it cool slightly.
Prepare the Crust: Combine graham cracker crumbs and brown butter, then press the mixture into the bottom of your springform pan. Use the back of a spoon or a flat-bottomed glass to get an even layer. Chill in the fridge while you prep the filling.
Mix the Filling: In a large bowl, beat the cream cheese and sugar until smooth. Add the sour cream, cornstarch, and vanilla bean paste. Then add the eggs one at a time, mixing gently just until incorporated. Don’t overmix—nobody wants a tough cheesecake!
Assemble the Cheesecake: Pour the filling over the chilled crust and smooth the top. Give the pan a gentle tap on the counter to release any air bubbles.
Bake to Perfection: Place the pan in a water bath and bake until the edges are set and the center still has a slight jiggle. Trust the process—it’ll continue to set as it cools.
Cool Slowly: Once baked, turn off the oven and let the cheesecake cool in there with the door slightly open. This prevents cracking and helps everything settle just right.
Chill Thoroughly: After cooling, transfer to the fridge for several hours or overnight. It needs that time to become the dreamy, creamy delight we’re aiming for.
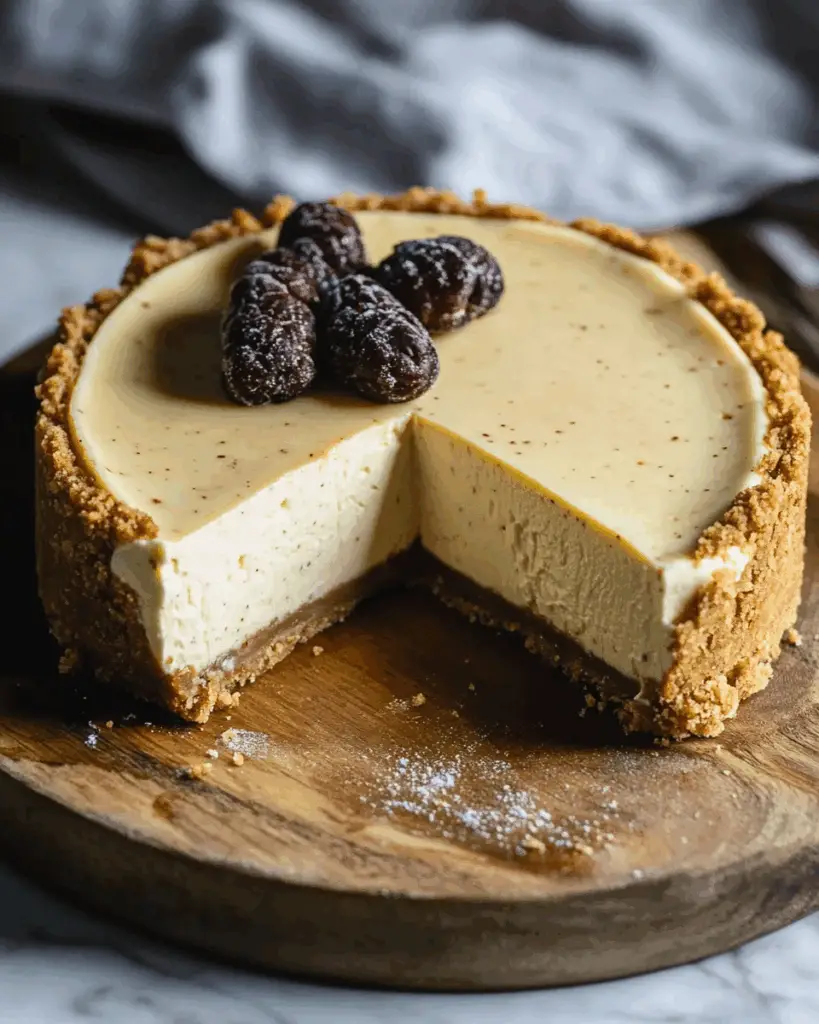
Serve and Enjoy: Slice, serve, and savor. Add a dollop of whipped cream, a dusting of powdered sugar, or a few fresh berries if you’re feeling fancy.
How to Serve Vanilla Bean Brown Butter Dream Cheesecake
This dish pairs wonderfully with various sides and accompaniments. Here are a few serving suggestions to enhance your dining experience:
Fresh Salads: Okay, maybe not with the cheesecake, but a light salad makes a nice starter before indulging in a rich dessert.
Crusty Bread: Not exactly needed for cheesecake, but hey—serve a little plate of shortbread or biscotti on the side if you’re making this part of a dessert spread.
Creamy Accompaniments: A swirl of whipped cream or a spoonful of crème fraîche adds a lovely contrast.
Fruit Toppings: Roasted cherries, fresh raspberries, or a drizzle of berry coulis are absolute showstoppers.
As a Standalone: Honestly, this cheesecake is a star all on its own. Add a sprig of mint or a tiny edible flower to fancy things up.
Additional Tips
Prep Ahead: You can make this cheesecake a day or two ahead. In fact, it’s even better the next day.
Spice It Up: Add a pinch of cinnamon to the crust or a splash of bourbon to the filling for extra depth.
Dietary Adjustments: Sub dairy-free cream cheese and plant-based butter if needed—just make sure they’re full-fat versions for the best texture.
Storage Tips: Store leftovers in an airtight container in the fridge for up to 5 days. For longer storage, freeze slices individually.
Double the Batch: Making dessert for a crowd? Double the recipe and use a larger pan—or make two cheesecakes and freeze one for later.
FAQ Section
Q1: Can I substitute vanilla bean paste with extract?
A1: Absolutely! Use pure vanilla extract if that’s what you have. The flavor won’t be quite as bold, and you’ll miss the specks, but it’ll still taste amazing.
Q2: Can I make this dish ahead of time?
A2: Yes! It’s actually best made ahead. Just bake, cool, and chill overnight for perfect texture and flavor.
Q3: How do I store leftovers?
A3: Keep them in an airtight container in the fridge for up to 5 days. Wrap individual slices if you like easy grab-and-go dessert.
Q4: Can I freeze this dish?
A4: Totally! Wrap slices in plastic and foil, then freeze for up to 2 months. Thaw overnight in the fridge.
Q5: What’s the best way to reheat this dish?
A5: Cheesecake’s best served chilled, but if you like it a little warmer, microwave individual slices in short bursts.
Q6: Can I double the recipe?
A6: Yep! Just be sure to adjust the baking time and use a larger pan (or make two cakes).
Q7: What’s the water bath trick for baking?
A7: Wrap the outside of your springform pan in foil and place it in a larger pan filled with hot water. It keeps the cheesecake moist and helps avoid cracks.
Q8: Can I add toppings before baking?
A8: Not really recommended—best to add them after baking and chilling to keep the texture perfect.
Q9: What if I don’t have a springform pan?
A9: You can use a deep pie dish or regular cake pan, but lining it with parchment will help with removal.
Q10: Can I turn this into mini cheesecakes?
A10: Yes! Use a muffin tin with liners and reduce the bake time to around 20–25 minutes.
Conclusion
There you have it—your new go-to cheesecake. Rich, creamy, and filled with cozy, buttery vanilla goodness. Whether it’s for a celebration, a potluck, or a self-care night in, this Vanilla Bean Brown Butter Dream Cheesecake always delivers. Bake it, share it, or keep it all to yourself (we won’t tell). Enjoy every dreamy bite!
Vanilla Bean Brown Butter Dream Cheesecake
- Prep Time: 45 minutes
- Cook Time: 1 hour
- Total Time: 1 hour 45 minutes
- Yield: 10 servings 1x
- Category: Dessert
- Method: Baked
- Cuisine: American
- Diet: Vegetarian
Description
This Vanilla Bean Brown Butter Cheesecake combines the rich flavor of brown butter with the smooth creaminess of a vanilla bean cheesecake. The addition of brown butter to the crust and filling creates a nutty, caramelized depth that elevates this dessert to perfection.
Ingredients
- 1 cup butter (for browning)
- 2 cups graham digestive or golden oreo cookie crumbs, 240g (if using oreos, remove the cream)
- 1 cup ground pecans, 115g
- 1/2 cup plus 1 tablespoon browned butter, 120g
- 2 tablespoons powdered sugar
- 2 packages cream cheese, 452g (at room temperature, soft)
- 1/4 cup brown butter, 57g (mostly the bottom brown bits)
- 1/2 cup labne or sour cream
- 1 cup brown sugar, 210g
- 1 vanilla bean, scraped
- 1/4 teaspoon fine sea salt
- Two large eggs
- 1 cup heavy whipping cream (for whipped cream topping)
- 2 tablespoons brown sugar (for whipped cream)
- Pinch of salt (for whipped cream)
- 1 teaspoon pure vanilla extract (for whipped cream, or vanilla bean scrapings)
Instructions
- Brown the butter: In a saucepan, melt the butter over medium heat. Turn the heat to medium-high and cook until the butter sputters, foams, and then quiets down. The butter should have brown bits at the bottom and a nutty aroma. Pour the browned butter into a heatproof bowl, scraping the pan to get all the brown bits. Let it cool slightly.
- Make the crust: Preheat the oven to 350℉. Grease and line a tall 8 or 9-inch cake pan with parchment paper. In a bowl, combine the ground pecans, cookie crumbs, powdered sugar, and ½ cup plus 1 tablespoon of the yellow liquid from the browned butter (reserve most of the browned bits for the filling). Press the mixture into the bottom and halfway up the sides of the pan. Bake the crust for 10 minutes, then reduce the heat to 325℉.
- Make the filling: In a bowl, beat together the softened cream cheese, brown sugar, salt, 3-4 tablespoons of the reserved browned butter bits, and vanilla bean scrapings until smooth. Add the sour cream and beat until smooth. Add the eggs and beat to combine. If there are still lumps, pour the filling through a fine mesh sieve into the cooled crust.
- Bake the cheesecake: Fill a 13×9-inch cake pan halfway with warm water and place the cheesecake in the center. Bake the cheesecake in the water bath for about 1 hour to 1 hour 15 minutes, or until the center is no longer jiggly and the top appears matte. Turn off the oven and let the cheesecake cool inside for 30 minutes. Leave it on the counter for another 30 minutes before refrigerating for at least 8 hours.
- Make the whipped cream: In a food processor, process the heavy cream, vanilla, salt, and brown sugar for 1-2 minutes, until thickened but not overwhipped. Top the cheesecake with the whipped cream and serve.
Notes
- The cheesecake must chill for at least 8 hours for the best texture.
- If using Oreos for the crust, be sure to remove the cream filling before grinding the cookies.
- This cheesecake is best stored in the fridge and can last up to a week.
- If you prefer a smoother whipped cream topping, avoid overwhipping the cream.
Nutrition
- Serving Size: 1 slice
- Calories: 510
- Sugar: 32g
- Sodium: 220mg
- Fat: 39g
- Saturated Fat: 23g
- Unsaturated Fat: 12g
- Trans Fat: 1g
- Carbohydrates: 43g
- Fiber: 2g
- Protein: 7g
- Cholesterol: 125mg