
There is something almost impossible to resist about a plate of hot, crispy chicken tenders. The crunch hits first, then that juicy, well-seasoned chicken takes over, and suddenly you understand why this kind of comfort food has such a loyal following. These homemade tenders bring that same golden exterior and tender center right into your kitchen, and let me tell you, it’s worth every bite.
Disclosure: This post contains affiliate links.If you click and make a purchase, I may earn a small commission at no extra cost to you.


Why These Chicken Tenders Always Hit the Spot
Some meals just know how to make everyone at the table happy, and this is one of them. The coating turns deeply golden and crisp, the chicken stays juicy, and every bite has that familiar savory flavor that makes you reach for just one more piece. Trust me, you’re going to love this, especially when you dip each tender into a creamy, peppery sauce.
The Story Behind This Fast Food Favorite
Chicken tenders have long been a comfort food staple in American kitchens, but restaurant-style versions gave them a cult following. The Southern tradition of marinating chicken in buttermilk and coating it in seasoned flour helped shape the crispy texture people crave today. This version takes inspiration from that style, with a simple pantry-friendly method that creates a tender inside and a crackly crust outside.
Why This Recipe Deserves a Spot in Your Rotation
Once you see how simple the process is, it becomes easy to understand why this one is a keeper. And now let’s dive into what makes it such a reliable favorite.
Versatile: These tenders work for lunch, dinner, game day platters, or casual family meals. They pair beautifully with fries, slaw, salad, or even tucked into a sandwich.
Budget-Friendly: Chicken tenders or sliced chicken breasts are easy to find and usually cost far less than takeout for the whole family. Most of the coating ingredients are pantry basics.
Quick and Easy: The prep is straightforward, and the tenders cook fast once the oil is hot. You get big flavor without a long kitchen session.
Customizable: You can adjust the seasoning, swap the dip, or make the coating a little spicier. It is easy to tailor without changing the heart of the dish.
Crowd-Pleasing: Crispy chicken has universal appeal. Kids love it, adults love it, and it disappears fast every single time.
Make-Ahead Friendly: You can marinate the chicken ahead of time and keep the dredging ingredients ready to go. That makes frying much easier later.
Great for Leftovers: Leftover tenders reheat well and can be used in wraps, bowls, or salads. This one’s a total game-changer for meal prep.
Pro Tips for Better Than Takeout Results
A few small tricks make a big difference here. These are the little details that help the coating cling well and fry up beautifully crisp.
- Use buttermilk for tenderness: It gently tenderizes the chicken and helps the flour coating grab onto every piece.
- Season every layer: Add salt, pepper, garlic powder, and paprika to both the marinade and flour mixture so the flavor runs all the way through.
- Let the coated chicken rest: After dredging, let the tenders sit for 10 minutes before frying. This helps the crust stick better.
- Keep the oil steady: Aim for 175°C, or 350°F, so the coating crisps without burning and the chicken cooks through evenly.
- Do not overcrowd the pan: Fry in batches so the oil temperature stays stable and the tenders stay crisp.
Kitchen Tools That Make the Job Easier
Before the frying starts, it helps to have everything ready and within reach. That smooth setup makes the whole process feel much more relaxed.
Mixing bowls: You will need one for the buttermilk marinade and one or two for the seasoned flour dredge.
Large skillet or Dutch oven: A heavy pan helps keep the oil temperature steady for evenly fried chicken.
Tongs: These make it easier to coat and turn the chicken without damaging the crust.
Wire rack: Resting fried chicken on a rack keeps the bottom from going soggy.
Thermometer: A simple kitchen thermometer helps you monitor the oil and cook the chicken safely.
What You’ll Need to Build That Crispy Crunch
Now that the method is taking shape, let’s talk about the ingredients that make these tenders so satisfying. Each one plays a role in building flavor, texture, and that restaurant-style finish.
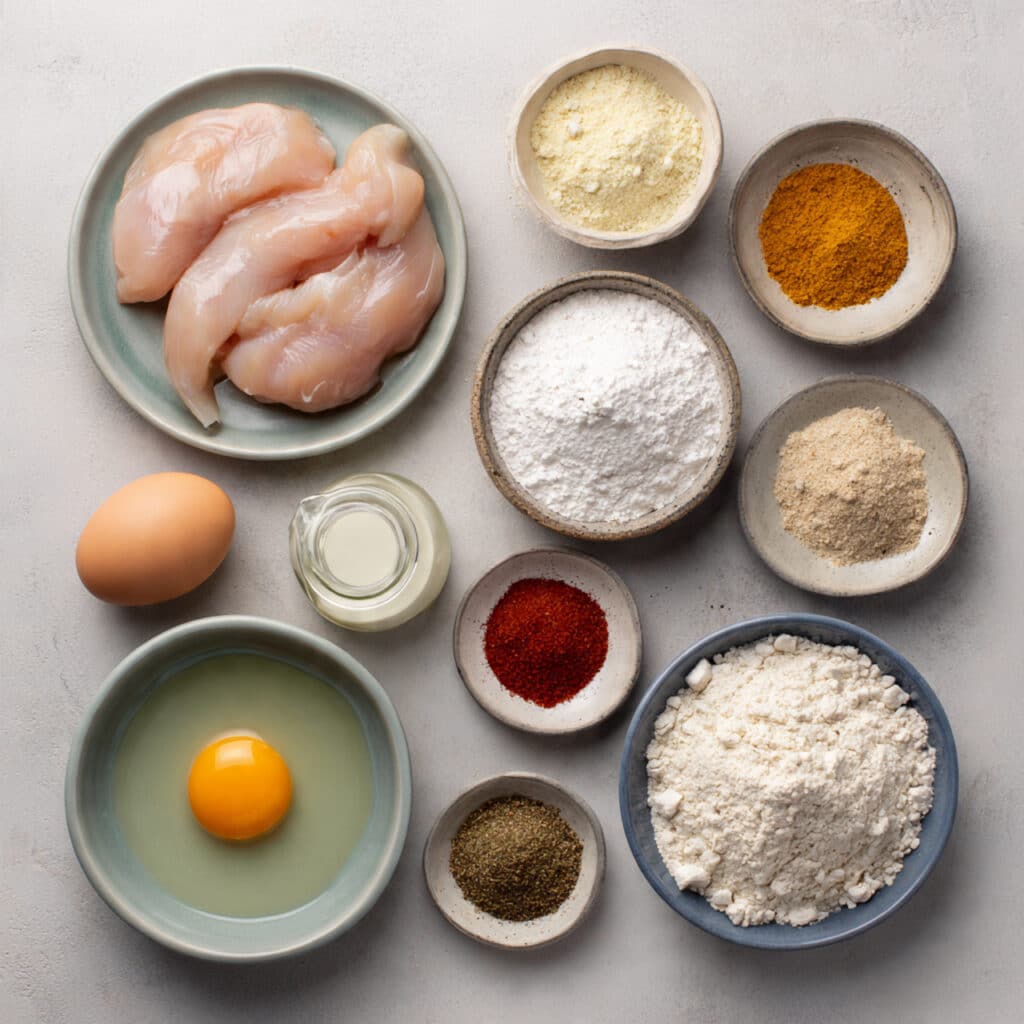
- Chicken tenderloins: 680 grams, or 1 1/2 pounds, the juicy base of the dish that cooks quickly and stays tender.
- Buttermilk: 2 cups, which tenderizes the chicken and gives the coating something to cling to.
- Egg: 1 large, which helps the marinade bind to the chicken and supports a sturdy crust.
- All-purpose flour: 2 cups, the foundation of the crispy outer coating.
- Cornstarch: 1/2 cup, which lightens the flour mixture and adds extra crispness.
- Garlic powder: 2 teaspoons, for savory depth throughout the coating.
- Onion powder: 1 teaspoon, which rounds out the seasoning with subtle sweetness.
- Paprika: 1 teaspoon, for warm color and a gentle smoky note.
- Salt: 2 teaspoons, divided, to season both the chicken and the crust properly.
- Black pepper: 1 teaspoon, for a little bite and balance.
- Vegetable oil: 3 to 4 cups for frying, enough for shallow frying in batches without crowding the pan.
Easy Swaps That Still Taste Great
Sometimes you need to work with what is already in the kitchen, and this recipe is flexible enough to handle that.
Chicken tenderloins: Sliced boneless, skinless chicken thighs or chicken breast strips.
Buttermilk: Milk mixed with 2 tablespoons lemon juice or white vinegar.
All-purpose flour: A balanced gluten-free flour blend.
Cornstarch: Potato starch for a similarly crisp finish.
Paprika: Smoked paprika for a deeper flavor.
Key Ingredients That Do the Heavy Lifting
A couple of ingredients really define the final result, and they deserve a little spotlight before you start frying.
Buttermilk: This is what keeps the chicken tender and flavorful while helping the seasoned coating stick beautifully.
Cornstarch: It is the secret to that light, crisp shell that shatters just a little when you bite into it.
Let’s Make Them Step by Step
This is where the kitchen starts to smell amazing. Set everything out, give yourself a little space, and enjoy the process because it comes together in a very satisfying way.
- Preheat Your Equipment: Heat 5 centimeters, or about 2 inches, of vegetable oil in a large skillet or Dutch oven to 175°C, or 350°F. Place a wire rack over a baking sheet nearby.
- Combine Ingredients: In a large bowl, whisk together the buttermilk, egg, 1 teaspoon salt, and 1/2 teaspoon black pepper. Add the chicken tenderloins and toss well. In a separate bowl, mix the flour, cornstarch, garlic powder, onion powder, paprika, remaining 1 teaspoon salt, and remaining 1/2 teaspoon black pepper.
- Prepare Your Cooking Vessel: Make sure your oil is holding steady at frying temperature. Keep tongs and the wire rack close so you can move quickly once the chicken is ready.
- Assemble the Dish: Remove each piece of chicken from the buttermilk mixture, letting the excess drip off, then dredge it thoroughly in the flour mixture. Press the flour onto the chicken so the coating forms craggy bits for extra crunch. Let the coated pieces rest for 10 minutes.
- Cook to Perfection: Fry the chicken in batches for 3 to 4 minutes per side, or until deeply golden and cooked through to an internal temperature of 74°C, or 165°F. Transfer to the wire rack after each batch.
- Finishing Touches: While the tenders are still hot, sprinkle lightly with a pinch of salt if needed. Let them rest for 2 minutes so the crust stays crisp.
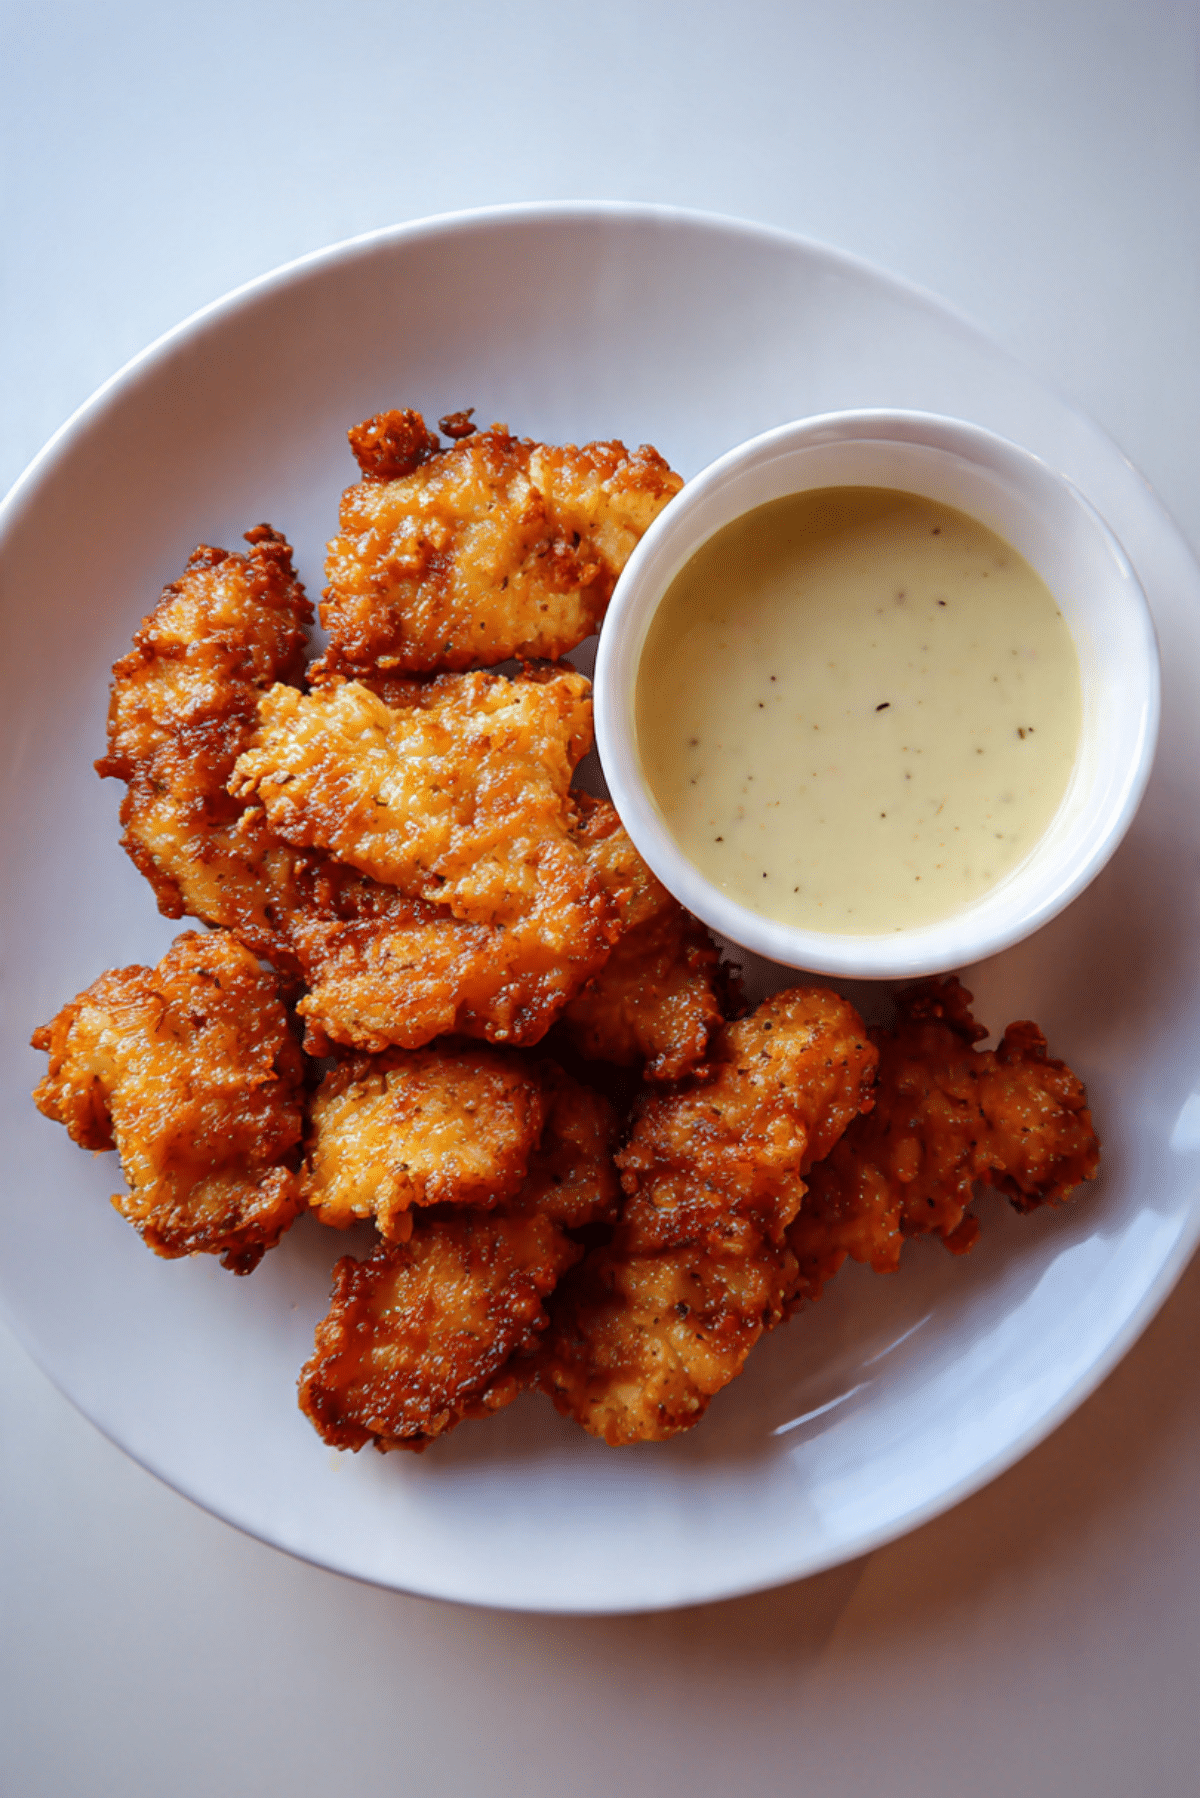
- Serve and Enjoy: Serve warm with your favorite creamy dipping sauce, fries, toast, or coleslaw for that classic comfort food feel.
The Texture and Flavor Magic Happening Here
What makes these tenders so memorable is the contrast. The outside is crisp and deeply golden, with all those little ridges catching extra crunch. Inside, the chicken stays moist and tender thanks to the buttermilk marinade. The flour and cornstarch coating gives you that delicate crackle, while the garlic, onion, paprika, salt, and pepper create a savory flavor that feels familiar, comforting, and seriously satisfying.
Helpful Tricks for Your Best Batch Yet
A few small adjustments can take your tenders from good to unforgettable.
- Let the chicken marinate for at least 30 minutes for better flavor and tenderness.
- Press the flour mixture firmly onto the chicken to create more crunchy edges.
- Use a wire rack instead of paper towels to keep the crust crisp.
- Check one larger piece first if you are unsure about doneness.
Common Mistakes to Skip for Crispier Results
Even a simple dish has a few pitfalls, but they are easy to avoid once you know what to watch for.
- Frying at low temperature can lead to greasy coating, so keep the oil around 175°C, or 350°F.
- Skipping the resting time after dredging can make the crust slip off during frying.
- Overcrowding the pan drops the oil temperature and softens the coating.
- Using very wet chicken straight from the marinade without letting excess drip off can create patchy breading.
Nutrition Facts You Can Expect
These numbers are approximate, but they give a useful picture of what each serving looks like.
Servings: 4
Calories per serving: 520
Note: These are approximate values.
Timing at a Glance
And now that you know what goes into them, here is how the timing breaks down.
Prep Time: 20 minutes
Cook Time: 15 minutes
Total Time: 35 minutes
Make-Ahead and Storage Tips That Actually Work
This is the kind of meal that fits nicely into a busy week. You can marinate the chicken up to 12 hours ahead and keep it covered in the fridge. The dry coating can also be mixed in advance and stored in an airtight container for a day.
Leftovers should be cooled fully, then stored in the refrigerator for up to 3 days. For freezing, place cooked tenders on a tray until firm, then transfer them to a freezer-safe container for up to 2 months. Reheat in the oven or air fryer at 190°C, or 375°F, until hot and crisp again.
The Best Ways to Serve Them
These tenders are delicious on their own, but the right sides make the whole meal feel extra special. Serve them with crinkle fries, thick-cut toast, coleslaw, or a crisp green salad. They also pair nicely with creamy dipping sauces, honey mustard, or a peppery mayo-based sauce. For a casual party spread, pile them onto a platter with pickle slices and plenty of napkins.
Leftovers Deserve a Second Life Too
A good leftover should feel like a new meal, and these tenders make that easy.
Slice them and tuck them into wraps with lettuce and sauce. Chop them over a salad for a crunchy protein boost. Layer them into a sandwich with pickles and slaw. You can even warm them up and serve them in a rice bowl with roasted vegetables and a drizzle of sauce.
Extra Little Details That Make a Difference
Sometimes it is the smallest things that bring the biggest improvement. Season the chicken well before frying, taste your dipping sauce before serving, and always let the tenders rest briefly after cooking. That little pause helps the juices settle and the crust stay crisp. Trust me, you’re going to notice the difference.
Turn a Simple Plate into Something Special
Presentation matters, especially with food this golden and inviting. Pile the tenders on a white platter so the color stands out, add a small bowl of creamy sauce, and serve them while the crust is still warm and crisp. A few pickle slices or a side of slaw adds contrast and makes the plate feel complete without overcomplicating anything.
Fun Variations Worth Trying
Once you have the base method down, it is easy to play a little.
- Spicy version: Add 1/2 teaspoon cayenne pepper to the flour mixture for a gentle heat.
- Extra peppery style: Increase the black pepper to 1 1/2 teaspoons for a sharper finish.
- Air fryer version: Spray the coated tenders lightly with oil and air fry at 200°C, or 400°F, until crisp and cooked through, turning halfway.
- Parmesan crust twist: Add 1/4 cup finely grated parmesan to the flour mixture for extra savory depth.
- Sandwich style: Serve the tenders in toasted buns with lettuce, pickles, and creamy sauce.
FAQ’s
1. Can I use chicken breast instead of tenderloins?
Yes, absolutely. Slice boneless, skinless chicken breasts into even strips so they cook at the same rate.
2. How long should I marinate the chicken?
At least 30 minutes works well, but a few hours gives even better flavor and tenderness.
3. Why add cornstarch to the flour?
Cornstarch helps create a lighter, crispier coating that stays crunchy after frying.
4. How do I know the chicken is fully cooked?
The safest way is to check for an internal temperature of 74°C, or 165°F.
5. Can I make these without buttermilk?
Yes. Regular milk mixed with lemon juice or vinegar is a good substitute.
6. What oil is best for frying?
Vegetable oil works well because it has a neutral flavor and a suitable frying temperature.
7. Can I reheat them and keep them crispy?
Yes, the oven or air fryer is best. Avoid the microwave if you want the coating to stay crisp.
8. Can I freeze them after cooking?
Yes. Cool them completely, freeze in a single layer first, then store in a sealed container.
9. What dipping sauces work best?
Creamy pepper sauce, honey mustard, ranch-style sauce, or a simple seasoned mayo all work beautifully.
10. Can I prepare the coating ahead of time?
Yes, the dry coating can be mixed ahead and stored in an airtight container for convenience.
Conclusion
There is just something deeply satisfying about making crispy chicken tenders at home and hearing that first crunchy bite. They are simple, comforting, and full of the kind of flavor that brings everyone back to the table fast. This one’s a total game-changer, and once you make a batch, you might never look at takeout the same way again.
Print
Raising Cane’s Crispy Chicken Tenders
- Prep Time: 20 minutes
- Cook Time: 15 minutes
- Total Time: 35 minutes
- Yield: 4 servings 1x
- Category: Main Course
- Method: Frying
- Cuisine: American
- Diet: Low Lactose
Description
Golden, crunchy chicken tenders with a juicy center, marinated in buttermilk and coated in a well-seasoned flour mixture for a homemade version of a fast food favorite.
Ingredients
- 680 grams chicken tenderloins (1 1/2 pounds)
- 2 cups buttermilk
- 1 large egg
- 2 cups all-purpose flour
- 1/2 cup cornstarch
- 2 teaspoons garlic powder
- 1 teaspoon onion powder
- 1 teaspoon paprika
- 2 teaspoons salt, divided
- 1 teaspoon black pepper, divided
- 3 to 4 cups vegetable oil, for frying
Instructions
- Heat about 2 inches of vegetable oil in a large skillet or Dutch oven to 175°C (350°F). Place a wire rack over a baking sheet nearby.
- In a large bowl, whisk together the buttermilk, egg, 1 teaspoon salt, and 1/2 teaspoon black pepper. Add the chicken tenderloins and coat well.
- In a separate bowl, mix the flour, cornstarch, garlic powder, onion powder, paprika, remaining 1 teaspoon salt, and remaining 1/2 teaspoon black pepper.
- Remove each piece of chicken from the buttermilk mixture, let the excess drip off, then dredge thoroughly in the flour mixture. Press the coating onto the chicken and let the coated pieces rest for 10 minutes.
- Fry the chicken in batches for 3 to 4 minutes per side, until golden brown and cooked through to an internal temperature of 74°C (165°F).
- Transfer the cooked tenders to the wire rack and lightly season with a pinch of salt if needed.
- Serve warm with your favorite dipping sauce.
Notes
- Marinate the chicken for at least 30 minutes for the best flavor and tenderness.
- Do not overcrowd the pan, or the coating may turn greasy instead of crisp.
- Letting the coated chicken rest before frying helps the crust stick better.
- Reheat leftovers in the oven or air fryer for the crispiest texture.
Nutrition
- Serving Size: 1/4 of recipe
- Calories: 520
- Sugar: 4 g
- Sodium: 980 mg
- Fat: 24 g
- Saturated Fat: 4 g
- Unsaturated Fat: 18 g
- Trans Fat: 0 g
- Carbohydrates: 34 g
- Fiber: 1 g
- Protein: 38 g
- Cholesterol: 135 mg