
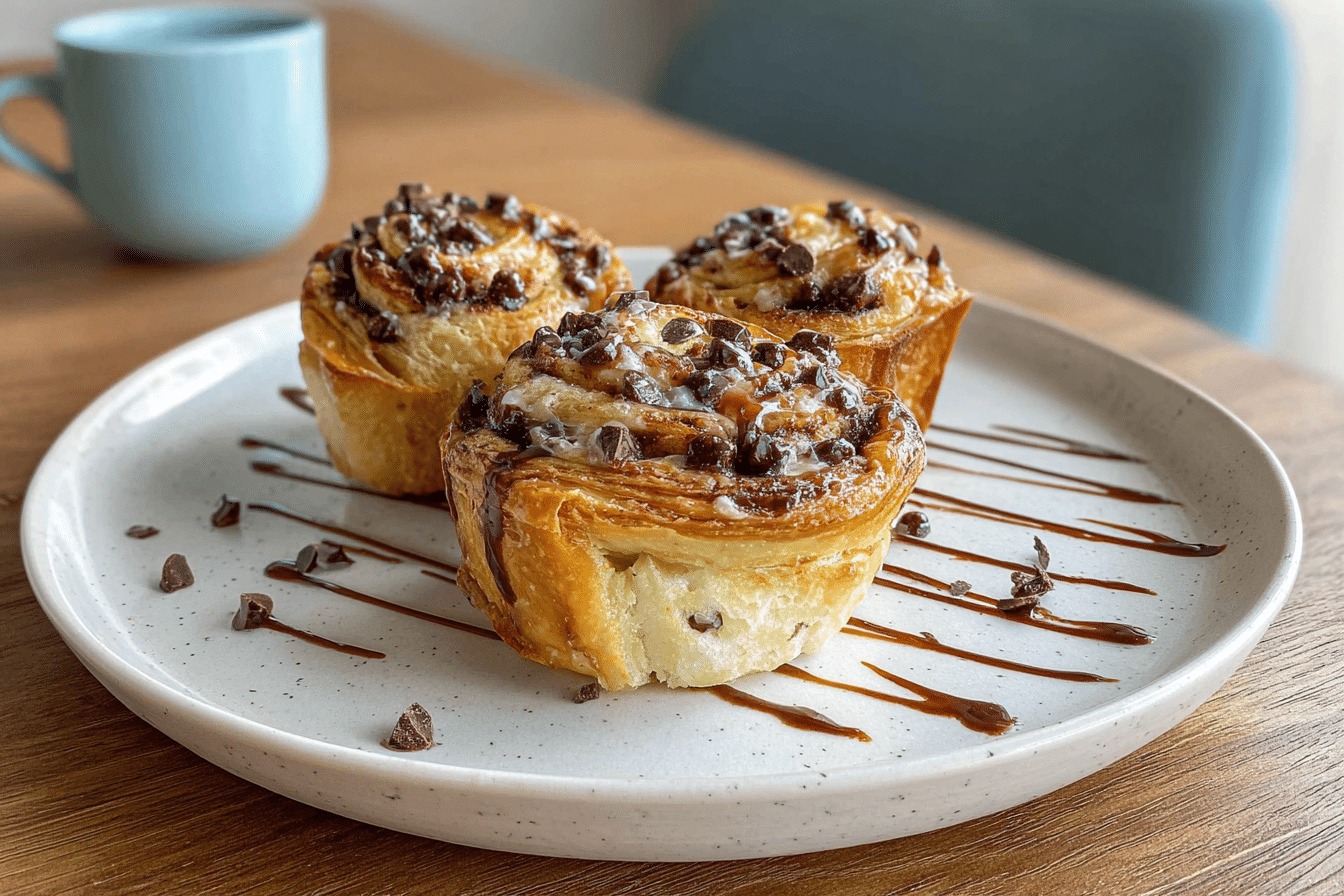
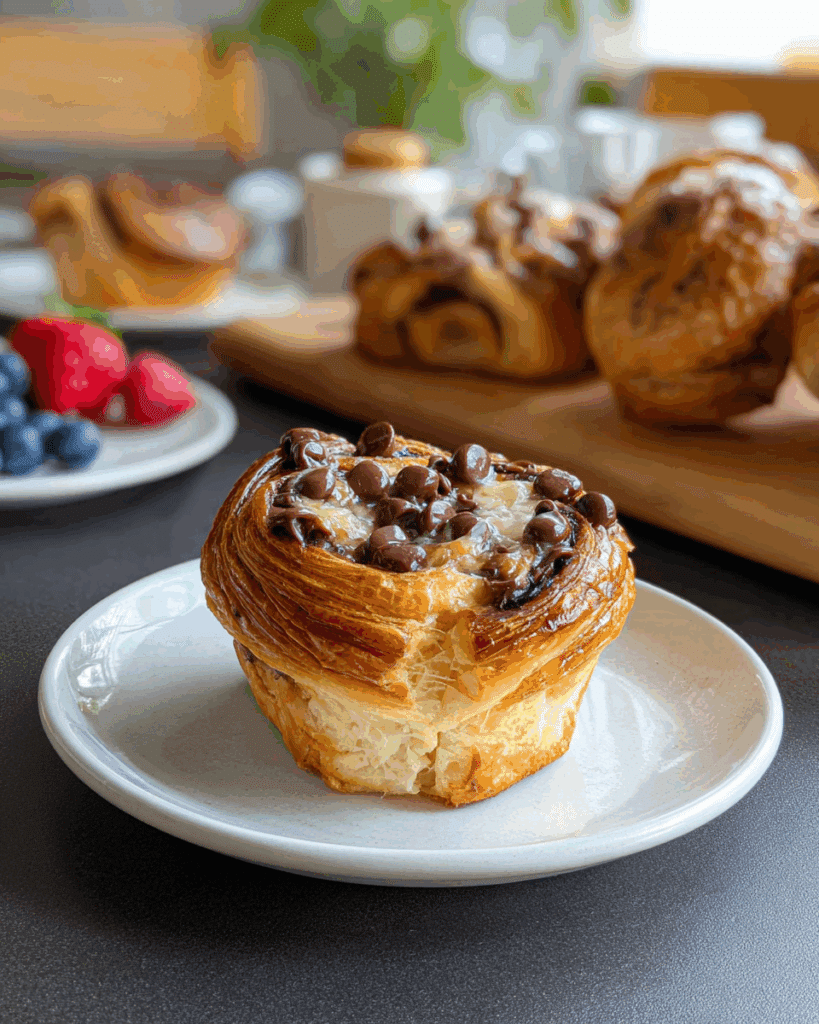
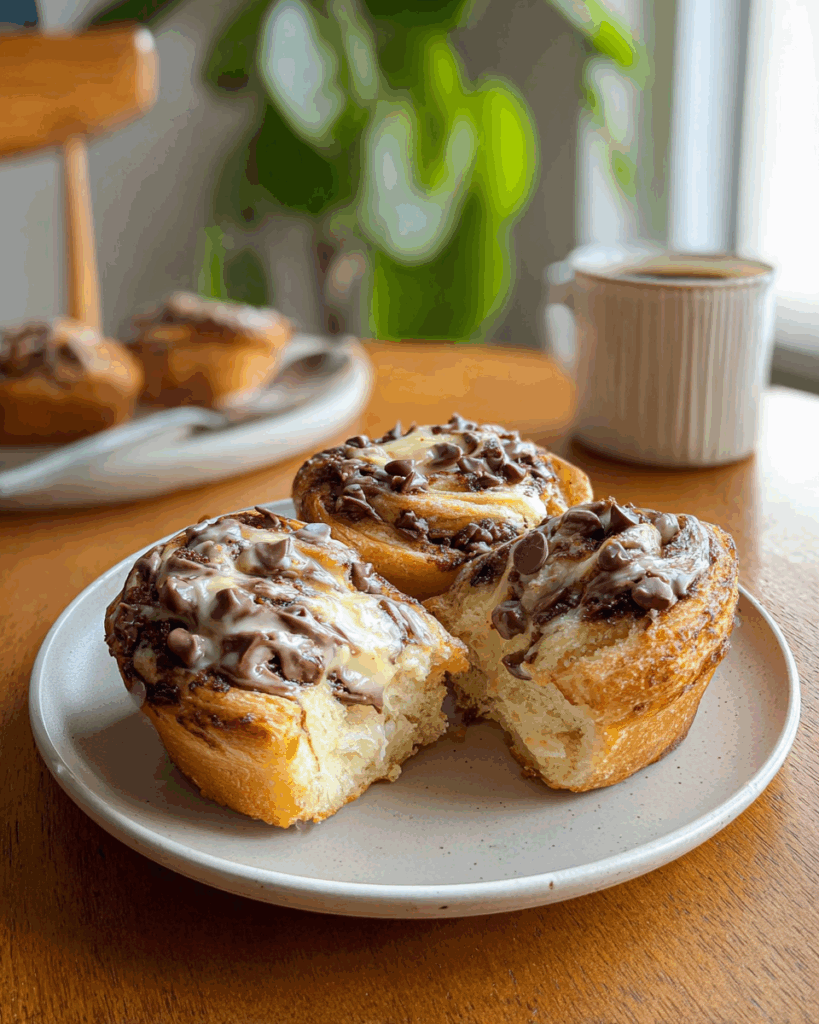
Chocolate Chip Sourdough Cruffins are the pastry world’s most delightful secret—an irresistible hybrid of croissant and muffin with the tang of sourdough and the richness of chocolate. These handcrafted beauties combine laminated layers of flaky, buttery dough with swirls of melted mini chocolate chips, all rolled into a perfect muffin shape and baked to golden perfection. If you’re the kind of person who can’t choose between a croissant and a muffin—don’t worry, this flaky masterpiece solves that delicious dilemma.
Disclosure: This post contains affiliate links.If you click and make a purchase, I may earn a small commission at no extra cost to you.


But this recipe isn’t just about technique—it’s personal. It started as a weekend experiment in my small, warm kitchen. After months of obsessing over sourdough and late-night chocolate cravings, I stumbled upon the cruffin concept. What followed was hours of testing, failed lamination layers, and burnt-bottomed batches. Yet, every mishap led me closer to the flaky, chocolate-studded, sourdough-cruffin perfection I’m sharing with you today.
In this detailed guide, we’ll break down each step of the Chocolate Chip Sourdough Cruffin journey—starting from the flour blend to the final spiral. You’ll learn how to properly laminate dough with a butter block, lock in flavor, shape beautiful cruffins, and troubleshoot like a pastry pro.
Don’t miss our almond croissant bites if you’re into flaky pastries with indulgent centers—another must-try treat!
Table of Contents
Table of Contents
Introduction to Chocolate Chip Sourdough Cruffins
What Are Chocolate Chip Sourdough Cruffins?
Chocolate Chip Sourdough Cruffins are the ultimate fusion bake. They start with sourdough-enriched laminated dough—think croissant layers—rolled with mini chocolate chips and baked in a muffin tin until crisp on the outside and fluffy inside. The sourdough not only adds complexity in flavor but also contributes to a chewy interior with slightly tangy notes that balance the sweetness of chocolate.
These are not your average pastries. Cruffins take time, patience, and love. But the result? Layers upon layers of buttery perfection infused with molten chocolate in every bite.
While they may look like something only a high-end patisserie could produce, this guide will show you how to bring that bakery magic into your own kitchen.
The Story Behind This Cruffin Recipe (About Page Style)
I started baking to connect—first with my grandmother who hand-wrote pie recipes on coffee-stained notepads, then with friends who gathered around my kitchen island for spontaneous brunches. But sourdough? That was my solo mission. A slow, introspective journey into fermentation and flavor.
It was during a late-night scroll through baking blogs that I saw something that changed everything: a cruffin. A laminated dough pastry, rolled like a cinnamon bun but shaped like a muffin. I immediately imagined how sourdough could add another layer to its richness. I scribbled notes, tweaked formulas, adjusted folds. Failures came fast—uneven butter blocks, exploding layers—but so did the wins.
Eventually, the idea for Chocolate Chip Sourdough Cruffins was born—a blend of personal nostalgia and technique-driven obsession. Each cruffin baked in my home has a story, a trial, and a triumph behind it. And now, it’s your turn to bring that story into your own oven.
Why You’ll Love This Sweet & Tangy Pastry Mashup
Chocolate Chip Sourdough Cruffins are worth every hour of proofing and laminating because they’re:
- Uniquely flavorful: The acidity from the sourdough counterbalances the chocolate’s richness.
- Ridiculously flaky: Because of the butter block technique and layered dough.
- Visually stunning: The spiral shape makes them eye-catching showstoppers.
- Versatile: Swap fillings, top with powdered sugar, or drizzle with ganache.
Whether you’re baking for a lazy Sunday brunch, a dessert buffet, or just craving something extraordinary, these cruffins deliver pure pastry bliss.
Print
Chocolate Chip Sourdough Cruffins An Easy Artisan Bake at Home
- Prep Time: Day 1: ~1 hr mixing + rises; Day 2: lamination folds (~1 hr) + overnight rest; Day 3 shaping/proof (~1 hr)
- Cook Time: 25–30 minutes
- Total Time: ≈2 days (active prep ~3–4 hrs + overnight rests)
- Yield: 12 cruffins 1x
- Category: Breakfast, Dessert
- Method: Laminated dough (croissant-style) baked in muffin tin
- Cuisine: American bakery-style
- Diet: Vegetarian
Description
Light, flaky sourdough-based ‘croissant muffins’ filled with melty chocolate chips and baked to golden perfection in a muffin tin.
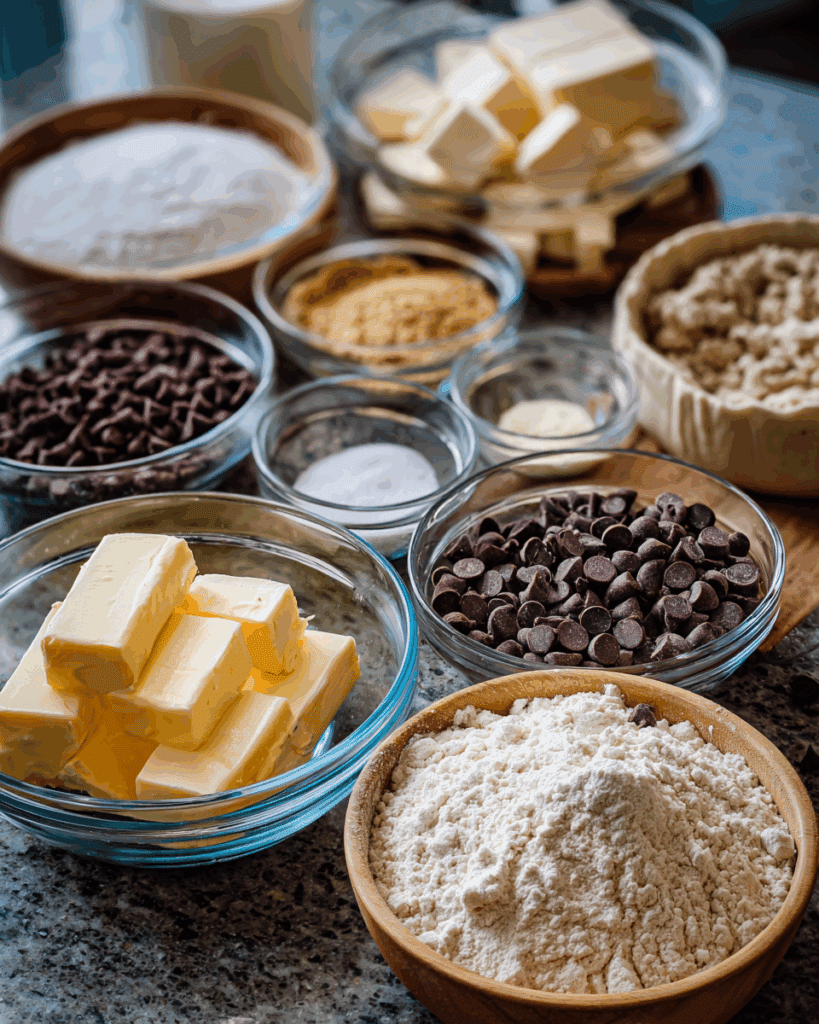
Ingredients
- 605 g all-purpose flour
- 66 g granulated sugar
- 12 g kosher salt
- 60 g active sourdough starter
- 214 g water (room temperature)
- 120 g whole milk (room temperature)
- 57 g unsalted butter, softened and cut into 1/2″ pieces
- 60 g mini chocolate chips (e.g. Enjoy Life)
- 1.5 g active dry yeast (optional, ~0.2%)
- Butter block: 340 g unsalted butter (84-86% butterfat)
Instructions
- Day 1: In stand mixer low-speed, mix flour, water, milk, sourdough starter, sugar, salt, and optional yeast 1 min; add softened butter and chocolate chips, mix ~3–4 min until smooth dough forms. ()
- Let the dough rise in a bowl, covered, at room temperature until 1.5× increased (~3–4 hrs), then refrigerate 4–12 hrs. :contentReference[oaicite:0]{index=0}
- Meanwhile prepare butter block: form 8″×8″ square of 340 g butter between parchment, chill until firm. :contentReference[oaicite:1]{index=1}
- Day 2: Laminate dough—enclose butter block, perform a book fold, chill, then a single fold, chill; rest overnight. :contentReference[oaicite:2]{index=2}
- Day 3: Roll dough into ~20″×12″ slab, cut strips (1″×6″), stack two strips with offset, roll into spiral, place seam‑side down in muffin tin, poke hole. :contentReference[oaicite:3]{index=3}
- Proof at room temp 4–6 hrs until jiggly/doubled (or 2–3 hrs in proof box/steam). :contentReference[oaicite:4]{index=4}
- Preheat oven to 375 °F; top each cruffin with a few mini chips, bake 15 min, rotate, bake 10–15 min until deep golden. :contentReference[oaicite:5]{index=5}
- Cool completely before removing from tins and serving. :contentReference[oaicite:6]{index=6}
Notes
- Optional active yeast helps with rise but is not essential. :contentReference[oaicite:7]{index=7}
- Use mini chocolate chips for even distribution. :contentReference[oaicite:8]{index=8}
- Laminate dough with cold butter and proper folds to create flakiness. :contentReference[oaicite:9]{index=9}
- Proofing time varies; ensure cruffins are jiggly before baking. :contentReference[oaicite:10]{index=10}
- Best when fresh but store in airtight container up to 3 days. Optional: roll in cinnamon sugar or fill with jam/cream. :contentReference[oaicite:11]{index=11}
Nutrition
- Serving Size: 1 cruffin
Essential Ingredients for Chocolate Chip Sourdough Cruffins
Detailed Cruffin Dough (Detrempe) Ingredients Breakdown
Creating the perfect Chocolate Chip Sourdough Cruffins begins with mastering the detrempe—your base dough before lamination. Each ingredient plays a crucial role in structure, elasticity, and flavor.
Here’s a closer look at the ingredients and why they matter:
| Ingredient | Amount (g) | Purpose |
|---|---|---|
| All-purpose flour | 605 g | Base structure, moderate protein for elasticity |
| Granulated sugar | 66 g | Adds sweetness and promotes browning |
| Kosher salt | 12 g | Enhances flavor, strengthens gluten network |
| Sourdough starter | 60 g | Adds tang, natural leavening, and flavor depth |
| Water (room temperature) | 214 g | Hydrates flour, activates gluten |
| Whole milk | 120 g | Adds richness, softness, and mild sweetness |
| Unsalted butter (softened) | 57 g | Tenderizes the dough and adds moisture |
| Mini chocolate chips | 60 g | Bursts of chocolate throughout the spiral layers (use dairy-free if needed) |
| Optional: Active dry yeast | 1.5 g (0.2%) | Ensures a reliable rise alongside sourdough (optional for insurance) |
When mixing, the balance between hydration and strength is key. The dough should feel smooth but not sticky—this makes rolling and laminating later much easier.
What Makes a Good Butter Block for Cruffins?
The butter block is the heart of lamination. Choosing high-quality, high-fat butter (84–86%) ensures smoother layers and fewer breaks. For this recipe, 340 g of unsalted Kerrygold butter is used. The higher fat content prevents leaking and gives a tender crumb with crisp, buttery edges.
Here’s how to prep it right:
- Beat butter into a ½’’ thick slab inside an 8’’ square parchment envelope.
- Keep it cool but pliable—this helps with even distribution during rolling.
- Avoid air bubbles—press them out gently as you shape the square.
Butter that’s too soft will melt into the dough; too cold, and it’ll shatter. The sweet spot lies in chilled, but malleable.
Why Mini Chocolate Chips Matter for Texture and Melt
Using mini chocolate chips is not just for cuteness—they’re essential. Standard chips or chunks can tear the dough during lamination and rolling. Minis, on the other hand:
- Distribute evenly between layers
- Melt just enough to create tiny chocolate pockets
- Don’t interfere with rolling or folding
We recommend Enjoy Life mini chocolate chips for their smooth melt and allergy-friendly ingredients. They provide just the right amount of chocolate without overwhelming the buttery dough or the sourdough flavor.
You’re free to experiment—dark chocolate, white, or even chopped caramel bits can work—but mini chips strike the best balance of sweetness, texture, and rollability.
The Magic of Sourdough in Cruffins
How Sourdough Enhances Flavor and Structure
When it comes to Chocolate Chip Sourdough Cruffins, the secret to their exceptional flavor lies in the sourdough itself. Unlike traditional yeasted pastries, sourdough provides a tangy complexity that evolves over time and balances the sweetness of the chocolate chips beautifully.
Here’s what sourdough does in your cruffin dough:
- Deepens the flavor profile with subtle sourness and fermented notes.
- Improves structure by contributing to gluten development.
- Extends shelf life due to its natural acidity.
- Creates a moist interior while keeping the outside golden and flaky.
The long fermentation process allows enzymes in the flour to break down, making the final pastry not only more flavorful but also easier to digest. That’s why so many bakers prefer sourdough laminated doughs—they just taste and feel better.
Plus, using a natural starter means you’re relying on wild yeast and good bacteria to bring your dough to life, which makes the whole process feel like baking magic.
Choosing the Right Sourdough Starter
Your sourdough starter is the soul of your Chocolate Chip Sourdough Cruffins. A mature, active starter will result in a dough that’s airy, elastic, and full of flavor.
Here’s what to keep in mind when prepping your starter for cruffins:
- Use a white flour starter for a cleaner taste and lighter crumb.
- Feed it 4–6 hours before mixing—you want it at its peak.
- Bubbly and doubled—a sign your starter is ready to rise some dough.
You’ll be adding about 60 g of this starter directly to your dough mix. While the recipe allows a pinch of commercial yeast as backup, don’t underestimate the rise power of an active sourdough culture on its own.
If you’re new to using starter in pastries, take a moment to read our full method on sourdough enrichment.
Check out our mini brown butter sourdough cinnabundts to explore another irresistible use of sourdough in sweet bakes.
This part of the process is less about speed and more about patience and transformation. Let the starter do its thing, and you’ll be rewarded with cruffins that are tender inside, boldly flavored, and beautifully golden on the outside.
Step-by-Step Day 1 – Making the Detrempe Dough
Mixing and Incorporating Chocolate Chips
The foundation of your Chocolate Chip Sourdough Cruffins starts with the detrempe—a dough that strikes the balance between strong structure and tender bite. On Day 1, we build the base that will later be folded and transformed into buttery, flaky layers.
Let’s break it down:
Step 1: Combine the dry and wet base
In the bowl of your stand mixer, add the all-purpose flour, sugar, salt, sourdough starter, room-temperature water, and milk. Mix everything with the dough hook on low for about a minute. At this point, the dough may look shaggy—don’t worry, that’s normal.
Step 2: Add the butter and mini chocolate chips
Toss in the softened unsalted butter, followed by those all-important mini chocolate chips. Continue mixing for another 3 to 4 minutes until a smooth, slightly tacky dough forms. You may need to scrape the bowl down once or twice to make sure no flour sticks to the sides.
The goal is not to over-knead—you want strength but not toughness. The finished dough should pull away from the sides of the bowl but still feel supple and elastic to the touch.
Why this order matters:
- Butter integrates better when added to already hydrated flour.
- Mini chips fold in evenly without clumping or tearing gluten strands.
- The dough is ready for fermentation, but not fatigued from overworking.
First Fermentation: Timing and Tips for a Perfect Rise
Fermentation is where the sourdough magic begins. Once mixed, shape the dough into a tight ball and place it in a lightly greased bowl. Cover with plastic wrap or a damp towel and let it rest at room temperature.
Here’s what you should expect:
- Room temp proof time: 3 to 4 hours.
- Goal: Increase dough volume by about 1.5x.
- Environment: Ideally 70–75°F, away from direct drafts or heat.
Watch your dough—don’t just go by the clock. If it’s sluggish, give it more time. If it’s doubling too fast, move it to a cooler spot.
The dough will become softer, more extensible, and slightly puffy. This first rise is crucial for building flavor and gluten tension before chilling.
Storing the Dough Overnight
Once the dough has risen, it’s time to slow things down.
Wrap it tightly in plastic and refrigerate it for at least 4 hours, or up to 12 hours. Overnight chilling helps:
- Strengthen gluten through cold fermentation.
- Allow flavors to deepen and sugars to develop.
- Make the dough easier to roll and laminate on Day 2.
It may seem simple, but this overnight stage is key to the final texture and taste of your Chocolate Chip Sourdough Cruffins. Cold dough handles better, rolls cleaner, and layers more consistently when it hits the butter block tomorrow.
You’re halfway to flaky pastry heaven.
Get ready, because Day 2 is where lamination magic begins.
Step-by-Step Day 2 – Laminating with Butter
Creating a Perfect Butter Block (Video Summary Link)
Day 2 is all about lamination—the art of layering butter into dough to create those stunning, flaky spirals that define Chocolate Chip Sourdough Cruffins. It begins with one essential component: the butter block.
You’ll need 340 g of unsalted, high-fat butter (like Kerrygold, ideally 84–86% butterfat). That higher fat content means fewer milk solids and more pliability, perfect for smooth layering without tearing.
Here’s how to form your butter block with confidence:
-
Lay out a large sheet of parchment paper.
Place the butter pieces side by side in the center. -
Fold the parchment over the butter.
Create a square packet roughly 8” x 8”. -
Use a rolling pin to beat and press the butter.
Lightly tap until it flattens evenly into the corners. -
Flip and roll.
Turn the butter packet over so the folded seams are face down, then roll gently until the butter fills the square fully. -
Remove air bubbles.
Press any visible pockets to ensure uniformity.
Re-wrap and chill the butter block until it’s firm but flexible—think cold clay, not frozen rock. This balance allows it to roll smoothly into the dough without cracking or melting.
Want a visual? Claire Saffitz offers a great visual reference in her lamination tutorial—well worth a watch if you’re new to butter blocks.
Locking in the Butter: The Book Fold Technique
Once your dough and butter are both chilled and ready, it’s time to combine them.
-
Shape and chill the dough.
Remove it from the fridge and roll it into an 8” x 8” square. Wrap it tightly and pop it into the freezer for 20 minutes to firm up just enough. -
Roll the dough to 16” x 8”.
Keep the width aligned with the butter square and roll lengthwise to double the butter’s length. -
Place the butter block at the center.
Peel away the parchment and position the butter so there’s equal dough overhang at the top and bottom. -
Fold dough over butter.
Bring the top and bottom edges up and seal them together, fully enclosing the butter. Pinch the sides to close.
Now we begin our first fold: the book fold.
- Rotate the dough so the seam is vertical.
- Roll the dough lengthwise into a 24” rectangle, trimming edges to get clean lines.
- Fold the top quarter toward the center, then do the same with the bottom quarter, leaving a slight gap.
- Fold the entire dough in half—like closing a book.
At this point, you’ve created four layers of butter in a single move, setting the stage for a beautifully laminated crumb.
How to Rest, Roll, and Chill the Dough Right
Laminated dough must stay cool but workable throughout folding. Butter melts fast—so you have to stay ahead of it.
After the book fold:
- Wrap and freeze for 15 minutes.
- Refrigerate for 1 hour before your next turn.
Then move on to the simple turn (also called a letter fold):
- Let dough rest for 5 minutes at room temp.
- Roll out into a long rectangle, about ⅜” thick.
- Fold the top third down and the bottom third up, like folding a letter.
- Wrap tightly again, freeze 15 minutes, and refrigerate for another hour.
Lamination success depends on temperature control and gentle rolling. If you notice butter smearing or resistance, chill everything again before proceeding.
Maintaining your cool (literally and figuratively) through lamination is essential for perfectly layered Chocolate Chip Sourdough Cruffins. The effort? 100% worth it.
Step-by-Step Day 3 – Shaping & Assembling Cruffins
Rolling and Cutting the Dough with Precision
It’s Day 3—your dough is chilled, rested, and ready to become the Chocolate Chip Sourdough Cruffins of your dreams. This is where precision meets creativity. The way you roll and cut your dough will directly impact the final rise, layers, and texture.
Start by unwrapping the rested dough.
Place it on a lightly floured surface and let it rest at room temperature for 5–7 minutes so it’s pliable but still cool. If needed, roll it again to a clean 20” x 12” rectangle. Consistency matters—aim for even thickness to ensure uniform baking and spirals.
Trim the edges using a sharp knife or wheel cutter to create perfectly straight sides. Clean edges help preserve those delicate laminated layers.
Now, cut with confidence:
- Slice down the center, lengthwise, creating two long strips, each 20” x 6”.
- Then, cut each strip vertically into 1” wide pieces. You’ll end up with about 38 smaller rectangles.
These strips will form the beautiful, chocolate-flecked spirals we associate with authentic Chocolate Chip Sourdough Cruffins.
The Spiral Technique: Mastering Cruffin Shapes
Now comes the fun part—shaping. This step is where your pastries transform from dough slabs to elegant, bakery-style cruffins with rich, chocolatey swirls.
Here’s the cruffin shaping process:
- Layer two dough strips slightly offset—½” overlap at the top, with a ½” overhang at the bottom.
- Pinch the top ends together, then begin rolling down into a tight spiral, just like a jelly roll.
- Tuck the ends underneath to secure the base and create tension in the spiral.
- Cup your hands around the roll to gently round and tighten the shape.
Now, place each rolled spiral—seam side down—into a greased muffin tin or popover tray. This orientation allows the dough to rise upward beautifully while holding the spiraled structure.
Looking for inspiration? Try our sweet focaccia with raspberry jam to see how layering and shaping can elevate everyday dough.
Pro Tip: Use your index finger to press a small indent into the center of each cruffin. This helps maintain their height and balances the internal pressure during baking.
Muffin Tin vs Popover Tray: Best Pan Options
Your pan choice makes a big difference in the final form of your Chocolate Chip Sourdough Cruffins. Both muffin tins and popover trays can work, but each has unique advantages:
| Pan Type | Benefits |
|---|---|
| Muffin Tin | Traditional shape, good height, easier to fill and rotate |
| Popover Tray | Taller, narrower sides for more dramatic rise and spiral view |
Whichever you choose, make sure it’s well-greased. Cruffins have high butter content and can stick if you skip this step. You can also use parchment paper muffin liners for extra security—especially if you’re baking for a crowd and want easy cleanup.
This shaping stage is hands-on and deeply satisfying. Watching those laminated layers swirl together with melted chocolate is part of what makes Chocolate Chip Sourdough Cruffins so irresistible.
Your trays are now filled, your dough is shaped, and your kitchen smells like anticipation. Next, we proof and bake.
Final Proofing and Baking
Two Proofing Options: Room Temp or Steam Boost
Now that your Chocolate Chip Sourdough Cruffins are shaped and nestled into their tins, it’s time for the final rise—the proof that determines your cruffin’s final height, texture, and delicacy.
This stage might be passive, but it’s just as critical as the hands-on steps. Proofing allows the laminated dough to relax and expand, setting up those flaky layers you worked so hard to create.
You have two solid proofing options to choose from:
Option 1: Room Temperature Proof (Slow & Steady)
- Time: 4 to 6 hours
- Temp: 68–74°F
- Cover loosely with plastic wrap or a damp towel
This is the traditional method that gives your Chocolate Chip Sourdough Cruffins maximum flavor development. Let them sit undisturbed in a warm corner of your kitchen. You’ll know they’re ready when they’re puffed, jiggly to the touch, and nearly doubled in size.
Option 2: Faster Proof with Gentle Steam
- Time: 2 to 3 hours
- Temp: 70–75°F
- Place a shallow pan of hot water in the oven or proofing box
If you’re short on time, this technique helps activate the sourdough culture and optional yeast quickly while maintaining softness. The steam adds moisture and promotes a better oven spring.
Whichever method you choose, don’t rush. Under-proofed cruffins won’t rise properly. Over-proofed ones may collapse or lose definition.
Best Oven Settings for Golden Cruffins
Once your Chocolate Chip Sourdough Cruffins are pillowy and proofed to perfection, it’s go time.
Preheat your oven to 375°F (190°C).
Be sure the oven is fully preheated before placing the tray inside—this guarantees a powerful first lift.
Here’s the baking game plan:
-
Top with extra chocolate chips.
Just before baking, gently press a few more mini chips onto the top of each cruffin. This enhances visual appeal and ensures a chocolaty finish on every bite. -
Bake for 15 minutes.
Then rotate the trays 180° to ensure even browning. -
Bake an additional 10–15 minutes.
You’re aiming for deep golden brown tops and crisp edges. Watch the layers carefully—this is when the magic happens.
Cool in the pan for 5 minutes, then gently remove the cruffins and transfer to a wire rack. This helps preserve the crispness of the outer layers while the inside continues to set.
Your kitchen will smell like melted butter, baked chocolate, and sourdough bliss.
Final Texture Check:
Perfectly baked Chocolate Chip Sourdough Cruffins should:
- Crackle when you peel them apart
- Reveal defined, airy laminated layers inside
- Melt in your mouth with sweet, tangy, and rich complexity
Adding Chocolate Chips Before Baking
Let’s go a bit deeper into the chocolate finish. Adding mini chocolate chips just before baking gives your Chocolate Chip Sourdough Cruffins an artisanal look and extra flavor burst. They slightly caramelize on top and offer a contrast to the melty layers inside.
Stick with mini chips—they melt evenly, don’t weigh down the top, and won’t create pooling.
If you’re feeling fancy, you can:
- Sprinkle a touch of raw sugar for added crunch
- Dust with cocoa powder post-bake
- Drizzle with melted chocolate after cooling
Whether you eat them warm or save them for later, this final chocolatey flourish takes your cruffins from great to unforgettable.
Variations, Troubleshooting & Pro Tips
Flavor Variations for Your Chocolate Chip Sourdough Cruffins
Once you’ve mastered the classic version, Chocolate Chip Sourdough Cruffins open the door to an endless world of possibilities. Think of the base recipe as your canvas—and the fillings, toppings, and flavors as your personal pastry palette.
Here are some mouthwatering variations to try:
- Cinnamon Sugar Swirl: Replace the chocolate chips with a brown sugar and cinnamon mixture. Brush with melted butter after baking and roll in cinnamon sugar for a cruffin-donut fusion.
- Nutella or Hazelnut Spread: Add a thin layer of Nutella between layers before rolling. You’ll get rich, gooey pockets inside every spiral.
- Orange Zest & Dark Chocolate: Mix orange zest into the dough or sprinkle it on top for a citrusy punch that pairs beautifully with chocolate.
- Raspberry Jam & Chocolate: Spread a thin layer of seedless jam on each dough strip before rolling. It adds color and brightens up the flavor.
- Toasted Nuts: Mix in crushed hazelnuts, pecans, or almonds for crunch and nuttiness that complements the sourdough base.
The sourdough component maintains the flavor rich and grounded no matter how you mix it up. Keep in mind that most fillings still work best with small chips, which preserve the lamination.
Common Mistakes to Avoid When Making Cruffins
Sometimes, even experienced bakers have problems making Chocolate Chip Sourdough Cruffins. The lamination process and sourdough fermentation introduce variables that require attention—but a little knowledge goes a long way.
Here are common cruffin-making mistakes and how to avoid them:
-
Butter Melts During Lamination
This happens if your kitchen is too warm or the butter isn’t cold enough. Always chill between folds and work fast on a cool surface. -
Under-proofed Cruffins
If your cruffins look tight or don’t expand in the oven, they probably needed more time to rise. Wait for a noticeable jiggle and visible puffiness before baking. -
Over-proofed Cruffins
Dough that collapses or flattens after baking likely fermented too long. Watch your proofing time and temperature, especially in humid or hot climates. -
Torn Dough During Rolling
This can be due to chips clumping or dough being too cold. Let the dough rest at room temperature briefly before rolling it out again. -
Bland Flavor
Make sure your sourdough starter is active and bubbly. Weak starters won’t bring enough tang or lift to your Chocolate Chip Sourdough Cruffins.
The more you bake them, the more intuitive the process becomes. Trust your senses—touch, smell, sight—and adjust accordingly.
Expert Tips to Elevate Your Chocolate Chip Sourdough Cruffins
Ready to level up your baking game? These professional tips will help you make Chocolate Chip Sourdough Cruffins that rival the best artisan bakeries:
- Use a digital scale: Precision matters, especially with laminated dough.
- Invest in quality butter: Higher fat content equals better layering and flavor.
- Cool completely before eating: Warm cruffins can feel doughy. Let them rest for 15–20 minutes after baking so the crumb can set.
- Chill your tools: When working in a warm kitchen, chill your rolling pin and counter briefly to help with lamination.
- Try a silicone muffin tray: Easier release and cleanup for beginners still perfecting the shaping technique.
If you want next-level results, try adding a sweet glaze made from powdered sugar and espresso or a light brushing of vanilla syrup right after baking.
Most importantly, don’t aim for perfect—aim for delicious. The slight irregularities are part of what makes homemade Chocolate Chip Sourdough Cruffins feel special.
You’ve now got the skills, knowledge, and confidence to customize, troubleshoot, and elevate every batch of this show-stopping pastry.
Conclusion: Why Chocolate Chip Sourdough Cruffins Are Worth Every Step
Mastering Chocolate Chip Sourdough Cruffins is more than just a baking project—it’s an experience that combines craft, creativity, and pure indulgence. With each step, from developing a tangy, complex dough to achieving those perfectly laminated spirals filled with melty chocolate, you’re building something extraordinary.
What sets these cruffins apart is the harmony between the sourdough’s depth and the sweetness of mini chocolate chips. The three-day process might seem long, but it’s a joyful rhythm of rest, roll, shape, and bake—a satisfying ritual that always ends in a show-stopping result.
Whether you’re preparing for a special weekend brunch or just baking to satisfy your inner pastry chef, these Chocolate Chip Sourdough Cruffins are the kind of treat that impresses on every level. So go ahead dust them with sugar, break them open, and savor each flake and swirl.
Don’t miss our popular recipes like this delicious Sourdough Croissants!
FAQs About Chocolate Chip Sourdough Cruffins
How do you store Chocolate Chip Sourdough Cruffins?
Storing Chocolate Chip Sourdough Cruffins properly ensures they stay fresh, flaky, and delicious. After baking, let them cool completely on a wire rack. Then, place them in an airtight container lined with parchment paper. Keep at room temperature for up to 2 days.
For longer storage, wrap each cruffin individually in plastic wrap, then place them in a freezer-safe bag. Frozen Chocolate Chip Sourdough Cruffins can last up to 1 month. Reheat them in a 325°F oven for 8–10 minutes to restore their crisp texture and melty chocolate pockets.
Avoid refrigerating unless they’re cream-filled, as cold air dries out laminated dough quickly.
Can I use dry yeast instead of sourdough for Chocolate Chip Sourdough Cruffins?
While sourdough gives these pastries their signature tang and texture, you can use a small amount of dry yeast as backup or insurance. However, replacing sourdough entirely with commercial yeast will turn your bake into a standard cruffin, losing the depth and complexity that define Chocolate Chip Sourdough Cruffins.
That said, adding 1.5 grams of active dry yeast alongside your starter can help support fermentation if your sourdough isn’t fully active—especially in cooler kitchens. Just be sure to keep the dough’s fermentation time shorter to avoid over-proofing.
Why is lamination important in Chocolate Chip Sourdough Cruffins?
Lamination is what makes Chocolate Chip Sourdough Cruffins so irresistibly flaky and buttery. By folding layers of cold butter into the dough through book and letter folds, you create dozens—sometimes hundreds—of ultra-thin layers that puff up in the oven.
This process also traps steam during baking, which lifts the dough and produces that signature cruffin rise. Without proper lamination, the texture of your Chocolate Chip Sourdough Cruffins will be flat and bread-like instead of light, layered, and tender.
Each buttery fold you complete contributes directly to the final texture and beauty of these pastries. It’s worth every minute of chilling and rolling.
What type of chocolate is best for Chocolate Chip Sourdough Cruffins?
Mini chocolate chips are the gold standard when making Chocolate Chip Sourdough Cruffins. They melt evenly, distribute easily through the layers, and won’t tear the dough during rolling and shaping.
You can use:
Semi-sweet mini chips (classic and balanced)
Dark chocolate mini chips (for a more intense flavor)
Dairy-free chocolate chips like Enjoy Life (for allergy-friendly versions)
Avoid using full-size chocolate chips or chunks—they can puncture your laminated layers and cause uneven baking. For those who want a fun twist, white chocolate or flavored baking chips can be added, but keep the chip size small to maintain structure.
Can I make the dough ahead of time for Chocolate Chip Sourdough Cruffins?
Yes—Chocolate Chip Sourdough Cruffins are perfect for prepping in stages. In fact, spreading the process over multiple days makes it more manageable and improves flavor development.
Here’s how you can break it down:
Day 1: Mix the dough and refrigerate it overnight.
Day 2: Laminate with butter and complete the folds.
Day 3: Shape, refrigerate again, and proof the next day.
Day 4: Final proofing and bake.
This make-ahead approach allows the sourdough to deepen in flavor and gives you flexibility for special occasions like brunches, holidays, or weekend gatherings. With the dough ready to go, you can enjoy warm Chocolate Chip Sourdough Cruffins without the early-morning stress.
What if I don’t have a muffin tin for Chocolate Chip Sourdough Cruffins?
If you don’t have a traditional muffin tin, don’t worry—you can still bake incredible Chocolate Chip Sourdough Cruffins. A popover tray is an excellent substitute and may even give you taller, more dramatic spirals.
Alternatively, use:
Individual ramekins
Silicone molds
Well-greased metal rings on a baking sheet
Just make sure whatever vessel you use has enough vertical support to help the cruffins rise upward. Keep the dough seam-side down, and use parchment or butter to prevent sticking.
No matter the mold, the delicious laminated structure and chocolate-studded layers of your Chocolate Chip Sourdough Cruffins will shine through.
mhi67f
k521d8