
There is something so comforting about a dessert that brings together soft baked apples, creamy cheesecake, and a buttery crust in one neat little square. These bars feel cozy from the very first bite, with warm cinnamon notes, a smooth filling, and just enough sweetness to make them feel extra special. Trust me, you’re going to love this, especially when your kitchen starts smelling like baked apples and vanilla.
Disclosure: This post contains affiliate links.If you click and make a purchase, I may earn a small commission at no extra cost to you.


Why These Bars Always Steal the Show
Some desserts look impressive but take a whole afternoon to make. These bars are not like that. They have that bakery-style look and rich, layered flavor, but the process is simple enough for a relaxed baking day at home. You get a tender crust, a silky cheesecake center, and a soft apple topping that feels perfect for fall, holidays, or honestly any day you want something sweet and comforting.
And now let’s dive a little deeper into what makes this dessert feel so timeless and loved.
A Little Story Behind This Cozy Favorite
Cheesecake bars are one of those clever dessert twists that make serving easier and sharing even better. Instead of slicing a full cheesecake, you get tidy squares that are simple to chill, cut, and bring to the table. Apple desserts, on the other hand, have long been a favorite in home baking, especially in cooler seasons when cinnamon, brown sugar, and tender fruit feel extra inviting.
Put those two traditions together, and you get a dessert that feels both familiar and a little indulgent. It has that old-fashioned comfort of baked apples, paired with the creamy richness people love in cheesecake.
Reasons You’ll Keep Coming Back to This Recipe
This dessert has a way of becoming a repeat favorite, and once you make it, you’ll see why.
Versatile: These bars fit almost any occasion, from casual family dinners to holiday dessert tables. They are easy to dress up with caramel or keep simple and classic.
Budget-Friendly: Most of the ingredients are pantry and refrigerator staples, which means you can make something that tastes special without a long shopping list.
Quick and Easy: The steps are straightforward, and the layers come together without any complicated techniques. This one’s a total game-changer when you want something that looks impressive without too much fuss.
Customizable: You can adjust the spice level, swap the apple variety, or add a little crunch on top to make them your own.
Crowd-Pleasing: Creamy cheesecake and cinnamon apples are a combination that almost everyone loves, so these bars disappear fast.
Make-Ahead Friendly: They actually taste even better after chilling, which makes them perfect for preparing in advance.
Great for Leftovers: A chilled square the next day with coffee or tea is a little moment of happiness, let me tell you, it’s worth every bite.
Smart Baking Tips That Make a Big Difference
Before you start layering everything together, a few small details can make the final result even better.
- Use room temperature cream cheese: This helps the filling turn out smooth instead of lumpy.
- Choose firm apples: Apples like Honeycrisp or Granny Smith hold their shape nicely while baking.
- Do not overmix the filling: Mix just until smooth so the texture stays creamy and not too airy.
- Line the pan with parchment: It makes lifting and slicing much easier later.
- Chill before cutting: Clean slices come from patience, and the bars firm up beautifully in the fridge.
Kitchen Tools That Help Everything Go Smoothly
Having the right tools ready makes this recipe feel easy from start to finish.
Mixing bowls: You will need a few bowls to keep the crust, filling, and topping organized.
Hand mixer or stand mixer: This helps create a smooth cheesecake layer with very little effort.
8×8-inch baking pan: This size gives the bars the right thickness for clean, satisfying layers.
Parchment paper: It helps with easy removal and neater slicing.
Knife and cutting board: These are essential for peeling and dicing the apples evenly.
Spatula: Great for spreading the filling and topping into even layers.
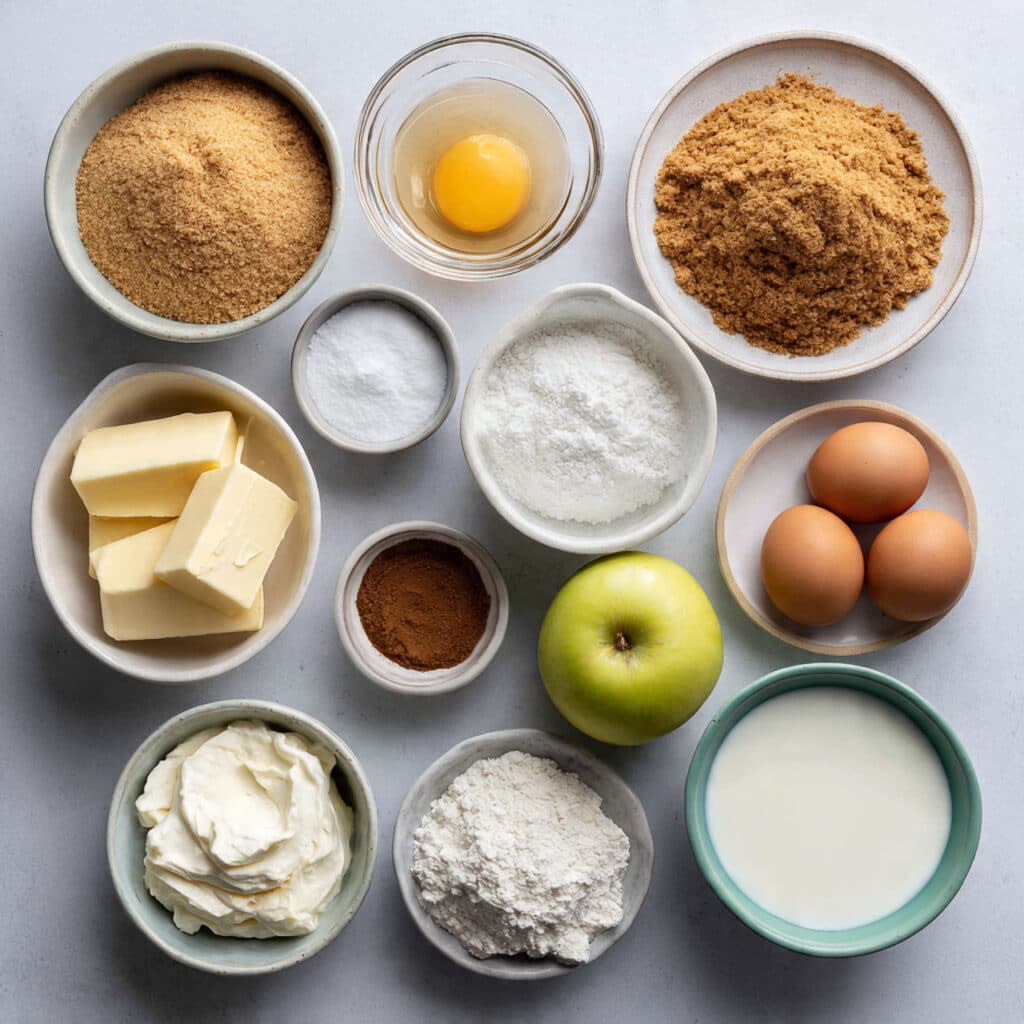
Ingredients That Build Every Delicious Layer
The beauty of this dessert is how each ingredient plays a specific role, creating layers that taste balanced, rich, and cozy all at once.
- Graham cracker crumbs: 1 1/2 cups, these create the buttery base and give the bars a gentle crunch.
- Unsalted butter, melted: 6 tablespoons, this binds the crust together and adds rich flavor.
- Granulated sugar: 1/4 cup for the crust, plus 1/2 cup for the filling, plus 2 tablespoons for the apple layer, this adds sweetness in the right places.
- Cream cheese, softened: 16 ounces, this is the heart of the filling and gives that smooth, tangy cheesecake texture.
- Large eggs: 2, these help the filling set while keeping it creamy.
- Vanilla extract: 1 teaspoon, this adds warmth and rounds out the flavor of the filling.
- Apples, peeled and diced: 2 medium, about 2 cups, these bring freshness, softness, and that classic cozy apple flavor.
- Brown sugar: 2 tablespoons, this gives the apple topping a deeper caramel-like sweetness.
- Ground cinnamon: 1 teaspoon, this brings warmth and makes the apples taste even more comforting.
- All-purpose flour: 1 tablespoon, this lightly thickens the apple layer so it sits nicely on top.
- Sour cream: 1/4 cup, this adds a gentle tang and makes the filling extra silky.
Easy Swaps When You Need a Little Flexibility
Sometimes you want to work with what you already have, and this dessert gives you a little room to do that.
Graham cracker crumbs: Vanilla wafer crumbs or crushed digestive biscuits.
Sour cream: Plain Greek yogurt.
Brown sugar: Coconut sugar or extra granulated sugar.
Honeycrisp apples: Granny Smith, Fuji, or Pink Lady apples.
Vanilla extract: Vanilla bean paste.
The Ingredients That Really Make the Magic Happen
A couple of ingredients do a lot of heavy lifting here, and they deserve a little spotlight.
Cream cheese: This creates that rich, smooth center that makes every bite feel luscious and balanced.
Apples: They add tenderness, freshness, and a gentle tartness that keeps the bars from feeling too heavy.
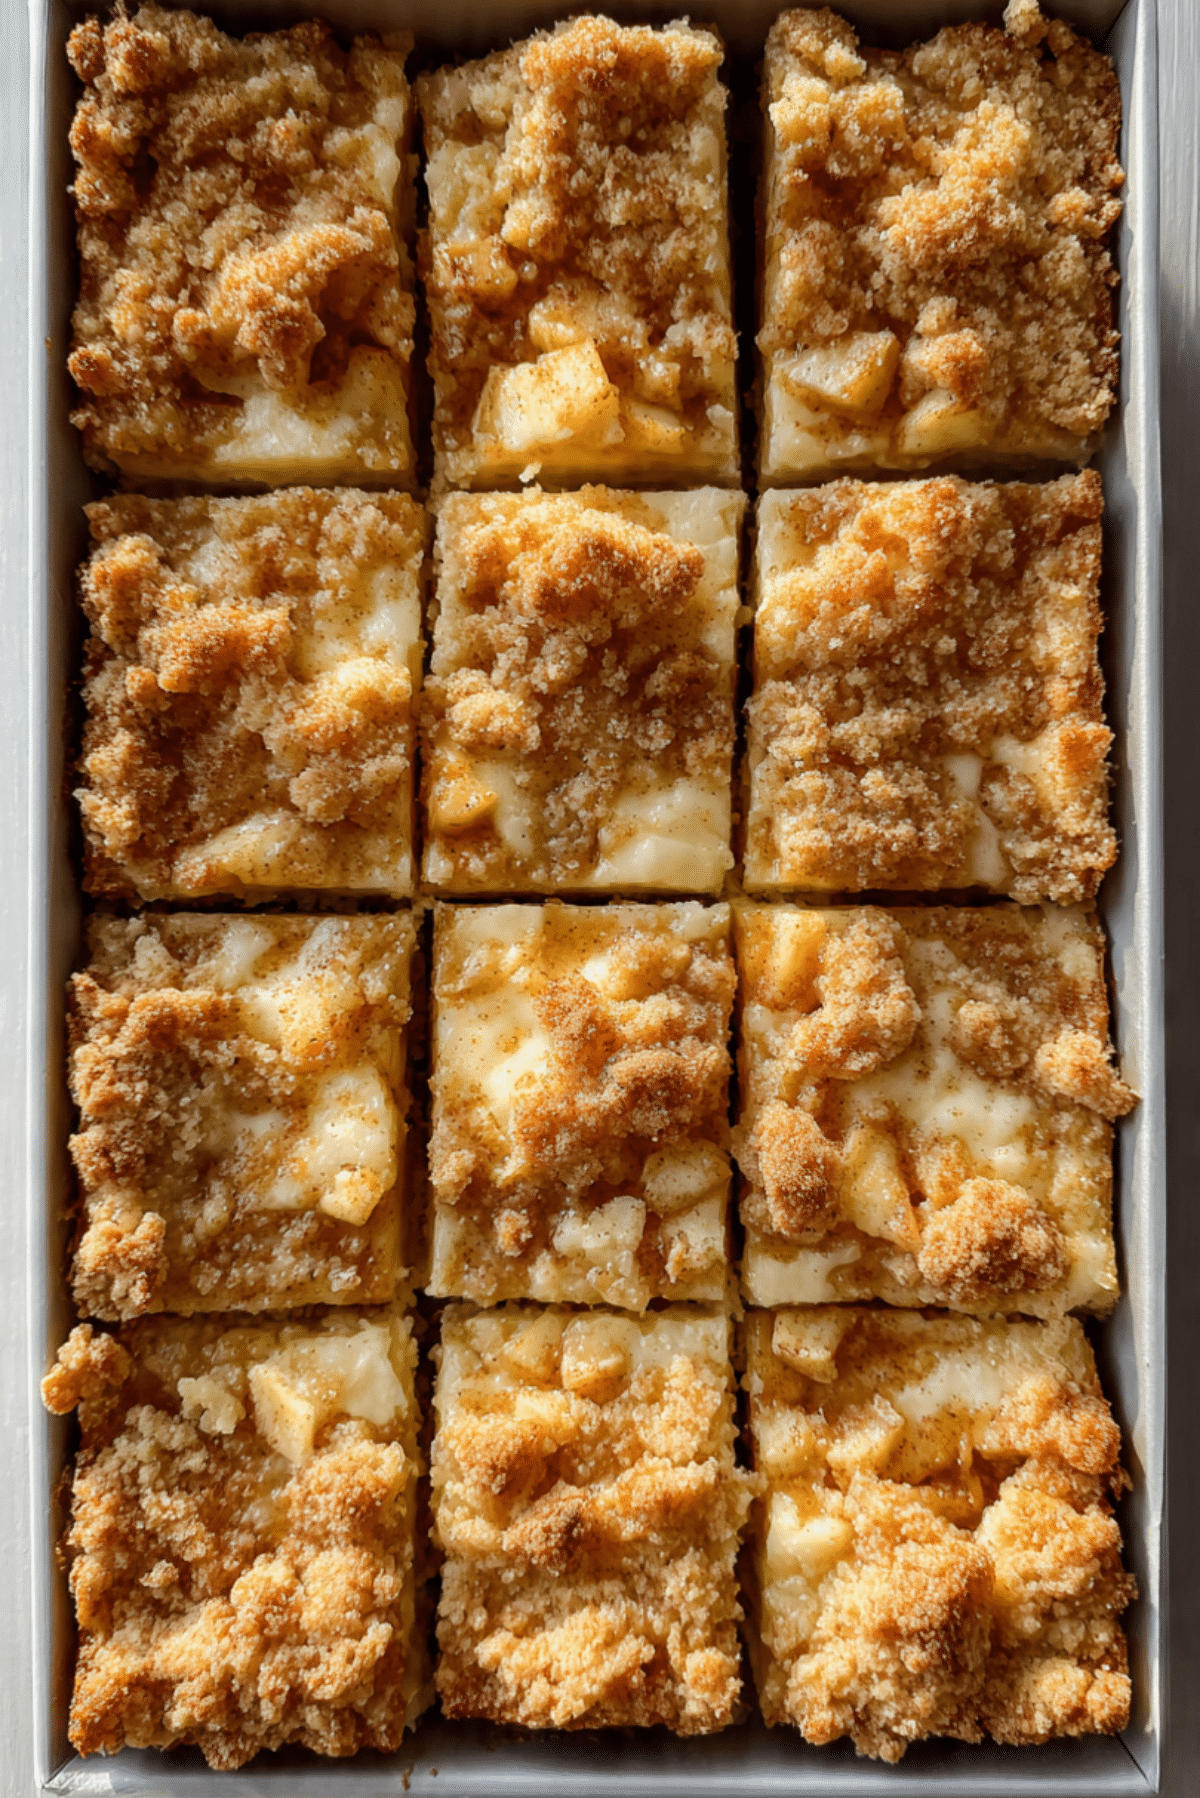
Let’s Build These Layers Together
This is the fun part, where everything starts coming together and the kitchen begins to smell amazing. Here are the steps you’re going to follow.
- Preheat Your Equipment: Preheat your oven to 350°F. Line an 8×8-inch baking pan with parchment paper, leaving a little overhang on the sides for easy lifting later.
- Combine Ingredients: In a medium bowl, stir together the graham cracker crumbs, melted butter, and 1/4 cup granulated sugar until the mixture looks like wet sand. In a separate bowl, beat the softened cream cheese with 1/2 cup granulated sugar until smooth. Add the eggs one at a time, then mix in the vanilla extract and sour cream just until creamy. In another bowl, toss the diced apples with brown sugar, cinnamon, flour, and the remaining 2 tablespoons granulated sugar.
- Prepare Your Cooking Vessel: Press the crust mixture firmly and evenly into the bottom of the prepared pan. Use the back of a spoon or the bottom of a measuring cup to flatten it well.
- Assemble the Dish: Spread the cheesecake filling over the crust in an even layer. Spoon the apple mixture over the top, distributing it gently so every bar gets some fruit.
- Cook to Perfection: Bake for 38 to 42 minutes, until the edges look set and the center has a slight wobble. The apples should be tender and the filling should look softly puffed.
- Finishing Touches: Let the bars cool completely at room temperature, then chill them in the refrigerator for at least 3 hours. Once cold, lift them out of the pan and slice into 9 bars with a clean knife.
- Serve and Enjoy: Serve chilled or let them sit for a few minutes at room temperature for a slightly softer bite. A little dusting of cinnamon on top can make them look extra lovely.
The Texture and Flavor Are What Make These So Good
What makes these bars unforgettable is the contrast in every bite. The crust is buttery and a little crumbly, the cheesecake layer is smooth and creamy, and the apple topping is soft with just a hint of texture. As the bars bake, the cinnamon and brown sugar melt into the fruit, creating a warm, almost caramel-like finish that settles beautifully into the creamy layer beneath it.
It is that mix of richness and freshness that keeps you coming back for another square.
Helpful Tricks for Even Better Results
A few little habits can make the whole process feel easier and the final bars even prettier.
- Dice the apples evenly: Small, even pieces cook at the same rate and sit more neatly on top.
- Wipe the knife between cuts: This gives you cleaner slices and prettier layers.
- Chill fully before serving: The flavor deepens and the texture becomes more structured after a good chill.
- Do not overload the topping: A balanced layer helps everything bake evenly.
Mistakes to Skip for the Best Batch
Even easy desserts have a few little pitfalls, but they are simple to avoid.
- Using cold cream cheese: This can leave lumps in the filling, so let it soften first.
- Skipping parchment paper: It makes lifting and slicing harder than it needs to be.
- Overbaking: The center should still have a slight wobble when you take it out.
- Cutting too early: Warm bars are delicious, but they will not slice neatly until fully chilled.
Nutrition Snapshot at a Glance
Servings: 9
Calories per serving: 320
Note: These are approximate values.
Time You’ll Want to Plan For
Prep Time: 20 minutes
Cook Time: 40 minutes
Total Time: 1 hour
Make-Ahead and Storage Tips That Actually Help
One of the best things about these bars is how well they fit into a busy schedule. You can bake them the day before and let them chill overnight, which actually improves the texture and flavor. Once sliced, store them in an airtight container in the refrigerator for up to 4 days.
For longer storage, wrap the bars individually and freeze them for up to 2 months. Thaw them overnight in the refrigerator before serving. For the best texture, enjoy them cold or after a few minutes on the counter.
My Favorite Ways to Serve Them
These bars are lovely straight from the fridge, but they also pair beautifully with a few simple extras. Serve them with hot coffee, chai, or black tea for a cozy afternoon treat. For dessert, a spoonful of whipped cream or a light drizzle of caramel sauce turns them into something that feels celebration-ready.
They also look beautiful on a holiday dessert tray, especially next to spiced cookies or fruit-based sweets.
Leftovers Never Have to Feel Boring
If you happen to have extras, there are some fun ways to enjoy them again.
You can crumble a bar over vanilla yogurt for a dessert-style breakfast, or tuck small pieces into a parfait with whipped cream and extra diced apples. Another favorite is serving a chilled square with a warm mug of coffee as an afternoon pick-me-up that feels just a little indulgent.
A Few Extra Tips Before You Bake
Sometimes the little details are what make baking feel more relaxed and successful.
Use apples that are sweet-tart for the best balance. Let the bars rest before slicing, and do not rush that chilling time. Keep your layers even, and remember that neat layers make every slice look more bakery-worthy. This one’s a total game-changer when you need a dessert that feels both homey and polished.
Make Them Look as Good as They Taste
Presentation is easy here because the layers do most of the work for you. Slice the bars cleanly and place them on a simple plate or tray so the crust, creamy center, and apple topping can really show off. A tiny sprinkle of cinnamon or a very light dusting of powdered sugar can make them look extra inviting without covering up that beautiful top layer.
For gatherings, place them in neat rows and let the golden apple topping catch the light. They always look like they came from a lovely little bakery.
Delicious Twists You Can Try Next Time
Once you’ve made the classic version, there are a few fun ways to change things up.
- Caramel Apple Version: Drizzle caramel sauce over the chilled bars before serving.
- Nutty Crunch Version: Add 1/4 cup chopped pecans to the apple mixture for extra texture.
- Spiced Autumn Version: Add a pinch of nutmeg and a pinch of ginger to the topping.
- Vanilla Wafer Crust Version: Swap the graham crumbs for crushed vanilla wafers for a sweeter base.
- Extra Tangy Version: Add 1 teaspoon lemon juice to the apple mixture for a brighter finish.
FAQ’s
1. Can I use a different kind of apple?
Yes, absolutely. Firm apples like Granny Smith, Fuji, Honeycrisp, and Pink Lady all work well.
2. Do I need to peel the apples?
Peeling is best for a softer topping, but if you like a little more texture, you can leave some skin on.
3. Can I make these a day ahead?
Yes, and they are even better that way because the layers firm up nicely in the fridge.
4. How do I know when they are done baking?
The edges should look set and the center should still jiggle slightly when the pan is gently moved.
5. Can I freeze them?
Yes. Wrap the bars well and freeze for up to 2 months.
6. What is the best way to cut clean slices?
Use a sharp knife and wipe it clean between cuts.
7. Can I double the recipe?
Yes, bake it in a 9×13-inch pan and adjust the baking time as needed.
8. Why did my filling crack a little?
A little cracking can happen if the bars are overbaked or cooled too quickly, but they will still taste delicious.
9. Can I add a streusel topping?
Yes, a light crumb topping would be lovely and adds extra texture.
10. Should I serve them cold or at room temperature?
Both are good, but chilled gives the cleanest texture and neatest slices.
Conclusion
These bars bring together everything people love about cozy baking, creamy cheesecake, soft apples, warm cinnamon, and a buttery base that holds it all together. They are simple enough for a weekend bake and special enough to share at gatherings, which makes them one of those desserts you end up thinking about long after the last bite. Trust me, you’re going to love this one.
Print
Apple Cheesecake Bars
- Prep Time: 20 minutes
- Cook Time: 40 minutes
- Total Time: 1 hour
- Yield: 9 bars 1x
- Category: Dessert
- Method: Baking
- Cuisine: American
- Diet: Vegetarian
Description
Creamy apple cheesecake bars with a buttery graham cracker crust, smooth vanilla cheesecake filling, and a soft cinnamon apple topping. These chilled bars are cozy, rich, and perfect for holidays, fall baking, or anytime you want an easy dessert that looks bakery-worthy.
Ingredients
- 1 1/2 cups graham cracker crumbs
- 6 tablespoons unsalted butter, melted
- 1/4 cup granulated sugar
- 16 ounces cream cheese, softened
- 1/2 cup granulated sugar
- 2 large eggs
- 1 teaspoon vanilla extract
- 1/4 cup sour cream
- 2 medium apples, peeled and diced, about 2 cups
- 2 tablespoons brown sugar
- 1 teaspoon ground cinnamon
- 1 tablespoon all-purpose flour
- 2 tablespoons granulated sugar
Instructions
- Preheat the oven to 350°F. Line an 8×8-inch baking pan with parchment paper.
- In a medium bowl, mix the graham cracker crumbs, melted butter, and 1/4 cup granulated sugar until combined.
- Press the crust mixture firmly into the bottom of the prepared pan.
- In a mixing bowl, beat the softened cream cheese with 1/2 cup granulated sugar until smooth.
- Add the eggs one at a time, then mix in the vanilla extract and sour cream just until creamy.
- In a separate bowl, toss the diced apples with brown sugar, cinnamon, flour, and 2 tablespoons granulated sugar.
- Spread the cheesecake filling evenly over the crust.
- Spoon the apple mixture evenly over the cheesecake layer.
- Bake for 38 to 42 minutes, until the edges are set and the center has a slight wobble.
- Cool completely, then refrigerate for at least 3 hours before slicing into 9 bars.
Notes
- Use room temperature cream cheese for the smoothest filling.
- Firm apples like Honeycrisp, Granny Smith, Fuji, or Pink Lady work best.
- Chill fully before slicing for clean layers.
- Store covered in the refrigerator for up to 4 days.
Nutrition
- Serving Size: 1 bar
- Calories: 320
- Sugar: 20g
- Sodium: 220mg
- Fat: 19g
- Saturated Fat: 11g
- Unsaturated Fat: 6g
- Trans Fat: 0g
- Carbohydrates: 33g
- Fiber: 1g
- Protein: 5g
- Cholesterol: 80mg
slot365 có tính năng “theo dõi bạn bè” – xem ai đang chơi gì, thắng bao nhiêu (với sự đồng ý). TONY05-15