

There’s something undeniably nostalgic about a Twinkie. That soft golden sponge, that dreamy, sweet filling tucked inside — it brings back after-school memories and lunchbox surprises. Now imagine turning that experience into a full-blown cake. That’s exactly what this Twinkie Cake delivers. It’s rich, fluffy, and filled with a whipped marshmallow center that makes every bite feel like a celebration.
Disclosure: This post contains affiliate links.If you click and make a purchase, I may earn a small commission at no extra cost to you.


Behind the Recipe
This cake was born out of a craving for childhood comfort with a grown-up twist. I was feeling nostalgic for the soft, creamy taste of a Twinkie but wanted something big enough to share at the table. The result was this homemade version that captures the essence of the classic treat, but in cake form — perfect for potlucks, birthdays, or simply reliving a sweet memory.
Recipe Origin or Trivia
Did you know the original Twinkie was invented in the 1930s? It was created by a bakery manager in Illinois as a way to use seasonal shortcake pans during the off-season. The original filling was actually banana-flavored, later swapped out for vanilla during World War II due to shortages. Twinkies have since become an iconic American snack, and this cake pays homage to that legacy.
Why You’ll Love Twinkie Cake
This cake isn’t just fun and nostalgic, it’s seriously tasty and easy to whip up.
Versatile: It works as a birthday cake, a party dessert, or a special weekend bake.
Budget-Friendly: Most ingredients are pantry staples or easy to grab on a quick store run.
Quick and Easy: Using a cake mix and pudding mix makes it straightforward without sacrificing flavor.
Customizable: You can switch up the flavor with different cake or pudding mixes.
Crowd-Pleasing: That fluffy filling and soft crumb make it irresistible for all ages.
Make-Ahead Friendly: Prepare it a day ahead and let it chill — it’s even better the next day.
Great for Leftovers: Stores beautifully in the fridge and stays moist for days.
Chef’s Pro Tips for Perfect Results
Getting this cake just right is all about the texture and timing. Here’s how to master it:
- Let ingredients come to room temp: Especially eggs and butter, for a smooth batter and creamy filling.
- Use whole milk: It helps create a rich, moist crumb that feels bakery-quality.
- Cool the cake completely before filling: This keeps the filling from melting into the cake.
- Chill before slicing: An hour in the fridge helps everything set and makes cleaner slices.
- Dust just before serving: Powdered sugar adds a pretty touch but can melt if added too soon.
Kitchen Tools You’ll Need
To keep things simple and efficient, have these tools ready:
Mixing bowls: One for the cake batter, one for the filling.
Electric mixer: For whipping that fluffy marshmallow filling to perfection.
Whisk: For combining pudding and milk smoothly.
9×13 baking pan: The ideal size for this layered cake.
Offset spatula: Helps spread the filling evenly without tearing the cake.
Sifter or fine mesh strainer: For that delicate powdered sugar finish.
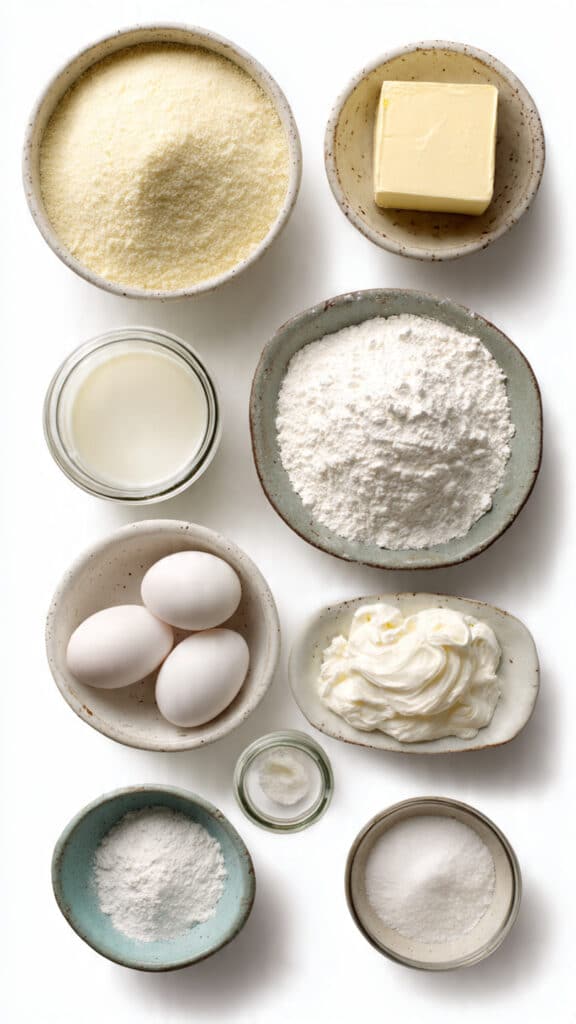
Ingredients in Twinkie Cake
The beauty of this recipe is in the balance between simple ingredients and nostalgic flavor.
- Vanilla Cake Mix: 1 box (about 13.25 ounces) – The foundation of the cake, making it moist and fluffy with minimal effort.
- Vanilla Pudding Mix: 1 box (3.4 ounces) – Adds extra moisture and richness to the batter.
- Unsalted Butter: ½ cup, melted and cooled – Infuses the cake with buttery flavor and tenderness.
- Milk: 1 cup – Adds moisture and helps activate the pudding mix.
- Eggs: 4 large – Bind everything together and help the cake rise evenly.
- Unsalted Butter (for filling): ½ cup, softened – Creates a creamy base for the marshmallow layer.
- Marshmallow Fluff: 1 jar (7 ounces) – The star of the filling, adding that signature Twinkie flavor.
- Powdered Sugar: 2¾ cups, plus extra for dusting – Sweetens and thickens the cream.
- Vanilla Extract: 1 teaspoon – Enhances the marshmallow flavor.
- Heavy Whipping Cream: 2 tablespoons – Lightens the texture of the filling and makes it silky.
Ingredient Substitutions
Need a swap? No problem.
Vanilla Cake Mix: Yellow cake mix works just as well.
Vanilla Pudding Mix: Try white chocolate or French vanilla for a twist.
Milk: Non-dairy milk like almond or oat can be used.
Butter: Margarine or a vegan butter alternative can sub in.
Marshmallow Fluff: Use whipped cream plus powdered sugar if fluff is unavailable.
Ingredient Spotlight
Marshmallow Fluff: This gives the cream filling that distinct cloud-like texture and nostalgic flavor.
Vanilla Pudding Mix: It sneaks in extra richness and helps the cake stay super moist.
Instructions for Making Twinkie Cake
Ready to bring the magic to life? Here are the steps you’re going to follow:
1. Preheat Your Equipment:
Set your oven to 350°F (175°C). Lightly grease a 9×13-inch baking pan and set aside.
2. Combine Ingredients:
In a large bowl, mix the vanilla cake mix, vanilla pudding mix, melted butter, milk, and eggs. Beat with an electric mixer for about 2 minutes until smooth.
3. Prepare Your Cooking Vessel:
Pour the batter into the greased baking pan and smooth the top.
4. Assemble the Dish:
Bake for 30 to 35 minutes or until a toothpick inserted comes out clean. Let the cake cool completely.
5. Cook to Perfection:
While the cake cools, beat the softened butter until light and fluffy. Add the marshmallow fluff, powdered sugar, vanilla extract, and heavy cream. Mix until fluffy and smooth.
6. Finishing Touches:
Once the cake has cooled, carefully slice it in half horizontally (or poke holes and fill if you prefer). Spread the cream evenly, then replace the top layer.
7. Serve and Enjoy:
Dust with powdered sugar just before serving. Chill for 30 to 60 minutes for best slicing results.
Texture & Flavor Secrets
The key to this Twinkie Cake lies in contrast. The cake is moist and spongy with just the right amount of bounce. The filling is airy and sweet with a silky creaminess that seeps into every bite. That final dusting of powdered sugar? It adds a delicate melt-in-your-mouth finish.
Cooking Tips & Tricks
Don’t worry, you’ve got this. These tips help make it foolproof:
- Let the cake cool completely before filling.
- Use parchment paper if you plan to slice the cake for layering.
- Chill before slicing for cleaner presentation.
What to Avoid
A few quick reminders to keep things on track:
- Don’t overmix the batter — it can make the cake dense.
- Avoid warm butter in the filling — it will melt the fluff.
- Don’t skip the chilling step if slicing the cake in layers.
Nutrition Facts
Servings: 12
Calories per serving: 410
Note: These are approximate values.
Preparation Time
Prep Time: 20 minutes
Cook Time: 35 minutes
Total Time: 55 minutes
Make-Ahead and Storage Tips
This cake is a dream to prep in advance. You can make it a day ahead and store it in the fridge. The flavors actually meld and get better overnight. Store leftovers covered in the refrigerator for up to 4 days. If you want to freeze it, do so before adding powdered sugar and wrap it tightly in plastic wrap and foil. Thaw in the fridge before serving.
How to Serve Twinkie Cake
Serve slices chilled or at room temp on a cute plate with a dollop of whipped cream or fresh berries on the side. Pair it with coffee, milk, or even a warm chai tea for the ultimate cozy dessert moment.
Creative Leftover Transformations
Got extra slices? Here’s how to jazz them up:
- Make Twinkie Cake parfaits by layering crumbled cake with fresh berries and cream.
- Cube and skewer with strawberries for a fun dessert kabob.
- Use leftovers to create a cake trifle with pudding and banana slices.
Additional Tips
Want to make it shine even more?
- Add a splash of almond extract to the batter for depth.
- Sprinkle with colorful sprinkles or edible glitter for a festive touch.
- Serve on a pastel or gold-rimmed plate for a vintage feel.
Make It a Showstopper
Presentation counts. Dust the top with powdered sugar using a stencil for a pretty design. Serve it on a cake stand with a doily underneath. Add a ribbon around the base for special occasions.
Variations to Try
- Chocolate Twist: Use chocolate pudding mix and drizzle with chocolate syrup.
- Berry Burst: Add chopped strawberries between the layers.
- Caramel Crunch: Top with crushed toffee bits and a caramel drizzle.
- Holiday Vibe: Add a dash of cinnamon and nutmeg for a festive flair.
- Mini Twinkie Cakes: Bake in a muffin tin and pipe filling inside each.
FAQ’s
Q1: Can I use homemade cake batter instead of a mix?
Yes, just make sure it yields enough for a 9×13-inch pan and has a soft, light texture.
Q2: How do I slice the cake cleanly?
Chill it for at least an hour, then use a serrated knife wiped clean between cuts.
Q3: Can I skip the pudding mix?
You can, but it really helps with moisture and texture. The cake may be drier without it.
Q4: How long will the cake last?
It keeps well in the fridge for up to 4 days when covered properly.
Q5: Is this freezer-friendly?
Yes, freeze it unfrosted or fully assembled without the powdered sugar.
Q6: What if I don’t have marshmallow fluff?
Use whipped cream and powdered sugar, though it won’t be as sweet or dense.
Q7: Can I bake this in two round pans?
Yes, just adjust the baking time and check doneness with a toothpick.
Q8: Will low-fat milk work?
It can, but whole milk gives the best richness.
Q9: Can I double the filling?
Absolutely! If you love cream, go for it.
Q10: Is this safe for kids?
Definitely, it’s a kid-favorite and contains no allergens beyond dairy and eggs.
Conclusion
This Twinkie Cake is like a warm hug from your childhood, only bigger and better. It’s rich, creamy, sweet, and oh-so-fun to make and eat. Whether you’re sharing it at a party or treating yourself to a cozy dessert night, trust me, it’s worth every bite. Now go ahead and whip up some sweet memories — you’re going to love it.
Print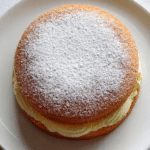
Twinkie Cake
- Prep Time: 20 minutes
- Cook Time: 35 minutes
- Total Time: 55 minutes
- Yield: 12 servings 1x
- Category: Dessert
- Method: Baking
- Cuisine: American
- Diet: Vegetarian
Description
A nostalgic and creamy Twinkie Cake made with soft vanilla sponge and a fluffy marshmallow filling — a crowd-pleasing treat that brings back sweet memories.
Ingredients
- 1 box vanilla cake mix (13.25 ounces)
- 1 box vanilla pudding mix (3.4 ounces)
- 1/2 cup unsalted butter, melted and cooled
- 1 cup milk
- 4 large eggs
- 1/2 cup unsalted butter (for filling), at room temperature
- 1 jar marshmallow fluff (7 ounces)
- 2 3/4 cups powdered sugar, plus more for dusting
- 1 teaspoon vanilla extract
- 2 tablespoons heavy whipping cream
Instructions
- Preheat your oven to 350°F (175°C). Lightly grease a 9×13-inch baking pan and set it aside.
- In a large mixing bowl, combine the cake mix, pudding mix, melted butter, milk, and eggs. Beat with an electric mixer for about 2 minutes until smooth.
- Pour the batter into the prepared baking pan and smooth out the top.
- Bake for 30 to 35 minutes or until a toothpick inserted in the center comes out clean. Allow the cake to cool completely in the pan.
- In a separate bowl, beat the softened butter until fluffy. Add marshmallow fluff, powdered sugar, vanilla extract, and heavy cream. Mix until the filling is light and smooth.
- Once the cake has cooled, carefully slice it horizontally or poke holes and spread the cream filling across the bottom layer. Replace the top layer.
- Dust with powdered sugar just before serving and refrigerate for at least 30 minutes to set.
Notes
- Make sure the cake is fully cooled before adding the filling to prevent melting.
- Chill the cake before slicing for cleaner, more defined layers.
- You can make the cake a day in advance — it tastes even better after sitting overnight.
Nutrition
- Serving Size: 1 slice
- Calories: 410
- Sugar: 38g
- Sodium: 360mg
- Fat: 21g
- Saturated Fat: 12g
- Unsaturated Fat: 8g
- Trans Fat: 0g
- Carbohydrates: 51g
- Fiber: 0g
- Protein: 4g
- Cholesterol: 90mg
Seriously addicted to Kingpk999! The game selection is awesome. Give it a whirl, you won’t regret it kingpk999.
Yo, check out wjcassino! It’s got a slick interface and some decent games. Nothing mind-blowing, but solid for a quick gamble. wjcassino
Alright, I think I’ll give 777betninecasino a whirl and see what I think, The games seem diverse enough to keep my intention! Check it out: 777betninecasino
9kbossgame? Man, I’ve had some good nights there. Feels like a proper place to unwind. Not too shabby at all. You should try it! Hop on 9kbossgame.
**mitolyn**
Mitolyn is a carefully developed, plant-based formula created to help support metabolic efficiency and encourage healthy, lasting weight management.