
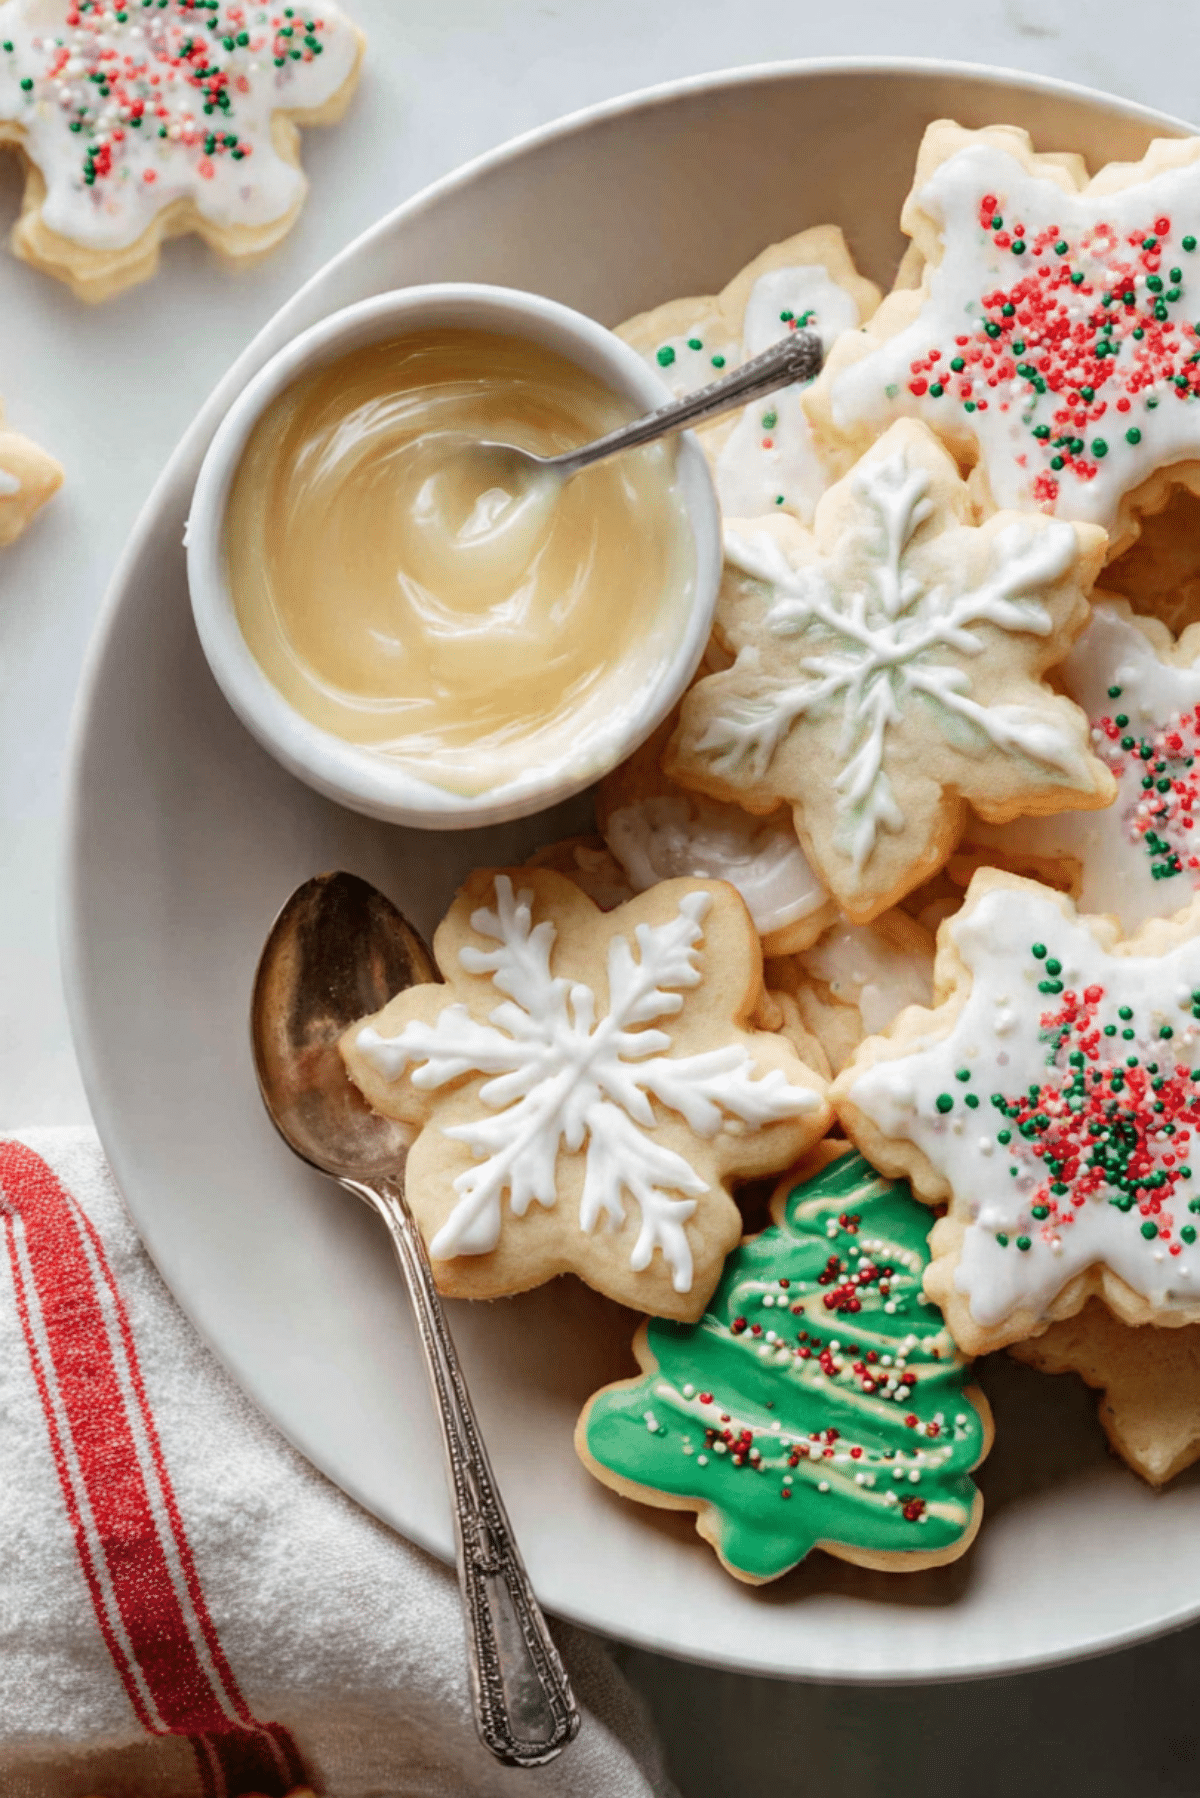
There’s something about perfectly decorated sugar cookies that just feels like magic. Whether it’s the holidays, birthdays, or just a fun afternoon in the kitchen, this Sugar Cookie Icing brings your cookies to life. Smooth, glossy, and easy to color or flavor, this icing dries beautifully with a soft shine, making it ideal for intricate designs or simple swirls. It’s easy to whip up, forgiving for beginners, and dries with that satisfying crack when you take a bite — trust me, it’s worth every swirl and squeeze.
Disclosure: This post contains affiliate links.If you click and make a purchase, I may earn a small commission at no extra cost to you.


Behind the Recipe
This icing recipe was born out of a baking marathon before a holiday cookie exchange. I needed something that would look beautiful, set firmly enough for stacking, but still taste better than cardboard. After a few sticky fails, this combination of powdered sugar, milk, corn syrup, and vanilla became my go-to. It’s smooth, customizable, and most importantly, it actually tastes good. Ever since then, it’s been the secret behind my most complimented cookies.
Recipe Origin or Trivia
While royal icing has long been the traditional choice for cookie decorating, many bakers prefer this corn syrup-based icing for its ease and glossy finish. Unlike royal icing, this version doesn’t require egg whites or meringue powder, making it simpler for everyday use. Its smooth texture and beautiful set make it popular for “flooding” cookie surfaces, outlining, or even writing messages. Over time, it’s become a staple for cookie decorators who want looks and flavor in one.
Why You’ll Love Sugar Cookie Icing
This icing is a must-have for decorators and cookie lovers alike:
Versatile: Works for outlining, flooding, drizzling, and fine details.
Budget-Friendly: Just a handful of pantry staples go a long way.
Quick and Easy: Mix it up in under five minutes with no special equipment.
Customizable: Add flavors, colors, or adjust consistency to fit any decorating style.
Crowd-Pleasing: Tastes sweet and smooth, not chalky or overly hard like royal icing.
Make-Ahead Friendly: Store it in an airtight container and use over a few days.
Great for Leftovers: Thin it out and drizzle over cakes, donuts, or muffins.
Chef’s Pro Tips for Perfect Results
Decorating cookies doesn’t have to be tricky. These tips will keep your icing smooth and easy to work with:
- Sift the powdered sugar: This keeps your icing lump-free and smooth.
- Adjust consistency slowly: Add milk a few drops at a time to avoid over-thinning.
- Use clear vanilla: If you want bright white icing, go with clear vanilla extract.
- Divide and conquer: Separate icing into bowls and tint with gel food coloring before decorating.
- Cover when resting: Icing dries quickly, so cover bowls with plastic wrap when not in use.
Kitchen Tools You’ll Need
Here’s what you’ll need to whip up and apply this icing like a pro:
Mixing bowl: To combine your ingredients.
Spoon or whisk: For mixing to a smooth texture.
Measuring cups and spoons: For accurate results.
Squeeze bottles or piping bags: For easy application and precision.
Toothpicks or scribe tools: For fine details and smoothing out bubbles.
Plastic wrap or lids: To prevent icing from crusting while resting.
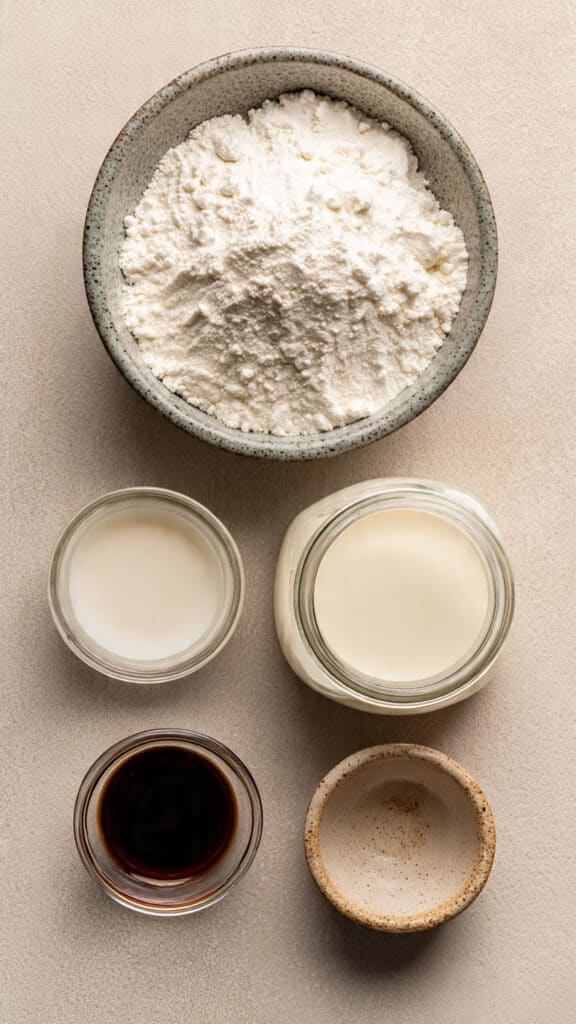
Ingredients in Sugar Cookie Icing
These simple ingredients combine to create a smooth, glossy icing that’s perfect for decorating.
- Powdered Sugar (sifted): 2 cups. The base of the icing, providing structure and sweetness.
- Milk: 2 tablespoons (plus more as needed). Thins the icing to your desired consistency.
- Light Corn Syrup: 2 tablespoons. Adds gloss and helps the icing set with a soft shine.
- Vanilla Extract (or Clear Vanilla): ½ teaspoon. Brings in subtle flavor without overpowering.
Ingredient Substitutions
Need to make a few swaps? Here’s how:
Milk: Use water or plant-based milk (like almond or oat) for a dairy-free version.
Light Corn Syrup: Honey or glucose syrup can be used, but the shine may vary.
Vanilla Extract: Try almond extract or lemon extract for a fun twist.
Ingredient Spotlight
Light Corn Syrup: This is the secret to that glossy finish. It also helps the icing set without becoming brittle, giving your cookies a soft crackle when you bite in — not a hard crunch.
Powdered Sugar: Make sure it’s finely sifted. Any lumps will show up in your designs or clog your piping tips.
Instructions for Making Sugar Cookie Icing
Let’s get into it — here’s how to mix up your icing in no time.
1. Preheat Your Equipment:
No need for heat, but prep your workspace with clean bowls, piping bags, and your decorated cookies.
2. Combine Ingredients:
In a bowl, whisk together sifted powdered sugar, 2 tablespoons milk, corn syrup, and vanilla extract until smooth.
3. Prepare Your Cooking Vessel:
If icing feels too thick, add more milk ½ teaspoon at a time. If too thin, add more powdered sugar.
4. Assemble the Dish:
Divide the icing into bowls and color as needed. Use thicker icing for outlines and thinner (flood) icing for filling in shapes.
5. Cook to Perfection:
No cooking required, but allow decorated cookies to dry at room temperature for 6 to 8 hours or overnight.
6. Finishing Touches:
Add sprinkles while the icing is still wet if desired. Use toothpicks to pop bubbles and smooth edges.
7. Serve and Enjoy:
Once the icing is set, your cookies are ready to stack, package, or share!
Texture & Flavor Secrets
This icing dries smooth and firm, but not rock hard. The corn syrup gives it a gentle sheen, while the milk keeps it soft enough to bite through without flaking off. The vanilla flavor adds a whisper of sweetness that complements the sugar cookie base beautifully.
Cooking Tips & Tricks
Here are a few extra tips to make the decorating process smooth and stress-free:
- Use gel food coloring to avoid thinning your icing.
- Store leftover icing in airtight containers with a damp paper towel on top to prevent crusting.
- Practice piping on parchment paper before starting on cookies.
- Label icing bags by color and consistency for easy access.
What to Avoid
These common mistakes can throw off your icing game — but they’re easy to fix:
- Too runny: Add more powdered sugar if the icing spreads too quickly.
- Lumpy icing: Always sift powdered sugar first.
- Cracks in dried icing: This can happen if the icing is applied too thin or dries too quickly.
Nutrition Facts
Servings: Enough for 24 medium cookies
Calories per serving: 45
Note: These are approximate values.
Preparation Time
Prep Time: 5 minutes
Cook Time: 0 minutes
Total Time: 5 minutes
Make-Ahead and Storage Tips
This icing is fantastic for planning ahead. Store it in an airtight container at room temperature for up to 3 days or in the fridge for up to a week. Let it come to room temperature and stir well before using. Decorated cookies can be stored at room temp in a single layer or with parchment between layers.
How to Serve Sugar Cookie Icing
Use it to decorate sugar cookies for holidays, birthdays, or themed parties. It also works well for dipping graham crackers or creating edible art on cupcakes. Pair it with classic vanilla sugar cookies or almond cookies for a perfect match.
Creative Leftover Transformations
Thin leftover icing slightly and drizzle over cinnamon rolls, muffins, donuts, or pancakes. You can even add cocoa powder or cinnamon for a spiced twist. Or dip pretzels and let dry for a sweet-salty snack.
Additional Tips
- Add a drop of glycerin for extra shine if desired.
- For more complex designs, layer colors and let each layer dry before adding the next.
- Use edible markers on dried icing for writing or drawing.
Make It a Showstopper
Decorate cookies in themes — snowflakes, hearts, or initials. Use pearl sprinkles, edible glitter, or metallic dust for a fancy finish. Line them up in a box with parchment for a gift-worthy presentation.
Variations to Try
- Lemon Glaze: Use lemon juice instead of milk for a citrusy twist.
- Almond Icing: Replace vanilla with almond extract for a nutty note.
- Color Swirl: Add two colors to a piping bag for a marbled effect.
- Maple Vanilla: Add a tiny bit of maple syrup for warmth.
- Coffee Glaze: Use espresso instead of milk for an adult version.
FAQ’s
Q1: How long does this icing take to dry?
A1: 6 to 8 hours at room temperature, or overnight for best results.
Q2: Can I freeze iced cookies?
A2: Yes, once fully dry. Layer with parchment and store in an airtight container.
Q3: Can I use this icing on cakes?
A3: It’s best for cookies, but it can be drizzled over cakes or cupcakes as a glaze.
Q4: Can I flavor the icing?
A4: Absolutely! Use any extract you love — just avoid oil-based ones.
Q5: Is this icing safe for kids?
A5: Yes! It doesn’t contain raw egg like royal icing, making it more kid-friendly.
Q6: How do I make it whiter?
A6: Use clear vanilla and add a touch of white gel food coloring.
Q7: Why is my icing cloudy?
A7: It may need more corn syrup for shine or was over-mixed with air.
Q8: Can I make it vegan?
A8: Yes! Use plant milk and swap corn syrup with agave or maple syrup.
Q9: How long does leftover icing last?
A9: Up to 1 week in the fridge or 3 days at room temp.
Q10: Can I stack the cookies after icing?
A10: Yes, once fully dry. Use parchment between layers to protect designs.
Conclusion
Sugar Cookie Icing is the unsung hero of beautiful baked goods. With just a few pantry staples and a little creativity, you’ll turn simple cookies into edible masterpieces. Whether you’re outlining, flooding, or simply drizzling, this icing delivers every time — glossy, flavorful, and so fun to use.

Sugar Cookie Icing
- Prep Time: 5 minutes
- Cook Time: 0 minutes
- Total Time: 5 minutes
- Yield: Covers approximately 24 medium cookies 1x
- Category: Dessert
- Method: No-Cook
- Cuisine: American
- Diet: Vegetarian
Description
Sugar Cookie Icing is smooth, glossy, and perfect for decorating cookies with detail and color. Made with just a few pantry staples, it sets beautifully and adds a delicious touch of sweetness to every cookie.
Ingredients
- 2 cups powdered sugar, sifted
- 2 tablespoons milk, plus more as needed
- 2 tablespoons light corn syrup
- 1/2 teaspoon vanilla extract (or clear vanilla for bright white)
Instructions
- In a mixing bowl, whisk together powdered sugar, milk, corn syrup, and vanilla extract until smooth and glossy.
- Adjust consistency as needed: add more milk in small amounts to thin, or powdered sugar to thicken.
- Divide icing into separate bowls if using multiple colors, and tint with gel food coloring.
- Use thicker icing for outlining cookies and thinner icing for flooding the inside.
- Apply with piping bags, squeeze bottles, or spoons.
- Allow decorated cookies to dry at room temperature for 6–8 hours or overnight.
Notes
- Use clear vanilla for bright white icing.
- Cover bowls of icing with plastic wrap to prevent crusting while decorating.
- Sift powdered sugar to avoid lumps and clogging piping tips.
- Add decorations or sprinkles before the icing sets.
Nutrition
- Serving Size: for 1 medium cookie
- Calories: 45
- Sugar: 10g
- Sodium: 1mg
- Fat: 0g
- Saturated Fat: 0g
- Unsaturated Fat: 0g
- Trans Fat: 0g
- Carbohydrates: 11g
- Fiber: 0g
- Protein: 0g
- Cholesterol: 0mg