
There’s nothing quite like the smell of a rich, fudgy brownie baking in a skillet, filling the kitchen with deep chocolatey warmth. This Skillet Brownie with Homemade Jarred Brownie Mix brings that indulgence to life in the easiest, most charming way possible. Whether you’re baking it straight from scratch or gifting the mix in a jar, this recipe is all about comfort, simplicity, and pure decadence in every bite.
Disclosure: This post contains affiliate links.If you click and make a purchase, I may earn a small commission at no extra cost to you.


Behind the Recipe
This recipe was born from my love for edible gifts and the magic of homemade mixes. One holiday season, I decided to layer all the dry ingredients of my favorite brownie recipe into glass jars tied with ribbon and a simple “just add wet ingredients” label. When I baked a batch myself using one of those jars, it turned out even better — gooey inside, crispy at the edges, and full of that nostalgic brownie smell that takes you straight back to childhood.
Recipe Origin or Trivia
Brownies were first created in the United States in the late 19th century and quickly became a symbol of home baking. The skillet version is a nod to old-fashioned cooking — using what you have, minimizing dishes, and letting the edges caramelize perfectly in a cast iron pan. The jarred mix twist came from the modern “DIY gift” trend, making it both delicious and thoughtful.
Why You’ll Love Skillet Brownie with Homemade Jarred Brownie Mix Recipe
There’s a reason this recipe belongs in your kitchen rotation:
Versatile: Bake it fresh, gift it, or store it for a rainy day.
Budget-Friendly: Simple pantry ingredients make a luxurious dessert.
Quick and Easy: The mix saves you time when cravings hit.
Customizable: Add nuts, caramel, or even a scoop of ice cream on top.
Crowd-Pleasing: Crispy edges, gooey center — everyone loves it.
Make-Ahead Friendly: The jarred mix keeps for weeks.
Great for Leftovers: Reheat slices for that fresh-baked magic again.
Chef’s Pro Tips for Perfect Results
Every great brownie starts with attention to detail. Here’s how to get it just right:
- Don’t overmix the batter — a few streaks of flour are okay.
- For extra gooey brownies, slightly underbake them.
- Use room temperature eggs and milk to prevent seizing.
- Sprinkle chocolate chunks on top right before baking for a glossy finish.
Kitchen Tools You’ll Need
You won’t need much, but here’s what helps make the process seamless:
Cast Iron Skillet: Gives those crispy edges and gooey middle.
Mixing Bowls: One for wet ingredients, one for the dry mix.
Whisk and Spatula: Perfect for mixing and folding.
Measuring Scale or Cups: Accuracy keeps texture consistent.
Jar with Lid: For storing or gifting your brownie mix.
Oven Mitts: Because that skillet stays hot longer than you think!
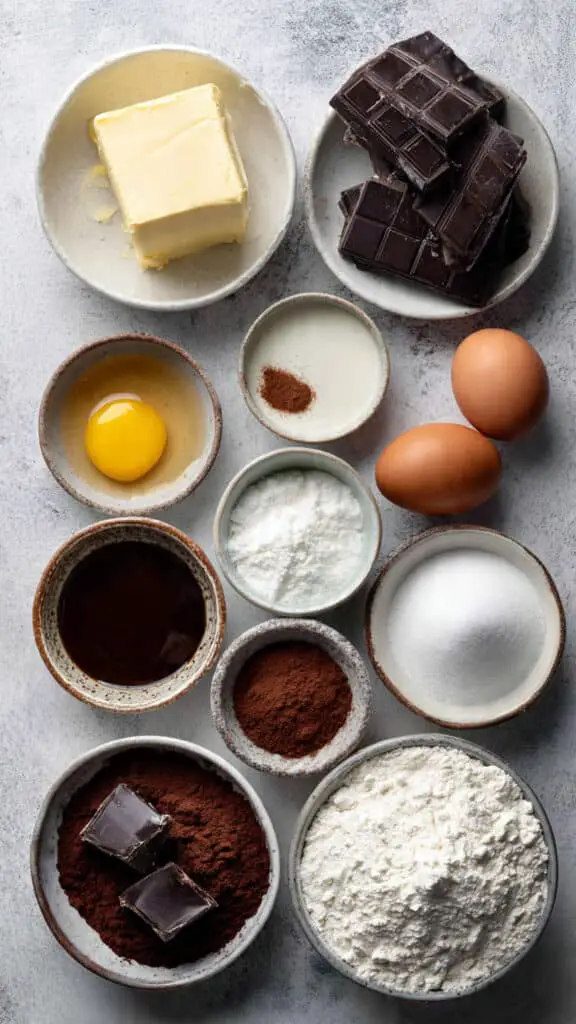
Ingredients in Skillet Brownie with Homemade Jarred Brownie Mix Recipe
This recipe is split between dry ingredients (what you’ll layer in the jar) and wet ingredients (added later to bake). Together, they make one indulgent dessert.
- Unsalted Butter: 2 sticks. Adds richness and moisture to the batter.
- Dark Chocolate: 4 ounces, chopped. Deepens the flavor and creates those melted pockets.
- Vanilla Extract: 1 tablespoon (15 ml). Enhances the chocolate’s natural sweetness.
- Milk: 2 tablespoons, room temperature. Keeps the batter smooth.
- Eggs: 2 large, room temperature. Add structure and chewiness.
- Egg Yolk: 1, room temperature. Adds extra richness and fudginess.
- Brown Sugar: 1/2 cup + 2 tablespoons (125 g). Gives a caramel undertone.
- Powdered Sugar: 1 cup (113 g). Creates a silky texture.
- Dutch-Processed Cocoa Powder: 1/3 cup (30 g). Intensifies the chocolate flavor.
- Espresso Powder: 1 teaspoon. Enhances the chocolate’s depth.
- Flour: 100 g (about 2/3 cup gluten-free or 3/4 cup all-purpose). Binds everything together.
- Kosher Salt: 1 teaspoon. Balances sweetness.
- Dark Chocolate Chunks or Chips: 1/2 cup (100 g, optional). For extra texture and melty bits.
Ingredient Substitutions
Need to make a few swaps? Here are your best options:
Butter: Use coconut oil for a dairy-free version.
Dark Chocolate: Semi-sweet chocolate works too.
Flour: Gluten-free 1:1 blend substitutes perfectly.
Espresso Powder: Replace with instant coffee granules.
Brown Sugar: Coconut sugar for a slightly earthier flavor.
Powdered Sugar: Granulated sugar blended until fine.
Ingredient Spotlight
Dutch-Processed Cocoa Powder: Known for its smooth, less acidic flavor, this cocoa gives brownies a rich, dark hue and a balanced chocolate taste.
Espresso Powder: You won’t taste the coffee, but it deepens the chocolate flavor, making it taste more intense and complex.
Instructions for Making Skillet Brownie with Homemade Jarred Brownie Mix Recipe
Here’s how to bring your homemade mix to life in the skillet:
-
Preheat Your Equipment:
Preheat oven to 350°F (175°C). Grease a 10-inch cast iron skillet. -
Combine Ingredients:
Melt butter and chopped dark chocolate together in a heat-safe bowl over simmering water or in short bursts in the microwave. Stir until smooth. Add vanilla extract, milk, eggs, and egg yolk, whisking until well combined. -
Prepare Your Cooking Vessel:
If you’re using the jar mix, pour all dry ingredients from the jar into a separate bowl. Stir gently to combine. -
Assemble the Dish:
Gradually fold the dry ingredients into the wet mixture until just combined. Avoid overmixing to keep the brownies fudgy. -
Cook to Perfection:
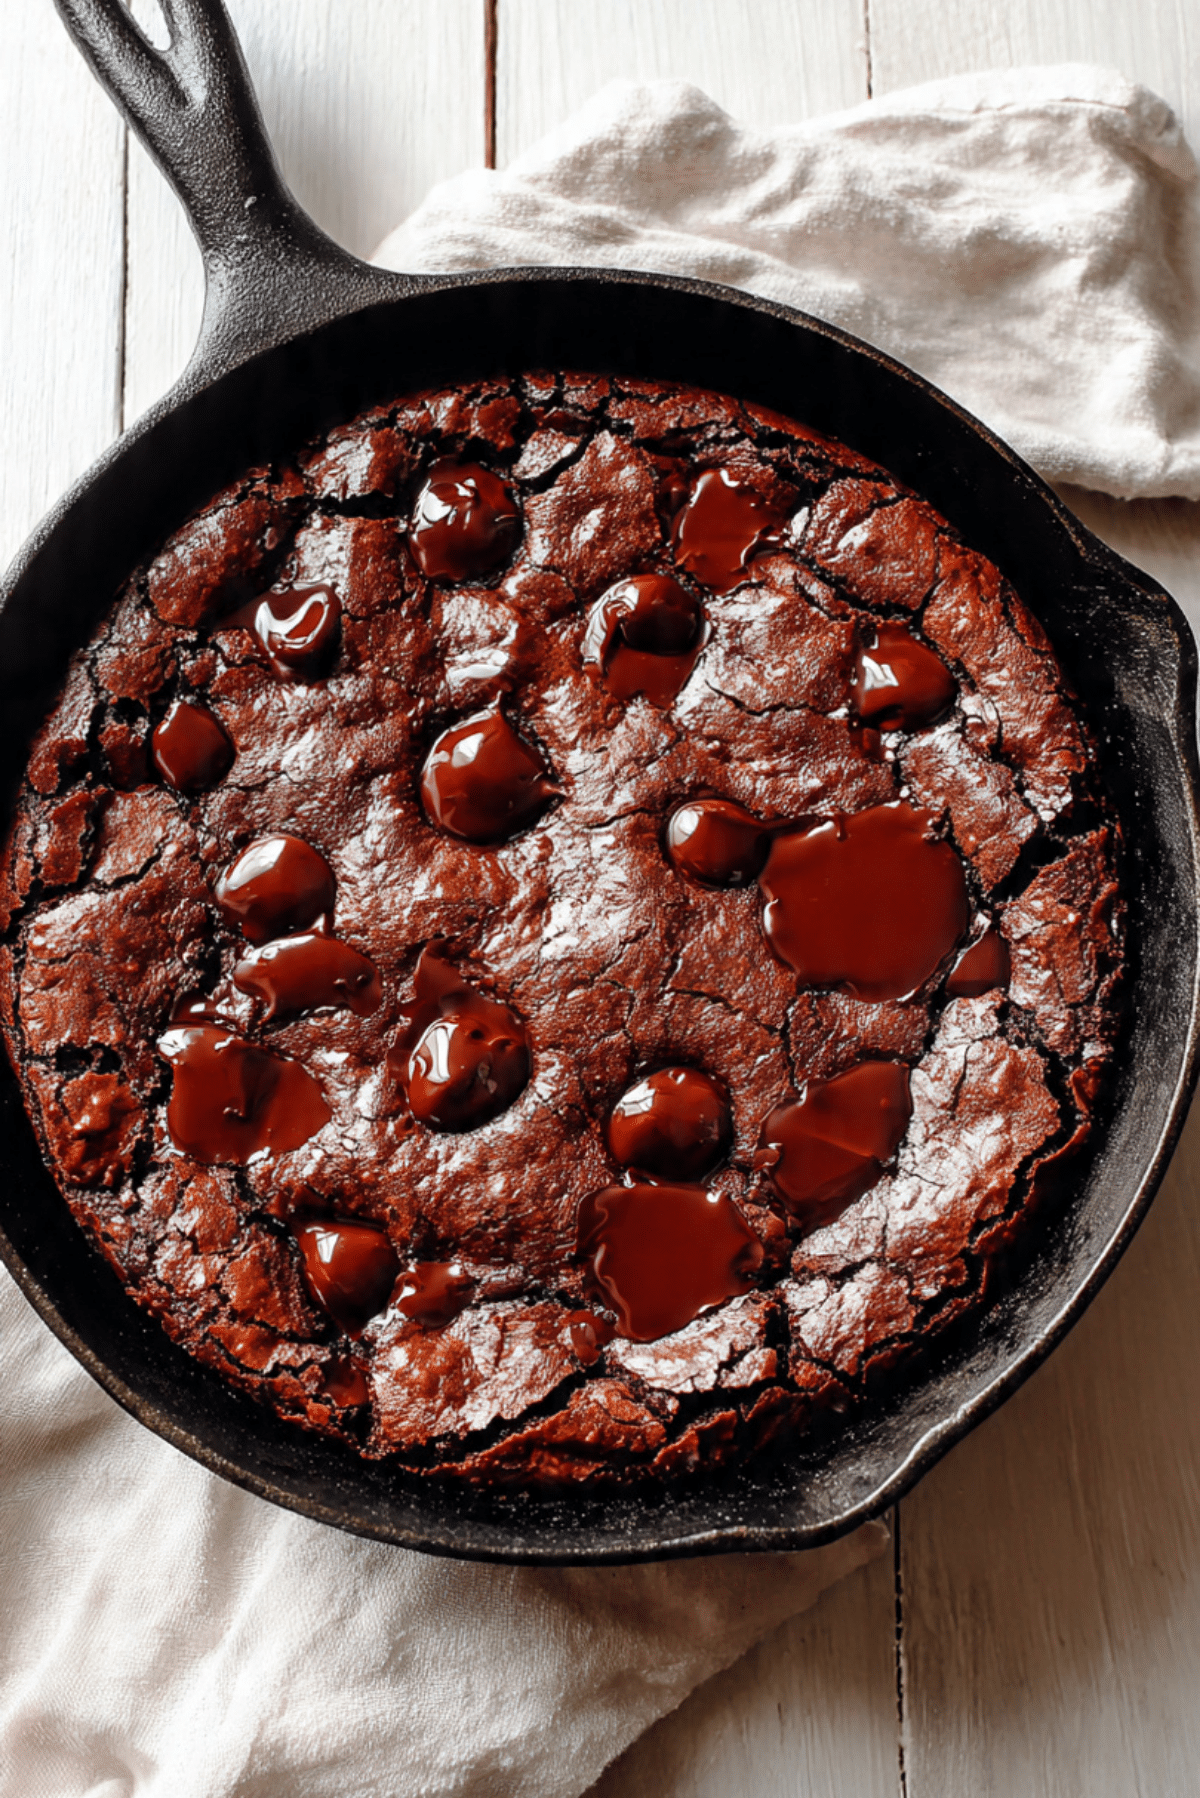
Pour the batter into the skillet and smooth the top. Sprinkle extra chocolate chunks if using. Bake for 25–30 minutes, or until edges are set but the center is still soft. -
Finishing Touches:
Let the brownie cool slightly in the skillet — it will continue to cook a bit as it rests. -
Serve and Enjoy:
Slice warm, top with a scoop of ice cream, or drizzle with caramel for a decadent dessert.
Texture & Flavor Secrets
This brownie delivers the best of both worlds — chewy edges with a molten center. The butter and chocolate combination creates a glossy crust, while the brown sugar and cocoa give it that deep, almost toffee-like flavor. Every bite feels indulgent yet perfectly balanced.
Cooking Tips & Tricks
A few pro tips for brownie perfection:
- Use quality chocolate for the best flavor payoff.
- Bake until just barely set for that fudgy texture.
- Add flaky salt on top before baking for a gourmet finish.
What to Avoid
Keep these in mind for foolproof results:
- Don’t overbake — it’ll turn cakey instead of fudgy.
- Avoid using cold eggs or milk; it can seize the chocolate.
- Don’t overmix once dry ingredients are added.
Nutrition Facts
Servings: 8
Calories per serving: 420
Note: These are approximate values.
Preparation Time
Prep Time: 15 minutes
Cook Time: 30 minutes
Total Time: 45 minutes
Make-Ahead and Storage Tips
If making as a jar mix, store the dry mix in a sealed jar at room temperature for up to 2 months. Once baked, the skillet brownie keeps for 3–4 days covered at room temp or up to a week in the fridge. Reheat gently before serving for that gooey warmth.
How to Serve Skillet Brownie with Homemade Jarred Brownie Mix Recipe
Here’s how to make it extra special:
- Top with vanilla or espresso ice cream.
- Drizzle with chocolate or caramel sauce.
- Dust with powdered sugar for a bakery-style touch.
- Serve right in the skillet for rustic charm.
Creative Leftover Transformations
Got a few slices left? Try this:
- Crumble into parfaits or sundaes.
- Layer between whipped cream for a brownie trifle.
- Warm and serve with peanut butter drizzle.
Additional Tips
Make your mix and dessert more fun:
- Layer dry ingredients in clear jars for a pretty gift.
- Add a hand-written tag with baking instructions.
- Use dark chocolate chunks for gourmet texture.
Make It a Showstopper
Presentation ideas for when you want to impress:
- Serve warm in the skillet with melting ice cream.
- Sprinkle edible gold dust or chocolate curls on top.
- Drizzle hot fudge just before serving for a dramatic look.
Variations to Try
Give this classic a twist with these ideas:
- Nutty Delight: Add toasted walnuts or pecans.
- Salted Caramel: Swirl caramel into the batter before baking.
- Mint Chocolate: Add peppermint extract and mint chips.
- Mocha Madness: Increase espresso powder for coffee lovers.
- Peanut Butter Swirl: Drop spoonfuls of peanut butter and swirl before baking.
FAQ’s
Q1: Can I make this without a skillet?
A1: Yes, use an 8×8-inch baking pan instead.
Q2: Can I make this gluten-free?
A2: Absolutely, just use a 1:1 gluten-free flour blend.
Q3: What’s the shelf life of the jar mix?
A3: It lasts up to 2 months in a cool, dry place.
Q4: Can I add nuts or caramel to the jar mix?
A4: Yes, just layer them separately at the top.
Q5: How do I know when it’s done?
A5: The edges should look set, and the center should jiggle slightly.
Q6: Can I double the recipe?
A6: Yes, but use a larger skillet or bake in two pans.
Q7: Can I use cocoa instead of melted chocolate?
A7: You can, but you’ll lose some richness — stick to both for best results.
Q8: Is espresso powder necessary?
A8: It’s optional, but it really enhances the chocolate flavor.
Q9: Can I prepare the wet and dry parts separately ahead of time?
A9: Yes, keep the mix sealed and add wet ingredients when ready to bake.
Q10: How should I store leftovers?
A10: Keep covered at room temp for up to 3 days or refrigerate up to a week.
Conclusion
This Skillet Brownie with Homemade Jarred Brownie Mix is proof that dessert can be simple, cozy, and impressive all at once. Whether you bake it for yourself or gift it to someone special, every bite feels like a little homemade luxury — gooey, rich, and undeniably chocolatey. Trust me, it’s worth every spoonful.
Print
Skillet Brownie with Homemade Jarred Brownie Mix Recipe
- Prep Time: 15 minutes
- Cook Time: 30 minutes
- Total Time: 45 minutes
- Yield: 8 servings 1x
- Category: Dessert
- Method: Baking
- Cuisine: American
- Diet: Vegetarian
Description
A rich, fudgy skillet brownie made from a homemade jarred brownie mix. Crispy at the edges, gooey in the center, and packed with deep chocolate flavor — the perfect dessert to bake or gift.
Ingredients
- 2 sticks unsalted butter
- 4 ounces dark chocolate, chopped
- 1 tablespoon vanilla extract (15 ml)
- 2 tablespoons milk, room temperature
- 2 large eggs, room temperature
- 1 egg yolk, room temperature
- 1/2 cup + 2 tablespoons brown sugar (125 g)
- 1 cup powdered sugar (113 g)
- 1/3 cup Dutch-processed cocoa powder (30 g)
- 1 teaspoon espresso powder
- 100 g flour (about 2/3 cup gluten-free or 3/4 cup all-purpose)
- 1 teaspoon kosher salt
- 1/2 cup dark chocolate chunks or chips (100 g, optional)
Instructions
- Preheat oven to 350°F (175°C). Grease a 10-inch cast iron skillet.
- Melt butter and chopped dark chocolate together over low heat or in the microwave until smooth. Stir in vanilla extract, milk, eggs, and egg yolk until combined.
- In a separate bowl, combine brown sugar, powdered sugar, cocoa powder, espresso powder, flour, and salt.
- Fold the dry ingredients into the wet mixture until just combined. Do not overmix.
- Pour the batter into the skillet, smoothing the top. Sprinkle dark chocolate chunks on top if using.
- Bake for 25–30 minutes, or until edges are set but the center remains soft.
- Cool slightly before slicing. Serve warm with ice cream or whipped cream.
Notes
- Use high-quality chocolate for the richest flavor.
- For fudgier brownies, bake slightly less time.
- Store dry mix in a jar for up to 2 months.
- To gift, attach a label with wet ingredient list and baking instructions.
Nutrition
- Serving Size: 1 slice
- Calories: 420
- Sugar: 33g
- Sodium: 210mg
- Fat: 24g
- Saturated Fat: 14g
- Unsaturated Fat: 8g
- Trans Fat: 0g
- Carbohydrates: 50g
- Fiber: 3g
- Protein: 5g
- Cholesterol: 115mg
It’s fascinating how quickly online gaming evolved in Southeast Asia! Platforms like luckyking app are really streamlining the experience – easy registration & security are key for wider adoption, don’t you think? A solid foundation for growth!
Alright, who’s chasing the big one? Jackpot777br seems promising enough. The name alone gets you pumped, doesn’t it? I’ve put a few quid in, haven’t hit the jackpot YET, but there’s always tomorrow! See if you have better luck at jackpot777br.