
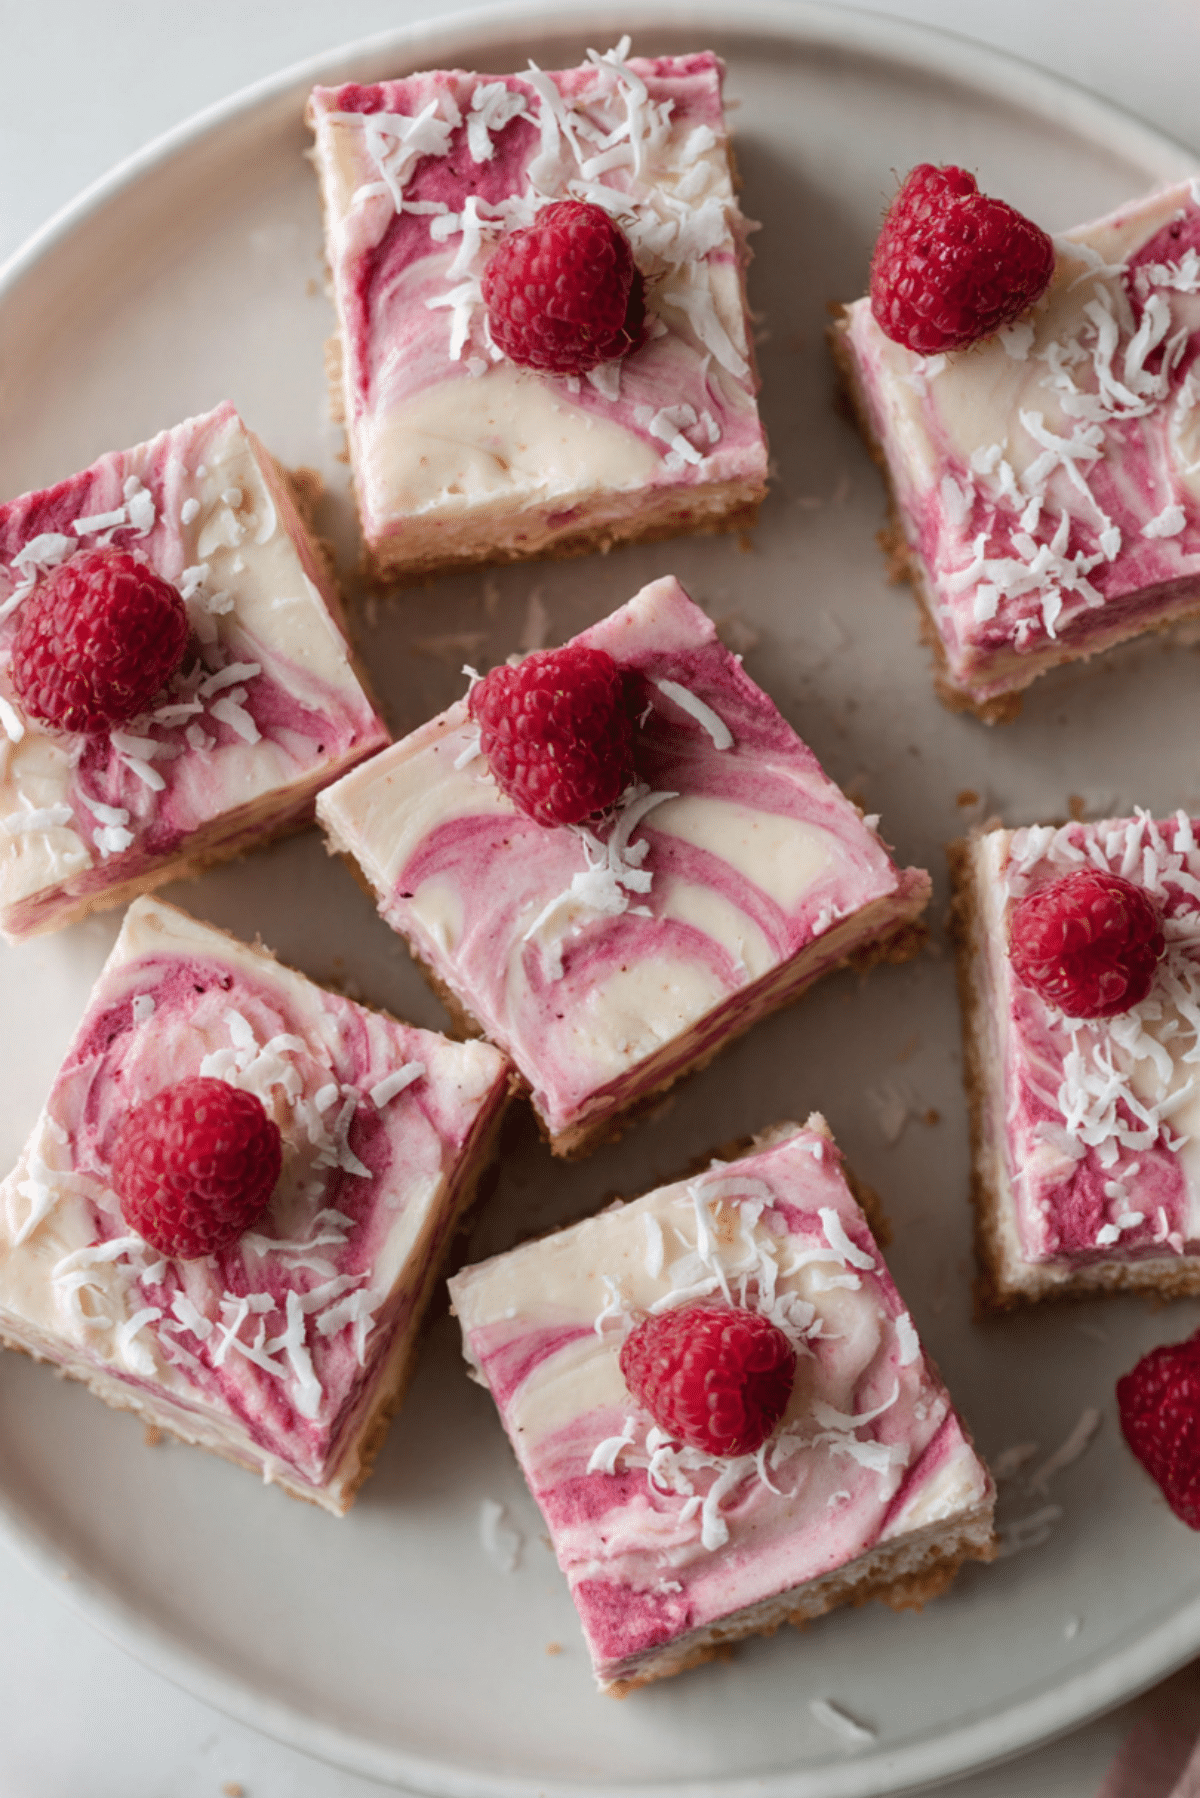
There is something about a thick, creamy cheesecake layered over a golden crust that just feels like pure comfort. These raspberry cheesecake bars take that comfort and turn it into something bright, fruity, and completely irresistible. The creamy pink filling, swirled gently with raspberries and finished with a sprinkle of coconut, looks almost too pretty to slice. Almost. Trust me, you’re going to love this.
Disclosure: This post contains affiliate links.If you click and make a purchase, I may earn a small commission at no extra cost to you.


Each bite is smooth and rich, with that sweet tang from the raspberries cutting through the creaminess in the best way. The buttery biscuit base adds just the right crunch underneath. Let me tell you, it’s worth every bite.
A Creamy Dessert That Feels Bakery Worthy
There is a special kind of joy in slicing into neat little squares and seeing those beautiful layers. The contrast between the crumbly golden crust and the silky raspberry cheesecake layer makes these bars feel elegant yet comforting at the same time.
They are perfect for gatherings, afternoon coffee, or even as a chilled dessert on a warm day. And the best part is how simple they are to put together. No complicated techniques, just good ingredients coming together beautifully.
A Sweet Classic with a Fruity Twist
Cheesecake has been around for centuries, evolving from simple baked versions to chilled, no bake favorites. Adding fruit has always been a popular way to lighten the richness, and raspberries are a natural choice. Their bright color and gentle tartness balance the creamy base perfectly.
Turning cheesecake into bars makes it easier to serve and share. It is a modern take on a classic dessert, and it feels both nostalgic and fresh at the same time.
Why This Recipe Always Delivers
Before we dive into the details, here is why these bars will quickly become a favorite.
Versatile: Perfect for parties, picnics, or as a make ahead dessert for family dinners.
Budget-Friendly: Simple ingredients like biscuits, cream cheese, and raspberries go a long way.
Quick and Easy: Straightforward steps with no complicated techniques.
Customizable: You can swap raspberries for strawberries or blueberries.
Crowd-Pleasing: The creamy texture and fruity flavor appeal to all ages.
Make-Ahead Friendly: They need chilling time, which makes them ideal to prepare in advance.
Great for Leftovers: They store beautifully in the refrigerator for days.
Pro Tips for the Perfect Texture
A few thoughtful touches make all the difference.
- Press the crust firmly into the pan so it holds together when sliced.
- Make sure the cream cheese is at room temperature for a smooth filling.
- Gently fold in raspberries to create swirls without fully blending.
- Chill thoroughly before slicing for clean, neat bars.
Kitchen Tools That Make It Easy
You do not need anything fancy, just a few reliable tools.
Mixing Bowl: For combining the crust and filling ingredients.
Springform or Square Pan: Helps create even layers and easy slicing.
Spatula: For smoothing the cheesecake layer evenly.
Food Processor or Rolling Pin: To crush the biscuits into fine crumbs.
Sharp Knife: For cutting clean, neat squares.
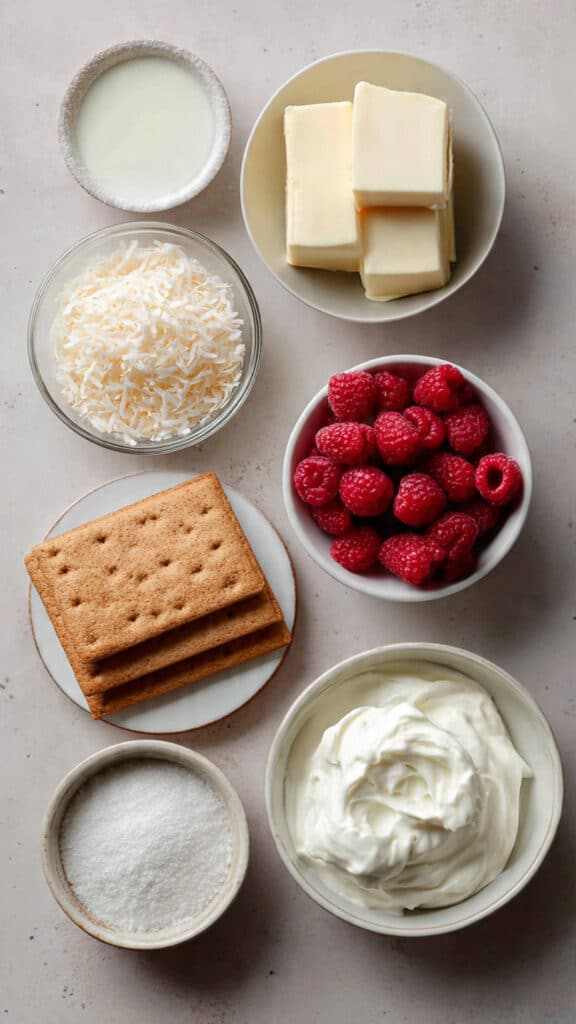
Ingredients You Will Need For These Bars
Each ingredient plays a specific role in building flavor and texture.
- Digestive Biscuits or Graham Crackers: 200 grams. Crushed to create the buttery base.
- Melted Butter: 100 grams. Binds the crumbs into a firm crust.
- Cream Cheese: 400 grams. Forms the rich and creamy cheesecake layer.
- Granulated Sugar: 100 grams. Adds sweetness and balances the tang.
- Fresh Raspberries: 200 grams. Provide color, flavor, and natural tartness.
- Heavy Cream: 200 milliliters. Whipped into the filling for extra smoothness.
- Shredded Coconut: 50 grams. Sprinkled on top for texture and a subtle tropical note.
Easy Ingredient Swaps
Sometimes a small change can give a new twist.
Fresh Raspberries: Use strawberries or blueberries instead.
Digestive Biscuits: Any plain sweet biscuit works well.
Shredded Coconut: Leave it out or replace with white chocolate shavings.
Spotlight on the Key Ingredients
Let’s take a closer look at what makes these bars shine.
Cream Cheese: The foundation of the filling, providing that rich, smooth texture.
Fresh Raspberries: Their natural tartness cuts through the sweetness and keeps the dessert balanced.
Let’s Make These Beautiful Bars
Now let dive into the process. It is simple, and watching the layers come together is so satisfying.
- Preheat Your Equipment: If baking the crust lightly, preheat the oven to 180 degrees Celsius. Line a square pan with parchment paper.
- Combine Ingredients: Crush the 200 grams digestive biscuits into fine crumbs. Mix with 100 grams melted butter until evenly combined.
- Prepare Your Cooking Vessel: Press the crumb mixture firmly into the base of the prepared pan to form an even layer. Bake for 8 to 10 minutes if desired, then allow to cool completely.
- Assemble the Dish: In a large bowl, beat 400 grams cream cheese with 100 grams granulated sugar until smooth. In a separate bowl, whip 200 milliliters heavy cream until soft peaks form. Gently fold the whipped cream into the cream cheese mixture. Fold in 200 grams fresh raspberries lightly to create swirls. Spread the filling evenly over the cooled crust. Sprinkle 50 grams shredded coconut over the top.
- Cook to Perfection: This is a no bake filling, so instead of baking, refrigerate for at least 4 hours, or until fully set.
- Finishing Touches: Once chilled and firm, lift from the pan using parchment paper and place on a cutting board.
- Serve and Enjoy: Slice into neat bars with a sharp knife and serve chilled.
The Texture and Flavor Experience
The base is slightly crumbly and buttery, giving way to a smooth, creamy cheesecake layer that melts gently in your mouth. The raspberries add bursts of freshness, while the coconut on top brings a light chew and subtle sweetness. Every bite feels balanced and satisfying.
Extra Tips for Success
- Chill for the full recommended time to ensure clean slices.
- Wipe the knife between cuts for neat edges.
- Use fresh, firm raspberries to avoid excess moisture.
Common Mistakes to Avoid
- Not pressing the crust firmly enough can cause it to crumble.
- Overmixing the raspberries may turn the filling fully pink instead of swirled.
- Cutting before fully set can result in messy bars.
Nutrition Facts
Servings: 12 bars
Calories per serving: Approximately 320
Note: These values are approximate.
Preparation Time
Prep Time: 25 minutes
Cook Time: 10 minutes for crust plus 4 hours chilling time
Total Time: Approximately 4 hours 35 minutes
Make Ahead and Storage Tips
These bars are perfect for making ahead. Store them in an airtight container in the refrigerator for up to 4 days. They can also be frozen for up to one month. Thaw in the refrigerator before serving.
How to Serve Them Beautifully
Serve chilled on a simple white platter to highlight the pink filling. Add a few fresh raspberries on the side for extra color. They also look stunning dusted lightly with powdered sugar just before serving.
Creative Leftover Transformations
Crumble leftover bars over yogurt for a quick dessert parfait. Blend small pieces into a milkshake for a raspberry cheesecake shake. You can even press crumbs into mini cups for bite sized treats.
Additional Helpful Tips
Always allow the cream cheese to soften before mixing. Taste the filling before spreading to adjust sweetness if needed. Keep the bars chilled until just before serving for best texture.
Make It a Showstopper
Slice one bar cleanly in half and place it at the front of your serving plate to show off those beautiful layers. The vibrant pink against the golden crust makes it look straight from a bakery display.
Variations to Try
- Add a layer of raspberry jam between crust and filling.
- Swirl in melted white chocolate for extra richness.
- Use a chocolate biscuit base for deeper flavor.
- Add a squeeze of lemon juice to the filling for extra brightness.
FAQ’s
Q1: Can I use frozen raspberries?
Yes, but thaw and drain them well to prevent excess moisture.
Q2: Do I have to bake the crust?
No, baking helps firm it up, but it can also set in the refrigerator.
Q3: How long do they need to chill?
At least 4 hours for best results.
Q4: Can I make them a day ahead?
Yes, they are perfect for preparing the day before serving.
Q5: How do I get clean slices?
Use a sharp knife and wipe it clean between each cut.
Q6: Can I reduce the sugar?
Yes, adjust slightly to taste.
Q7: Can I skip the coconut?
Yes, it is optional.
Q8: Are these freezer friendly?
Yes, wrap tightly and freeze up to one month.
Q9: Can I use low fat cream cheese?
Yes, but the texture may be slightly less rich.
Q10: Why is my filling soft?
It may need more chilling time to fully set.
Conclusion
These raspberry cheesecake bars bring together creamy, fruity, and buttery layers in the most satisfying way. They are simple to make, beautiful to serve, and full of bright flavor. Once you try them, they will quickly earn a permanent spot in your dessert rotation.
Print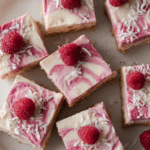
Raspberry Cheesecake Bars
- Prep Time: 25 minutes
- Cook Time: 10 minutes plus 4 hours chilling time
- Total Time: 4 hours 35 minutes
- Yield: 12 bars 1x
- Category: Dessert
- Method: No Bake
- Cuisine: American
- Diet: Vegetarian
Description
Creamy raspberry cheesecake bars layered over a buttery biscuit crust and topped with shredded coconut. These no bake bars are smooth, fruity, and perfectly balanced between sweet and tangy, making them an ideal make-ahead dessert.
Ingredients
- 200 grams digestive biscuits or graham crackers
- 100 grams melted butter
- 400 grams cream cheese
- 100 grams granulated sugar
- 200 grams fresh raspberries
- 200 milliliters heavy cream
- 50 grams shredded coconut
Instructions
- Preheat the oven to 180 degrees Celsius if baking the crust. Line a square pan with parchment paper.
- Crush the 200 grams digestive biscuits or graham crackers into fine crumbs using a food processor or rolling pin.
- Mix the crumbs with 100 grams melted butter until evenly combined.
- Press the crumb mixture firmly into the base of the prepared pan to form an even layer.
- Bake the crust for 8 to 10 minutes if desired, then allow it to cool completely. Alternatively, chill in the refrigerator until firm.
- In a large bowl, beat 400 grams cream cheese with 100 grams granulated sugar until smooth and creamy.
- In a separate bowl, whip 200 milliliters heavy cream until soft peaks form.
- Gently fold the whipped cream into the cream cheese mixture until fully combined.
- Lightly fold in 200 grams fresh raspberries to create gentle swirls without fully blending.
- Spread the filling evenly over the cooled crust and smooth the top with a spatula.
- Sprinkle 50 grams shredded coconut evenly over the surface.
- Refrigerate for at least 4 hours, or until fully set.
- Lift from the pan using the parchment paper, slice into 12 bars, and serve chilled.
Notes
- Make sure the cream cheese is at room temperature for a smooth filling.
- Chill thoroughly before slicing to achieve clean edges.
- Wipe the knife between cuts for neat, professional looking bars.
Nutrition
- Serving Size: 1 bar
- Calories: 320 kcal
- Sugar: 18 g
- Sodium: 190 mg
- Fat: 23 g
- Saturated Fat: 14 g
- Unsaturated Fat: 7 g
- Trans Fat: 0 g
- Carbohydrates: 25 g
- Fiber: 2 g
- Protein: 4 g
- Cholesterol: 65 mg