
Fluffernutter bars. Just saying the name makes your sweet tooth tingle, right? If you’ve never had one, get ready for a dessert that combines the creamy richness of peanut butter, the light sweetness of marshmallow fluff, and the soft chewiness of a perfectly baked bar. Whether you’re a lifelong fluffernutter fan or just curious about what all the fuss is about, this recipe is a certified crowd-pleaser.
Disclosure: This post contains affiliate links.If you click and make a purchase, I may earn a small commission at no extra cost to you.


At Cooktune, we believe dessert should be simple, nostalgic, and a little indulgent. Our passion started with a childhood obsession with peanut butter sandwiches and marshmallow crème, and that obsession turned into a mission—to bring those comforting flavors to your kitchen, one gooey square at a time. Inspired by family recipes and top-ranking baking blogs (check our sitemap for more), we’ve crafted the ultimate fluffernutter bars recipe that delivers on taste, ease, and wow-factor.
Whether you’re baking for a birthday, holiday, or just because it’s a Tuesday, this guide will walk you through every buttery, fluffy step of the process. Bonus? We’ll also cover gluten free fluffernutter bars options, tackle common baking questions like “Why is my marshmallow fluff raised after baking?”, and show you how to make your bars look as good as they taste.
Let’s dive in and discover why easy fluffernutter bars are about to become your new favorite dessert!
Table of Contents
Table of Contents
What Are Fluffernutter Bars?
If you’ve ever heard of a fluffernutter sandwich—peanut butter and marshmallow fluff slapped between two slices of white bread—you’ve already got the basic concept. Now imagine that sandwich reimagined as a dessert bar: denser, chewier, and way more indulgent. That’s exactly what fluffernutter bars deliver.
These bars start with a peanut butter cookie base that’s both soft and rich, then get topped with a light, sugary marshmallow frosting made from marshmallow fluff and butter. Some recipes, like those from The FeedFeed and other top blogs, add chopped peanuts or crushed Nutter Butters on top for crunch. You can totally customize them to fit your cravings.
There’s also been a rise in gluten free fluffernutter bars, especially for those with dietary needs. You can easily substitute regular flour with a 1:1 gluten-free baking mix without sacrificing taste or texture. The result? A dreamy, chewy square that’s completely gluten free and totally irresistible.
These aren’t just some passing dessert trend—they’re a nostalgic favorite turned modern masterpiece. From bake sales to Instagram-worthy snack boards, fluffernutter bars are showing up everywhere, and for good reason.
Print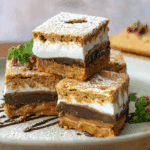
How to Make the Best Fluffernutter bars Dessert Recipe?
- Prep Time: 15 minutes
- Cook Time: 30 minutes
- Total Time: 45 minutes
- Yield: 12 bars 1x
- Category: Dessert
- Method: Baking
- Cuisine: American
- Diet: Vegetarian
Description
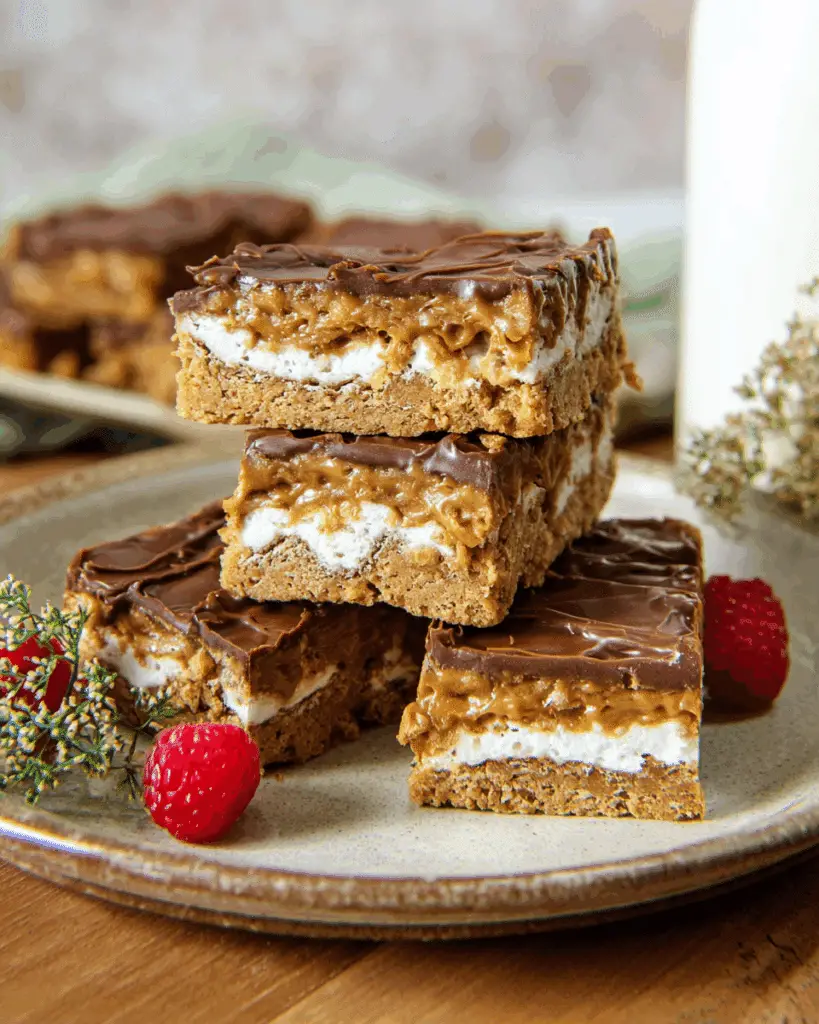
These gooey, sweet Fluffernutter Bars combine creamy peanut butter, marshmallow fluff, and crushed Nutter Butter cookies into a nostalgic, crowd-pleasing treat. Perfectly chewy and rich with classic flavor.
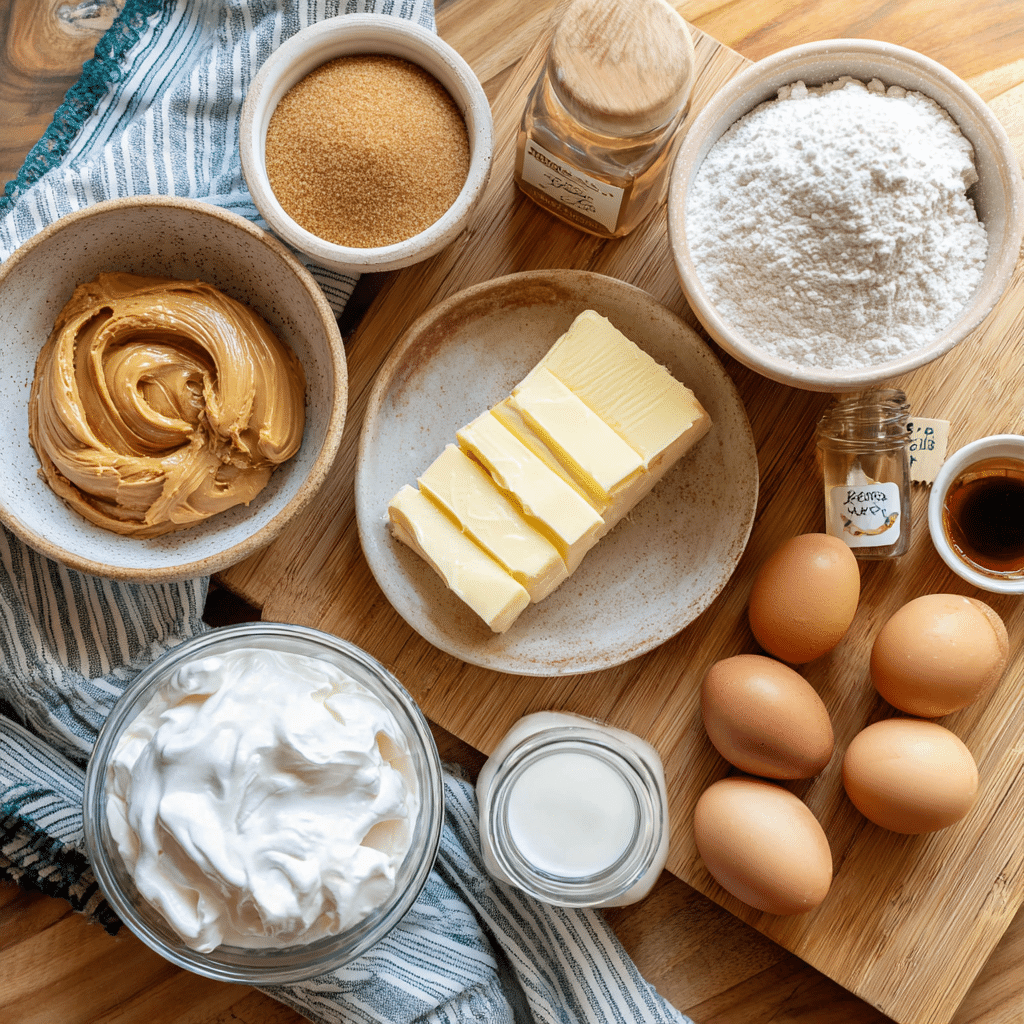
Ingredients
- 1/2 cup butter, room temperature
- 1/2 cup creamy peanut butter
- 3/4 cup light brown sugar
- 1 egg, room temperature
- 1 tablespoon vanilla extract
- 1 1/2 cups all-purpose flour
- 1/2 teaspoon salt
- 1 cup marshmallow fluff
- 6–8 Nutter Butter sandwich cookies, roughly crushed
Instructions
- Preheat oven to 350°F (175°C). Grease or line an 8×8-inch baking dish with parchment paper.
- In a large mixing bowl, cream together the butter, peanut butter, and brown sugar until light and fluffy.
- Add the egg and vanilla, mixing until fully incorporated.
- Stir in the flour and salt until a soft dough forms.
- Spread 2/3 of the dough evenly in the bottom of the prepared pan.
- Gently spread the marshmallow fluff over the dough layer (it’s okay if it doesn’t fully reach the edges).
- Drop spoonfuls of the remaining dough on top and gently press to cover most of the fluff.
- Top with crushed Nutter Butter cookies, pressing them lightly into the dough.
- Bake for 25–30 minutes, or until the top is golden and set.
- Allow to cool completely in the pan before cutting into bars.
Notes
- Wet your fingers or use parchment to press down the sticky dough easily.
- For neater slices, chill the bars before cutting.
- Store in an airtight container for up to 4 days.
Nutrition
- Serving Size: 1 bar
- Calories: 280
- Sugar: 18g
- Sodium: 180mg
- Fat: 15g
- Saturated Fat: 6g
- Unsaturated Fat: 8g
- Trans Fat: 0g
- Carbohydrates: 32g
- Fiber: 1g
- Protein: 4g
- Cholesterol: 30mg
Ingredients You’ll Need
Creating the ultimate fluffernutter bars recipe starts with the right blend of sweet, salty, and creamy. The beauty of this treat is how simple the ingredient list is—everything is likely already sitting in your pantry. Let’s break down what you’ll need for both the bars and the frosting.
For the Bars:
- 3/4 Cup Unsalted Butter, Melted – Adds richness and moisture.
- 1 Cup Brown Sugar – Brings that deep caramel-like flavor.
- 1/2 Cup Granulated Sugar – Balances the brown sugar’s molasses tones.
- 2 Eggs – Bind everything together and add structure.
- 2 teaspoons Vanilla Extract – Adds warm, sweet depth.
- 3/4 Cup Creamy Peanut Butter – The heart of all fluffernutter bars.
- 1/2 teaspoon Salt – Enhances the flavor.
- 1 1/2 Cups All-Purpose Flour – For structure and chew.
Want to go gluten-free? Swap in your favorite 1:1 gluten-free flour to make gluten free fluffernutter bars without compromising taste or texture!
For the Frosting:
- 1/2 Cup Unsalted Butter, Softened – Helps achieve a creamy consistency.
- 1 (7 oz) Container Marshmallow Fluff – The classic fluffernutter flavor hero.
- 2 Cups Powdered Sugar – Sweetens and thickens the frosting.
- 1/2 Cup Chopped Peanuts – Optional, for crunch and contrast.
Pro Tip: You can also crumble some Nutter Butters on top for a bonus peanut butter punch. But if you’re asking…
Do I Have to Add Nutter Butters on Top?
Nope! While crushed Nutter Butters make for a fun, extra-peanutty topping, they’re totally optional. The bars are plenty flavorful and decadent without them. Still, if you want to go all-in on peanut butter deliciousness, they’re a tasty addition.
Step-by-Step Instructions
Ready to bring these easy fluffernutter bars to life? Let’s get baking.
1. Prep Your Pan & Preheat the Oven
Start by preheating your oven to 350°F (175°C). Grease a 9×13-inch baking pan with nonstick spray or line it with parchment paper for easier cleanup. Set the pan aside.
2. Mix the Wet Ingredients
In a large mixing bowl, beat together:
- Melted butter
- Brown sugar
- Granulated sugar
Use a hand mixer or stand mixer on medium speed until fully blended. Then add:
- Eggs
- Vanilla extract
Beat until the mixture is light and fluffy.
Next, mix in the creamy peanut butter until smooth. This is when that nutty aroma starts to take over your kitchen—in the best way possible.
3. Add Dry Ingredients
In a separate bowl, whisk together:
- All-purpose flour
- Salt
Gradually add the dry ingredients into your wet mixture. Stir just until combined—don’t overmix!
4. Bake to Golden Perfection
Pour the batter into your prepared baking pan and spread evenly using a spatula. Bake for 25 to 30 minutes or until the edges are golden and a toothpick inserted into the center comes out clean.
Once done, let the bars cool completely before frosting. If you try to frost too soon, the marshmallow fluff can melt and slide off. Patience pays off here!
5. Make the Fluff Frosting
In another bowl, beat together:
- Softened butter
- Marshmallow fluff
Gradually add powdered sugar, one cup at a time, until the frosting is thick and spreadable.
6. Assemble Your Fluffernutter Bars
Once the bars have cooled, spread the marshmallow frosting evenly over the top. Sprinkle with chopped peanuts—or go wild with crushed Nutter Butters if you’re feeling bold.
Refrigerate for about 15–20 minutes to help the frosting set. Then, slice into squares and get ready to be the hero of snack time.
Creative Twists on Classic Fluffernutter Bars Recipes
Adding a Chocolate Drizzle or Swirl
Chocolate lovers, rejoice. One of the easiest ways to elevate the classic fluffernutter bars recipe is by adding a decadent chocolate drizzle—or better yet, swirling semi-sweet chips right into the batter. Not only does this balance the sweet marshmallow fluff and salty peanut butter, but it adds richness and visual appeal. For a swirl effect, drop spoonfuls of melted chocolate on the batter before baking, then drag a knife through in figure-eight motions. Drizzle melted chocolate over the frosted bars once they cool for extra flair.
Looking for inspiration? Try this fluffernutter bars version that nails the classic while leaving room for chocolate creativity.
Turning Them Into Fluffernutter Cookie Cups
Another fun variation is baking your batter in a muffin tin for fluffernutter cookie cups. Line each cup with dough, bake slightly less time, and then pipe the marshmallow fluff frosting on top like a cupcake. These mini desserts are perfect for parties and offer bite-sized indulgence.
To take things up a notch, consider pressing a mini peanut butter cup into the center while the cookie cups are still warm for a molten surprise inside.
Making Gluten-Free Fluffernutter Bars
If you’re working with dietary restrictions, there’s great news: gluten free fluffernutter bars are just as rich, chewy, and satisfying. Simply replace the all-purpose flour with a 1:1 gluten-free baking mix and ensure the marshmallow fluff and peanut butter you use are certified gluten-free. You may need to adjust baking time slightly, but the results are amazing.
Discover great ideas like these in our brown sugar pop tart cookies that also work well with gluten-free substitutions.
Experimenting With Toppings: Nutter Butters, Pretzels & More
You’ve probably seen fluffernutter bars the feedfeed features—loaded with eye-catching toppings. Whether you’re sprinkling chopped Nutter Butters, crunchy pretzels, or crushed banana chips, the goal is to add dimension. The creamy-soft texture of these bars benefits from something snappy on top. Nutter Butters bring more peanut punch, while salted pretzels cut through the sweetness beautifully.
Check out what we did with cookie dough ice cream bites for topping inspo that blends textures and flavors seamlessly.
Troubleshooting Common Issues
Even though these easy fluffernutter bars are super straightforward, a few hiccups can happen—especially if it’s your first time baking with marshmallow fluff. But don’t worry, we’ve got you covered with solutions to the most common problems.
Why Is My Marshmallow Fluff Raised After Baking?
This is one of the most frequently asked questions from home bakers. If you’ve noticed your fluff layer puffing up like a balloon in the oven, you’re not alone. But here’s the twist: you’re not supposed to bake the frosting layer at all!
The marshmallow fluff is used in the frosting after the bars are baked and cooled. If you accidentally added it before baking, it reacts to the heat by expanding rapidly—just like marshmallows do when roasted over a fire.
Fix: Always let the base bake and cool completely before adding the frosting. No shortcuts here!
My Bars Are Too Dry—What Went Wrong?
Overbaking is usually the culprit. Even just five extra minutes in the oven can turn chewy into crumbly. Aim for that golden brown color around the edges and a clean toothpick test from the center.
The Frosting Is Too Runny or Too Sweet
If your frosting isn’t holding its shape, it may be because the butter wasn’t soft enough or the fluff was overbeaten. For overly sweet frosting, try balancing with a pinch of salt or adding an extra spoonful of fluff to tone it down.
Recipe Variations & Tips
You can absolutely stick with the classic version of these fluffernutter bars, but part of the fun is experimenting. Here are some popular (and totally delicious) variations to explore.
Gluten Free Fluffernutter Bars
As mentioned earlier, a 1:1 gluten-free flour blend works like magic. You still get that chewy texture and rich flavor without any of the gluten. Make sure your marshmallow fluff and peanut butter are certified gluten-free, and you’re good to go.
Fluffernutter Cookies
Short on time or prefer handheld treats? You can turn this same recipe into fluffernutter cookies! Scoop the dough into balls and bake for 10–12 minutes. Once cooled, spread a dollop of fluff between two cookies for sandwich-style fun.
You can even freeze the cookies and add the fluff filling just before serving for a fresher finish.
Add Chocolate Chips
Peanut butter + marshmallow + chocolate = heaven. Sprinkle chocolate chips into the batter or melt some and drizzle over the frosting for that Reese’s-meets-Fluffernutter vibe.
Make It a Layered Dessert
For party presentations, try layering:
- A crushed peanut butter cookie crust
- Fluff frosting
- Chopped Nutter Butters or peanuts on top
Slice into bite-sized bars and serve on a tray—instant showstopper!
erving, Storing, and Gifting Fluffernutter Bars
Now that your house smells like a peanut butter dream and your fluffernutter bars are frosted and fabulous, let’s talk about what to do next. Whether you’re baking for a casual hangout or prepping a holiday treat tray, these bars are versatile and guaranteed to impress.
How to Serve Fluffernutter Bars
These bars are best served at room temperature, especially if you’ve refrigerated them to firm up the frosting. Cut them into bite-sized squares for parties, or go big with generous chunks if you’re just treating yourself. You can even drizzle a little chocolate syrup or caramel over the top for a sweet upgrade.
They pair beautifully with:
- Cold milk or oat milk
- Coffee or lattes
- Hot cocoa during colder months
Trust us, easy fluffernutter bars are the kind of dessert that works for everything from a kid’s birthday party to a sophisticated bake sale table.
Storage Tips
These fluffernutter bars hold up well for several days if stored properly. Here’s how to keep them fresh:
- Room Temp: Store in an airtight container for up to 3 days.
- Refrigerator: Keeps them fresh for 5–7 days. Just let them come to room temp before serving so the frosting softens.
- Freezer: Yes, you can freeze them! Wrap each square in parchment paper and place in a sealed freezer bag. Freeze for up to 2 months.
Just be sure to defrost overnight in the fridge or on the counter for a few hours before eating.
Gifting Ideas
Want to impress a friend, coworker, or neighbor? Wrap individual bars in clear treat bags and tie with string. Add a little tag that says “You’re Fluffin’ Awesome!” or “Spread the Sweetness.”
Include these fluffernutter bars in holiday cookie boxes along with fluffernutter cookies, brownies, and chocolate chip treats for a balanced variety.
Frequently Asked Questions
Do I Have to Add Nutter Butters on Top?
Not at all! Nutter Butters are a fun, optional topping that adds texture and even more peanut butter goodness, but they’re not required. Your bars will still be ridiculously good without them. If you’re avoiding packaged cookies or want a smoother top, just skip them or replace with chopped peanuts for a crunchy finish.
Why Is My Marshmallow Fluff Raised After Baking?
This question comes up a lot, and it’s usually because the marshmallow fluff was mistakenly baked with the bars. The fluff should be used after baking, as part of the frosting. When exposed to heat, marshmallow fluff puffs up—similar to roasting a marshmallow over a fire. Always wait until the bars are fully cooled before spreading the frosting.
Conclusion: Why Fluffernutter Bars Deserve a Spot in Your Dessert Rotation
By now, you’re probably craving a bite (or five) of these insanely rich, chewy, creamy fluffernutter bars—and we don’t blame you. This dessert blends the best of both worlds: the nutty, salty kick of creamy peanut butter with the dreamy sweetness of marshmallow fluff. Together, they form a nostalgic flavor combo that’s pure magic, whether you grew up eating fluffernutter sandwiches or not.
From their simple ingredients to their decadent frosting and soft texture, these bars check all the boxes:
- Easy to make (even for beginners)
- Customizable with gluten-free or nut-free options
- Crowd-pleasing at parties, holidays, bake sales, or school events
Thanks to their flexibility and over-the-top deliciousness, these easy fluffernutter bars are quickly becoming a staple in kitchens across the country—and honestly, they deserve it.
Looking to mix things up? You can turn this recipe into fluffernutter cookies, use a gluten-free flour for dietary needs, or add toppings like chocolate drizzle or crushed Nutter Butters. Want more recipe ideas and sweet inspiration? Browse our latest updates through the CookingFlash recipe collection and check out these peanut butter cheerio bites from Grandma Recipes Flash to discover even more ways to make your baking stand out.
So whether you’re a peanut butter fanatic, a marshmallow fluff devotee, or just someone who appreciates a truly indulgent treat, fluffernutter bars belong on your dessert table. Trust us—once you make these, they’ll be gone in minutes.