
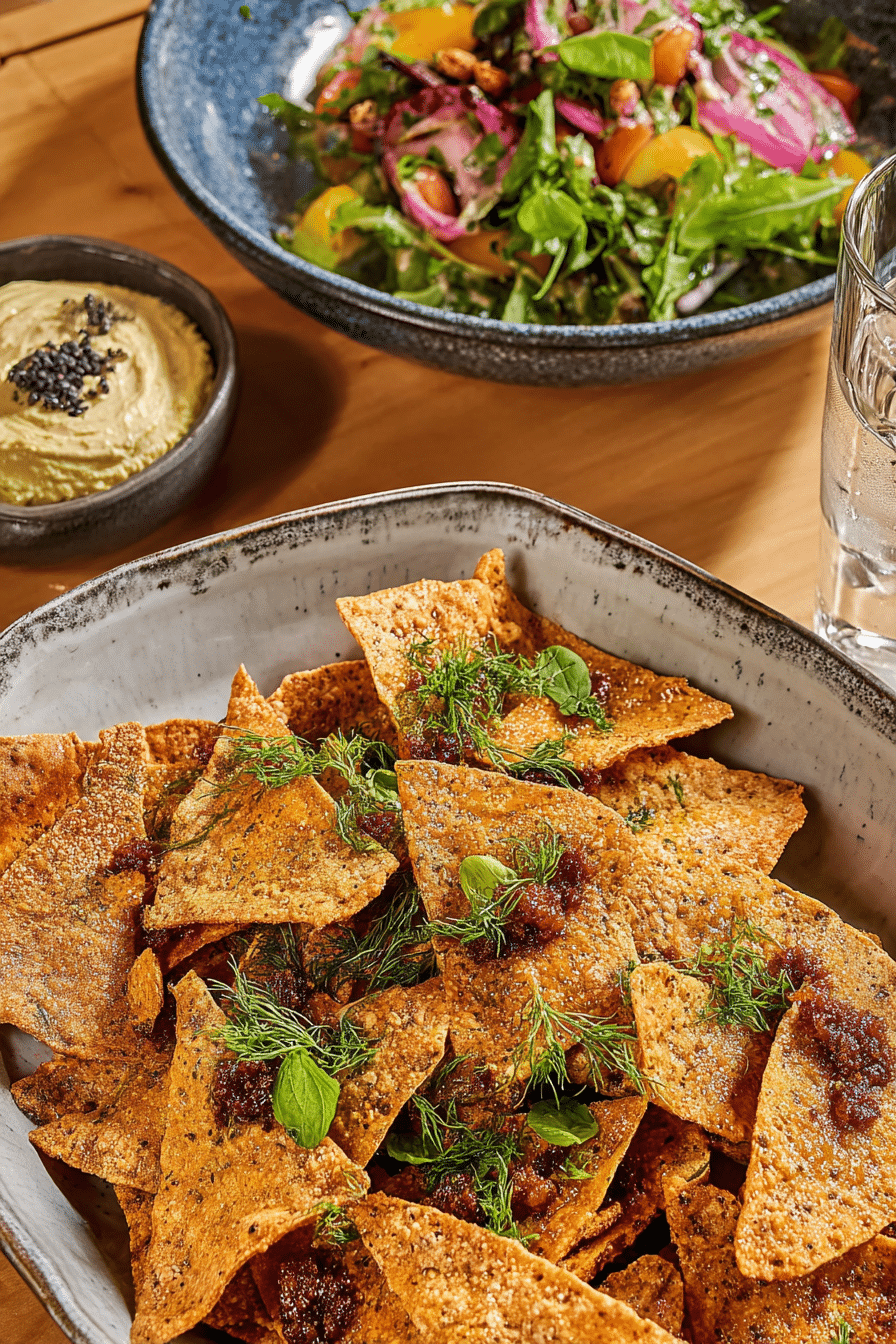
There’s nothing quite like the satisfying crunch of freshly baked pita chips, warm from the oven and dusted with aromatic spices. These chips are crunchy, lightly golden, and carry a subtle warmth from the paprika and cumin that makes them utterly addictive. Imagine breaking one and hearing that perfect snap, the aroma of toasted spices filling your kitchen, and knowing that they’re healthier and more flavorful than store-bought alternatives. Trust me, once you try these, you’ll never go back to packaged chips. They are perfect for dipping, snacking, or adding a little crunch to salads and soups.
Disclosure: This post contains affiliate links.If you click and make a purchase, I may earn a small commission at no extra cost to you.


Recipe Origin
Pita chips come from the classic Middle Eastern flatbread called pita, traditionally eaten with dips like hummus or baba ganoush. By baking them at home with olive oil and spices, we elevate a simple flatbread into a snack that’s crisp, aromatic, and irresistible. This version combines familiar spices like cumin, paprika, and coriander for a warm, slightly smoky flavor that works beautifully with a wide range of dips.
Kitchen Tools You’ll Need
Baking sheet
Knife and cutting board
Mixing bowl
Pastry brush or spoon for tossing
Oven
Why You’ll Love Homemade Pita Chips
This recipe isn’t just about making chips; it’s about creating a snack that’s crunchy, flavorful, and better than anything you can buy.
Versatile: Great with dips, soups, or even as croutons for salads. They’re also perfect for entertaining or casual snacking.
Budget-Friendly: Uses simple pantry ingredients you likely already have. Pita bread transforms into a gourmet snack with minimal effort.
Quick and Easy: From start to finish, you can have crisp, golden chips in under 20 minutes. Even beginners can make them successfully.
Customizable: Adjust the spices to your preference. Love heat? Add cayenne. Prefer smoky flavor? Increase paprika.
Crowd-Pleasing: Crunchy, flavorful, and addictive. Even picky eaters love them, and they’re hard to stop munching once you start.
Chef’s Pro Tips for Perfect Results
Cut pita evenly to ensure uniform baking.
Don’t overcrowd the baking sheet so chips crisp evenly.
Use fresh spices for the most vibrant flavor.
Bake until lightly golden but not burnt for the perfect crunch.
Serve immediately for maximum crispiness or store in an airtight container for a few days.
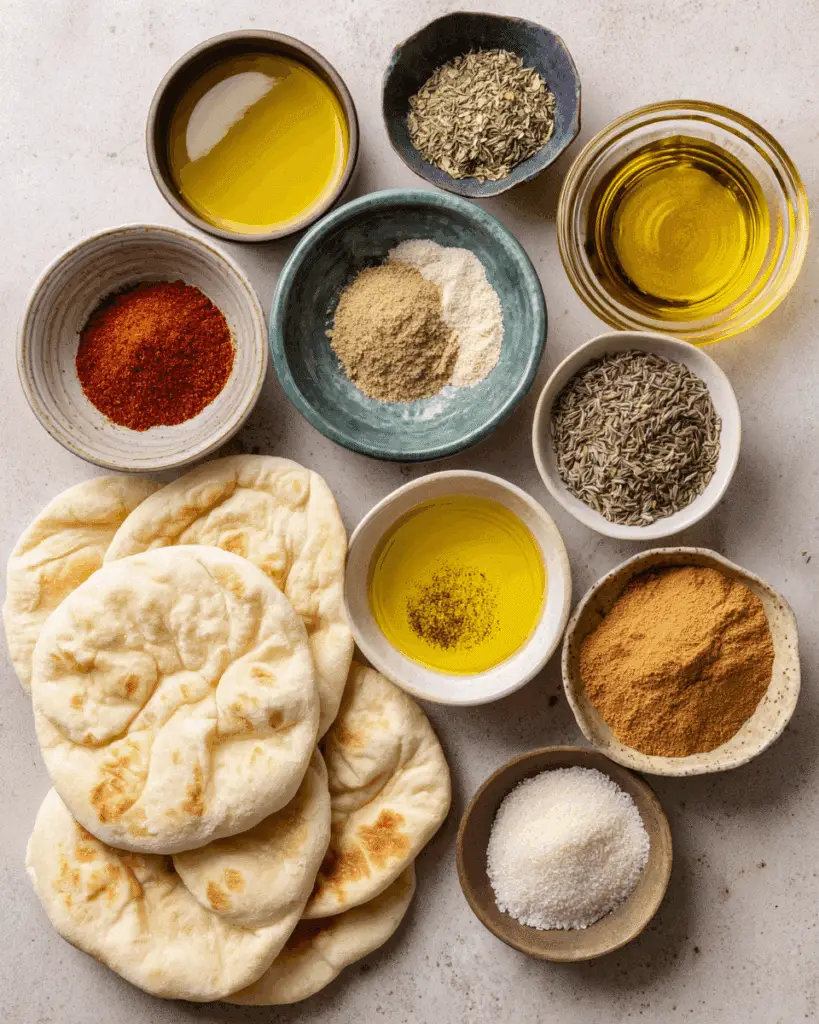
Ingredients in Homemade Pita Chips
(Note: the full ingredients list, including measurements, is provided in the recipe card directly below.)
Pita Bread: The base of the chips. Soft yet sturdy, it crisps beautifully in the oven, creating the perfect crunchy bite.
Olive Oil: Adds richness and helps the spices adhere while promoting even browning.
Ground Coriander: Brings a citrusy, slightly sweet aroma that pairs perfectly with warm spices.
Paprika: Sweet or hot, it adds color, depth, and a gentle warmth that elevates the flavor profile.
Cumin: Earthy and aromatic, it gives a subtle smoky undertone to the chips.
Salt: Enhances all the flavors and makes the chips irresistible.
Instructions
Let’s make these crunchy, spiced pita chips.
Preheat Your Oven
Set your oven to the temperature in the recipe card. Preheating ensures even baking and perfect crispness.
Prepare the Pita Bread
Cut the pita into triangles or desired shapes. The more uniform they are, the more evenly they bake.
Toss with Olive Oil and Spices
In a mixing bowl, drizzle the pita pieces with olive oil. Sprinkle with ground coriander, paprika, cumin, and salt. Toss until each piece is lightly coated and evenly seasoned.
Arrange on Baking Sheet
Lay the pita pieces in a single layer on a baking sheet. Make sure they aren’t overlapping so each chip bakes evenly.
Bake to Perfection
Bake until golden brown and crisp. Check halfway through and rotate the pan if necessary to ensure even baking.
Cool and Serve
Remove from the oven and let the chips cool slightly. They will continue to crisp as they cool. Serve with your favorite dips or enjoy them on their own.
Nutrition Facts
Servings:
Calories per serving:
Preparation Time
Prep Time:
Cook Time:
Total Time:
How to Serve Homemade Pita Chips
Dips: Perfect with hummus, guacamole, tzatziki, or salsa.
Soups: Add crunch to creamy soups or stews.
Salads: Crush over salads for texture and flavor.
Snack: Enjoy straight from the baking sheet for an addictive snack.
Presentation matters too. Serve in a small bowl or on a platter with a sprinkle of fresh herbs or extra paprika for color.
Make-Ahead and Storage Tips
Bake and cool completely before storing. Keep in an airtight container to maintain crispiness for a few days. Re-crisp in the oven for a few minutes if needed.
Variations to Try
Add garlic powder or onion powder for extra savory flavor.
Use smoked paprika for a richer, smoky taste.
Toss with za’atar or other spice blends for a Middle Eastern twist.
Brush lightly with lemon juice and herbs after baking for a fresh flavor variation.
Additional Tips
Cut pita into uniform sizes to ensure even baking.
Avoid overcrowding the baking sheet for crispness.
Use high-quality olive oil for the best flavor.
Experiment with spice levels to suit your taste.
FAQ
Q1: Can I use whole wheat pita?
A1: Yes, it will add a nuttier flavor and still bake crisp.
Q2: Can I make these in advance?
A2: Yes, but store in an airtight container to maintain crunch.
Q3: How do I re-crisp pita chips?
A3: Bake at a low temperature for a few minutes until crispy.
Q4: Can I add more spices?
A4: Absolutely, customize with paprika, chili powder, or herbs.
Q5: Can I make them without oil?
A5: Yes, but they may be less golden and flavorful.
Q6: Are these gluten-free?
A6: Only if you use gluten-free pita bread.
Q7: Can I freeze baked pita chips?
A7: Yes, store in an airtight freezer-safe container, then re-crisp in the oven.
Q8: Can I make sweet pita chips?
A8: Yes, substitute spices for cinnamon and sugar.
Q9: How thin should I cut pita?
A9: Triangles roughly 1–2 inches wide work best for even crisping.
Q10: Can I use homemade pita?
A10: Definitely, they will be even more flavorful and fresh.
Conclusion
These Homemade Pita Chips are crunchy, aromatic, and incredibly versatile. The combination of olive oil, paprika, cumin, and coriander transforms simple pita into a snack that’s both healthy and irresistible. Serve them with dips, add to soups, or enjoy them on their own for a flavorful crunch. They are easy to make, satisfying to eat, and a perfect addition to any gathering or casual snack time.
Homemade Pita Chips
- Prep Time: 5 minutes
- Cook Time: 15 minutes
- Total Time: 20 minutes
- Yield: 4 servings 1x
- Category: Snack
- Method: Baked
- Cuisine: Mediterranean
- Diet: Vegetarian
Description
Crispy Homemade Pita Chips seasoned with a blend of spices, perfect for dipping or snacking.
Ingredients
- 4 pita breads
- 2 tbsp olive oil
- 1/4 tsp ground coriander
- 1/2 tsp paprika (sweet or hot)
- 1/4 tsp cumin (whole or ground)
- Salt, to taste
Instructions
- Preheat oven to 375°F (190°C).
- Cut pita breads into triangles or desired shapes.
- In a large bowl, toss pita pieces with olive oil, ground coriander, paprika, cumin, and salt until evenly coated.
- Spread pita pieces in a single layer on a baking sheet.
- Bake for 10–15 minutes, flipping halfway through, until golden brown and crispy.
- Allow to cool slightly before serving.
Notes
- Use fresh spices for the most vibrant flavor.
- Keep an eye on the chips while baking to avoid burning.
- These can be stored in an airtight container for up to 1 week.