

There’s something truly special about an Easter dessert that’s as stunning as it is delicious. This Easter Ripple Cake is a masterpiece of flavors and textures, combining layers of rich, creamy goodness with a beautiful marbled effect. If you’re looking for a showstopping dessert that’s as fun to make as it is to eat, this one’s for you! Trust me, once you take a bite, you’ll be hooked.
Disclosure: This post contains affiliate links.If you click and make a purchase, I may earn a small commission at no extra cost to you.


With swirls of pastel colors and a melt-in-your-mouth texture, this cake is perfect for celebrating spring and all things Easter. Whether you’re serving it at a family gathering, a festive brunch, or just treating yourself, it’s guaranteed to impress. Let’s dive into why this cake is a must-try!
Why You’ll Love This Recipe
Festive & Fun: The ripple effect creates a stunning visual that’s perfect for Easter celebrations. The pastel colors make it almost too pretty to eat!
Creamy & Dreamy: Each bite is rich, smooth, and full of delightful flavors. It’s the perfect balance of sweet and creamy.
Easy to Make: Despite its elegant look, this cake is surprisingly simple to prepare. No need for fancy baking skills!
Make-Ahead Friendly: This cake tastes even better after chilling, making it ideal for prepping ahead of time.
Crowd-Pleasing: Everyone from kids to adults will love this fun and festive treat.
Ingredients in Easter Ripple Cake
Here’s what makes this cake so irresistible:
Vanilla Cake Base: A soft and fluffy cake that serves as the perfect canvas for the ripple effect.
Sweetened Whipped Cream: Light, airy, and just the right amount of sweetness to complement the cake.
White Chocolate Ganache: Adds a touch of richness and smooth texture.
Pastel Food Coloring: The key to creating those beautiful Easter swirls. Choose soft hues like pink, blue, and yellow for the best effect.
Vanilla Extract: Enhances the overall flavor and adds a warm, comforting aroma.
How to Make Easter Ripple Cake
Let’s dive into the steps to create this stunning dessert:
Bake the Cake: Start by preparing a classic vanilla cake base. Let it cool completely before moving on to the next step.
Prepare the Ganache: Melt the white chocolate with a splash of cream until smooth and glossy. Let it cool slightly before use.
Whip the Cream: Beat heavy cream with a little sugar and vanilla extract until soft peaks form.
Create the Ripple Effect: Divide the whipped cream into separate bowls and tint each with different pastel colors. Dollop the colors onto the cake and gently swirl with a knife for a marbled effect.
Chill & Set: Allow the cake to chill in the fridge for at least an hour to let the flavors meld together beautifully.
Serve & Enjoy: Slice, serve, and watch as everyone falls in love with this delightful Easter treat!
How to Serve Easter Ripple Cake
This cake is a delight on its own, but here are a few ways to make it even more special:
With Fresh Berries: Strawberries, raspberries, or blueberries add a burst of fresh flavor.
Topped with Chocolate Shavings: A sprinkle of white or milk chocolate shavings adds a lovely touch.
Drizzled with Caramel or Berry Sauce: A little extra drizzle makes this cake even more indulgent.
With a Scoop of Ice Cream: Vanilla or strawberry ice cream pairs beautifully with the creamy texture.
Additional Tips
Use Gel Food Coloring: Gel food coloring gives vibrant colors without affecting the texture.
Make It Ahead: This cake tastes even better after chilling overnight, so feel free to make it the day before.
Store Properly: Keep leftovers in an airtight container in the fridge for up to 3 days.
Experiment with Flavors: Try adding a hint of almond or coconut extract for a unique twist.
FAQ Section
Q1: Can I use store-bought cake mix?
A1: Absolutely! A vanilla cake mix works great if you’re short on time.
Q2: Can I use different colors?
A2: Yes! Feel free to use any pastel shades you love.
Q3: How do I get the perfect ripple effect?
A3: Use a toothpick or a butter knife to gently swirl the colors together.
Q4: Can I freeze this cake?
A4: Yes! Wrap it tightly and freeze for up to 1 month. Thaw in the fridge before serving.
Q5: What’s the best way to store leftovers?
A5: Store in an airtight container in the fridge for up to 3 days.
Q6: Can I use buttercream instead of whipped cream?
A6: Yes, but the texture will be heavier. Whipped cream gives it a light and airy feel.
Q7: Can I add sprinkles?
A7: Definitely! Pastel sprinkles make a fun and festive addition.
Q8: What if I don’t have white chocolate?
A8: You can use a simple vanilla glaze instead.
Q9: Can I make this cake dairy-free?
A9: Yes! Use coconut cream and dairy-free white chocolate.
Q10: Can I make cupcakes instead?
A10: Absolutely! Just adjust the baking time accordingly.
Final Thoughts
This Easter Ripple Cake is the ultimate festive dessert—beautiful, delicious, and fun to make. Whether you’re celebrating with family, hosting an Easter brunch, or just treating yourself, this cake will bring joy to every bite. Give it a try, and let the pastel swirls and creamy layers make your Easter extra special!
Print
Easter Ripple Cake
- Prep Time: 10 minutes
- Cook Time: 6 hours
- Total Time: 6 hours 10 minutes
- Yield: 10 servings
- Category: Dessert
- Method: No-Bake
- Cuisine: Australian
Description
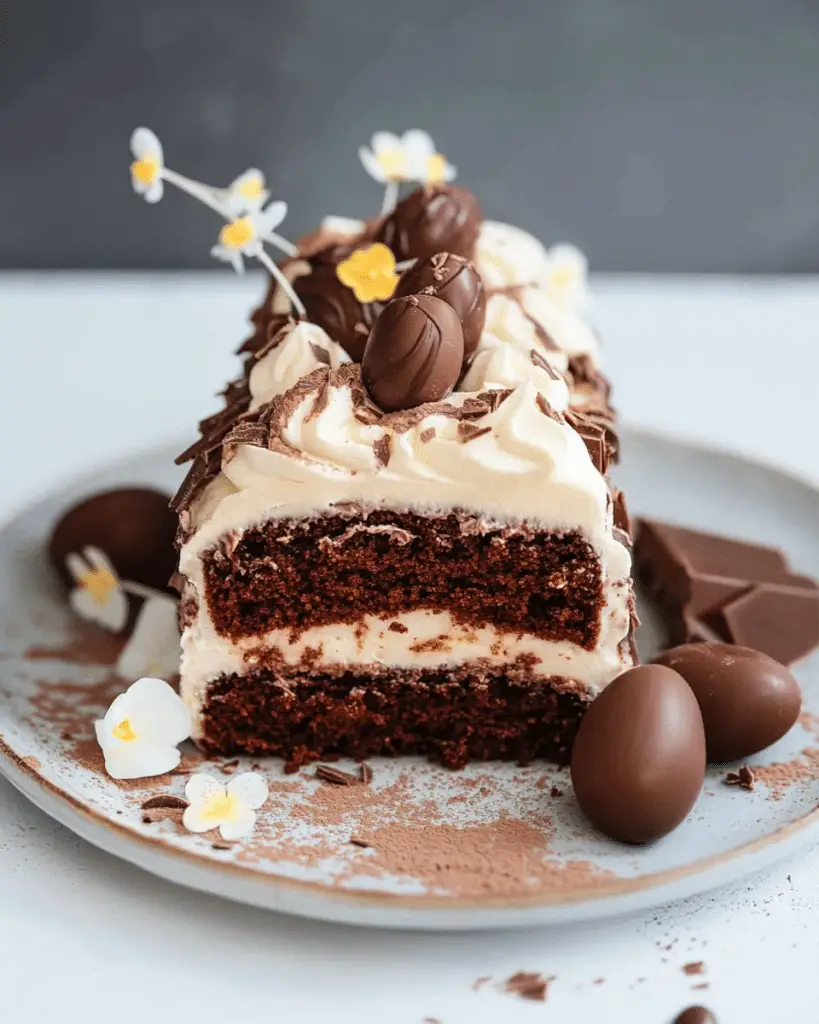
This Easter Chocolate Ripple Cake is a fun, no-bake twist on the classic Aussie dessert! Made with Arnott’s Choc Ripple biscuits, fluffy whipped cream, and topped with Easter eggs, it’s a 10-minute recipe that chills into a decadent, crowd-pleasing treat. Perfect for Easter gatherings, holiday desserts, or a simple sweet indulgence.
Ingredients
-
600ml thickened cream (heavy whipping cream)
-
1 tsp caster sugar (superfine sugar)
-
1 tsp vanilla extract
-
250g Arnott’s Choc Ripple biscuits (or any chocolate cookies)
-
Easter eggs, for decorating
Instructions
Conventional Method
-
Whip the cream: In a bowl, beat cream, sugar, and vanilla until soft peaks form.
-
Prep the dish: Spread a thin layer of cream on the base of your serving platter.
-
Stack biscuits:
-
Hold one biscuit, spread cream on its flat side, and sandwich another on top. Repeat to form stacks of 3–4 biscuits.
-
Place stacks upright on the platter, joining them to form a log.
-
-
Frost & chill: Cover the entire log with remaining cream. Refrigerate overnight (or at least 6 hours) to soften biscuits.
-
Decorate: Add Easter eggs before serving.
Thermomix Method
-
Whip cream: Insert butterfly, add cream, sugar, and vanilla. Beat (Speed 3) until soft peaks form.
-
Follow steps 2–5 above.
Notes
-
Make ahead: Assemble 1 day in advance for the best texture.
-
Variations: Add cocoa powder to the cream for extra chocolate flavor, or drizzle with melted chocolate before serving.
-
Storage: Keep refrigerated for up to 3 days.
Nutrition
- Serving Size: 1 slice (100g)
- Calories: 318
- Sugar: 14g
- Sodium: 95mg
- Fat: 25g
- Saturated Fat: 16g
- Unsaturated Fat: 7g
- Trans Fat: 0g
- Carbohydrates: 20g
- Fiber: 1g
- Protein: 3g
- Cholesterol: 85mg