
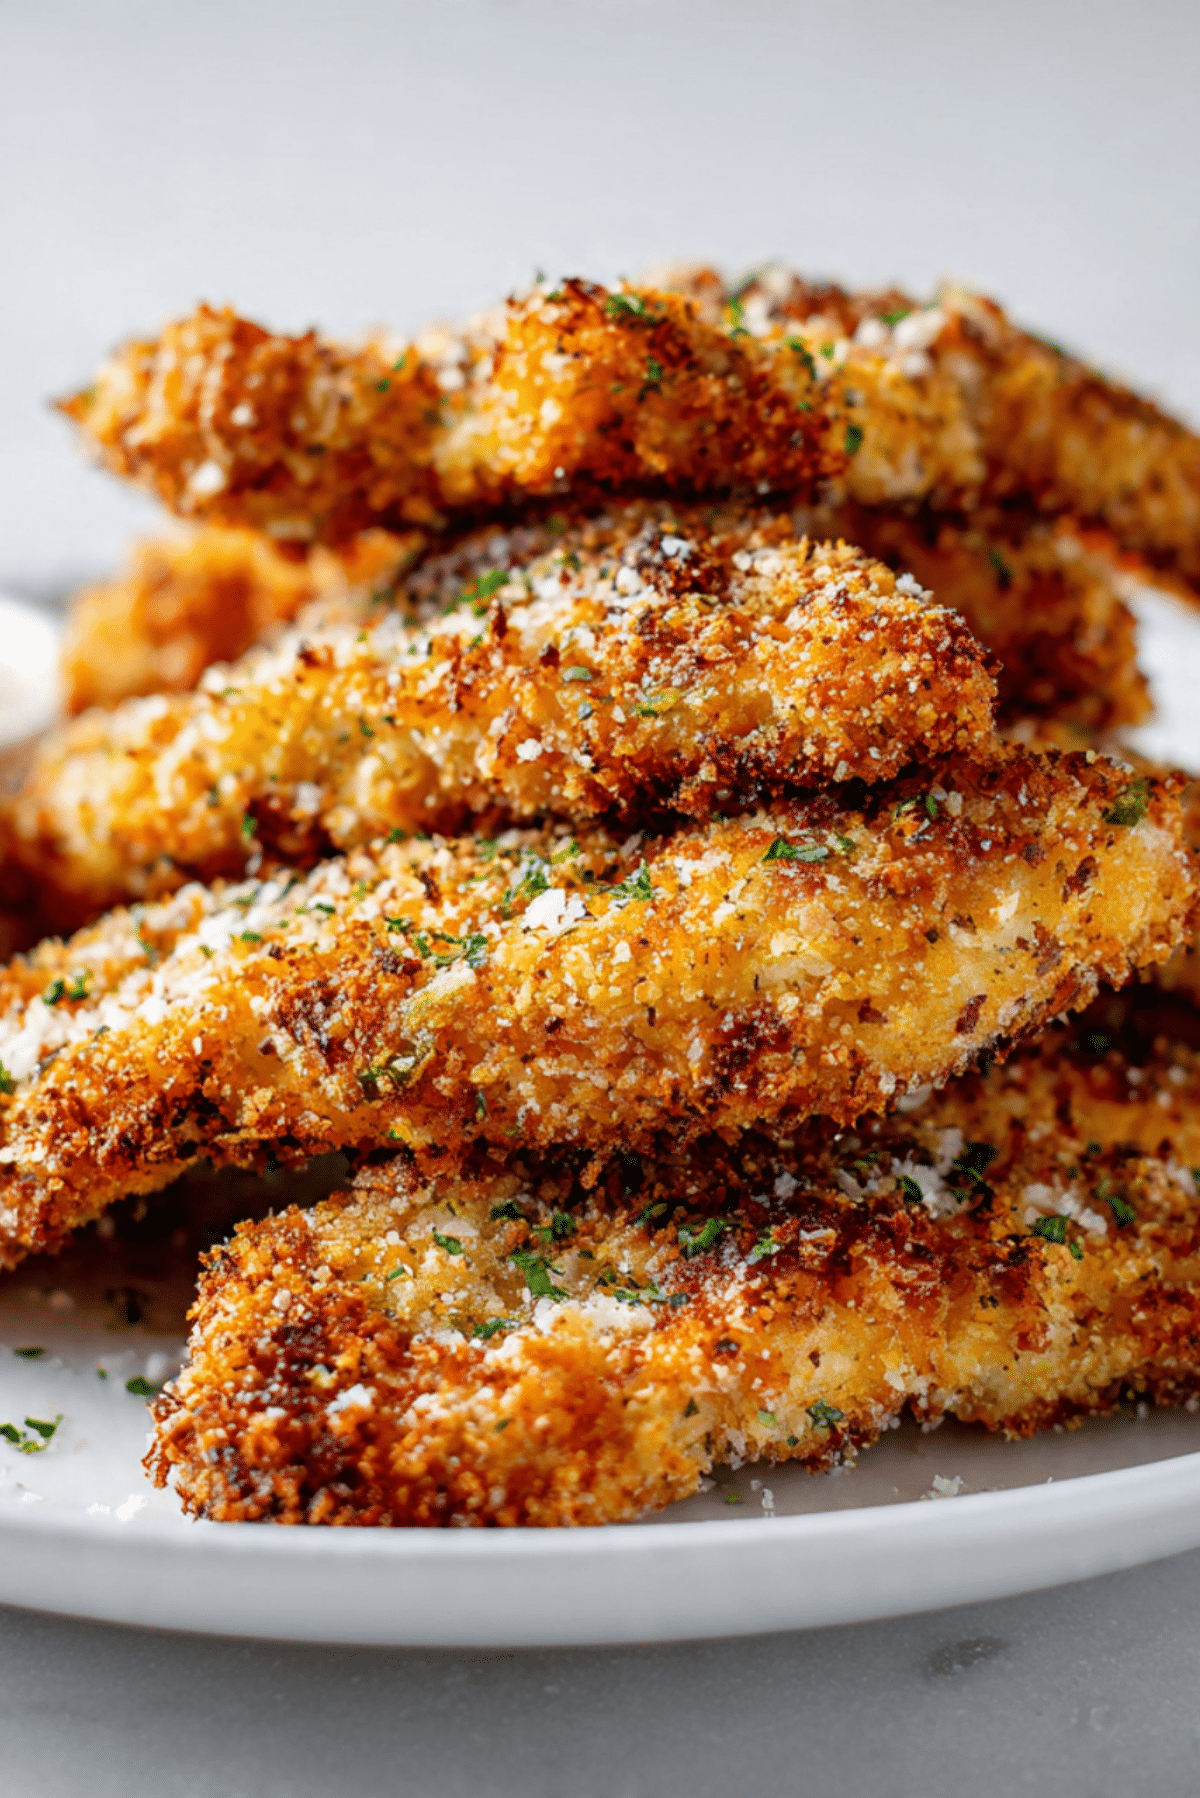
There is something almost impossible to resist about a plate of golden chicken strips fresh from the oven, especially when the coating is packed with garlicky flavor and plenty of nutty parmesan. The outside turns crisp and deeply savory, while the inside stays juicy and tender, which is exactly the kind of dinner that disappears fast. Trust me, you’re going to love this, because every bite brings that perfect contrast of crunch, warmth, and rich cheesy flavor.
Disclosure: This post contains affiliate links.If you click and make a purchase, I may earn a small commission at no extra cost to you.


Why These Chicken Strips Deserve a Spot in Your Dinner Rotation
Some meals just make life easier, and this is one of them. It has that cozy, crowd pleasing feel of comfort food, but it still comes together with simple ingredients you can grab without much planning. And now let dive into what makes this one such a reliable favorite, because once you make it, it tends to become the thing everyone asks for again.
A Little Backstory Behind This Crispy Favorite
Chicken strips have been a weeknight staple in countless kitchens for years, mostly because they hit that sweet spot between familiar and endlessly adaptable. The garlic and parmesan pairing brings in an Italian-inspired touch, the kind of flavor combo that has shown up in pasta, breads, roasted vegetables, and now this irresistibly crisp chicken. It feels classic, a little playful, and very easy to make your own.
Why This Recipe Works So Well Every Single Time
This dish has a way of winning people over from the very first bite. The seasoning is bold without being overwhelming, the texture is incredibly satisfying, and the ingredient list stays refreshingly practical.
Versatile: These strips work for dinner, lunch bowls, wraps, salads, or even party platters. They feel just as right on a casual weekday as they do on a game day table.
Budget-Friendly: Chicken tenders, pantry breadcrumbs, garlic, and parmesan turn into something that tastes far more special than the cost suggests. It is proof that simple ingredients can still feel exciting.
Quick and Easy: The prep is straightforward, and the breading process is easy to follow. Once everything is coated, the oven does most of the work.
Customizable: You can adjust the seasonings, swap the crumbs, or serve them with different dips. A little heat, extra herbs, or lemon zest can completely shift the vibe.
Crowd-Pleasing: Crispy chicken almost always disappears first. Kids love it, adults love it, and nobody complains when a second batch shows up.
Make-Ahead Friendly: You can bread the chicken ahead of time and keep it chilled until you are ready to bake. That makes dinner feel way less rushed.
Great for Leftovers: Leftover strips reheat beautifully and slide easily into sandwiches, grain bowls, or salads. Let me tell you, it’s worth every bite the next day too.
Pro Tips That Make a Big Difference
Before you head into the kitchen, a few little tricks can make the final result even better. This one’s a total game-changer when you want that coating crisp and flavorful from edge to edge.
- Pat the chicken dry: A dry surface helps the coating cling better, which means a more even crust.
- Use finely grated parmesan: It blends into the crumbs more smoothly and creates a better golden finish.
- Press the coating on firmly: A gentle press keeps the breading from falling off during baking.
- Space the strips apart: Air circulation helps them crisp instead of steam.
- Flip once during baking: This gives both sides a chance to turn beautifully golden.
Kitchen Tools That Make the Process Easy
A few basic tools are all you need here, which is part of the charm. Nothing fancy, just reliable kitchen basics that help the whole process feel smooth.
Baking sheet: Gives the chicken enough room to roast and crisp evenly.
Wire rack: Helps hot air move around the strips so the bottoms stay crisp too.
Shallow bowls: Perfect for setting up the flour, egg, and breadcrumb coating stations.
Tongs: Make it easier to coat and move the chicken without making a mess.
Microplane or fine grater: Useful for finely grating parmesan and garlic if needed.
Ingredients That Bring Everything Together
The beauty of this recipe is how a handful of everyday ingredients create something that tastes deeply satisfying. Each one has a clear role, and together they build that crunchy, savory coating and juicy center we are after.
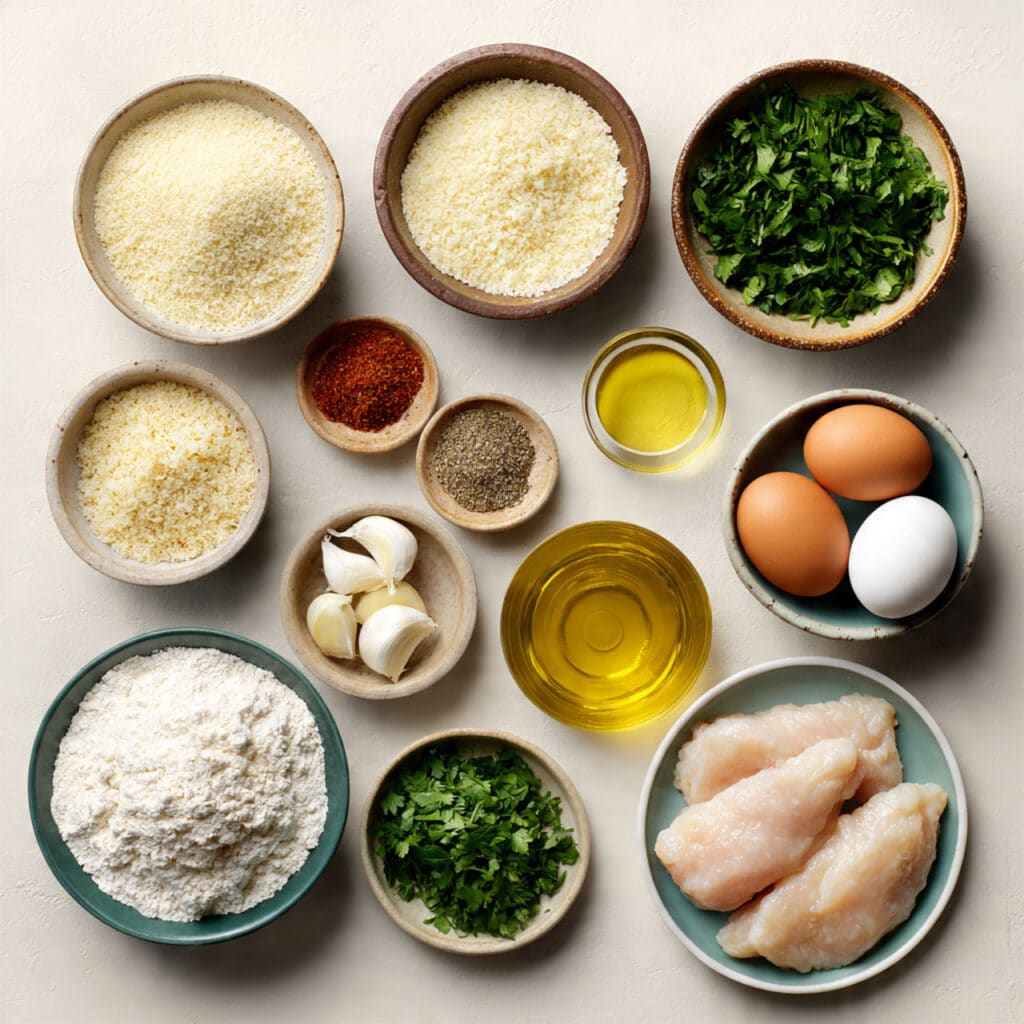
- Chicken tenders: 1 1/2 pounds, the tender and juicy base of the dish that cooks quickly and evenly.
- All-purpose flour: 1/2 cup, helps the egg stick and creates the first layer of the coating.
- Eggs: 2 large, beaten, they act like the glue that holds the crumb mixture in place.
- Panko breadcrumbs: 1 1/2 cups, these create the light, crisp texture that makes the strips so satisfying.
- Parmesan cheese: 3/4 cup, finely grated, adds salty, nutty flavor and helps the crust turn golden.
- Garlic: 4 cloves, minced very finely, brings that bold savory flavor that makes the coating pop.
- Italian seasoning: 1 teaspoon, adds herby warmth and rounds out the flavor.
- Paprika: 1 teaspoon, gives gentle warmth and a rich golden color.
- Salt: 1 teaspoon, seasons the coating and the chicken all the way through.
- Black pepper: 1/2 teaspoon, adds a little sharpness and balance.
- Olive oil: 2 tablespoons, drizzled over the coated strips to help them crisp in the oven.
- Fresh parsley: 1 tablespoon, chopped, for a bright finishing touch after baking.
Easy Swaps That Still Taste Amazing
One of the nicest things about this recipe is how forgiving it is. You can change a few ingredients and still end up with something delicious and crisp.
Chicken tenders: Boneless skinless chicken breasts cut into strips.
All-purpose flour: Gluten-free all-purpose flour.
Panko breadcrumbs: Crushed cornflakes or gluten-free panko.
Parmesan cheese: Pecorino Romano for a sharper flavor.
Italian seasoning: A mix of dried oregano, basil, and parsley.
Olive oil: Avocado oil.
The Ingredients That Really Steal the Show
A couple of ingredients do a lot of heavy lifting here, and they are worth appreciating for the magic they bring.
Parmesan cheese: This is where the coating gets its deep savory edge. It melts slightly into the crumbs as the strips bake, creating extra flavor and those irresistible golden bits.
Garlic: Fresh garlic gives the coating its bold personality. As it cooks, the sharpness softens and turns warm, aromatic, and rich.
Let’s Get Cooking
Now comes the fun part, where everything starts to come together. The breading station feels a little messy in the best possible way, and once those strips hit the oven, the smell alone will tell you dinner is headed somewhere very good.
- Preheat Your Equipment: Preheat your oven to 425°F. Line a baking sheet with parchment paper and place a wire rack on top if you have one.
- Combine Ingredients: In one shallow bowl, add the flour. In a second bowl, beat the eggs. In a third bowl, mix the panko breadcrumbs, parmesan, minced garlic, Italian seasoning, paprika, salt, and black pepper until everything is evenly combined.
- Prepare Your Cooking Vessel: Lightly grease the wire rack or parchment so the strips release easily after baking.
- Assemble the Dish: Pat the chicken dry. Dredge each piece first in flour, then dip it into the beaten egg, and finally press it into the breadcrumb mixture until fully coated. Arrange the coated strips on the prepared rack or baking sheet.
- Cook to Perfection: Drizzle the olive oil lightly over the strips. Bake for 18 to 22 minutes, flipping once halfway through, until the coating is crisp and the chicken reaches 165°F inside.
- Finishing Touches: Remove from the oven and let the strips rest for 2 to 3 minutes. Sprinkle with chopped parsley while they are still hot.
- Serve and Enjoy: Serve warm with your favorite dipping sauce, a squeeze of lemon, or alongside a fresh salad or roasted potatoes.
How the Flavor and Texture Build in Every Bite
What makes this dish so satisfying is the way the textures layer together. The coating starts dry and crumbly, then bakes into a crisp shell with toasted parmesan and fragrant garlic woven through every bite. Inside, the chicken stays moist and tender, which creates that contrast everyone chases. The flavor develops in stages too, first the crunchy savory crust, then the mellow garlic, then the salty richness of parmesan, and finally the juicy chicken at the center.
Helpful Tips for Even Better Results
A few small choices can take these from very good to ridiculously good. And now let dive into the kind of details that make the process feel easy and the outcome feel dependable.
- Use freshly grated parmesan for the best texture and flavor.
- Do not overcrowd the pan, because packed strips will steam instead of crisp.
- Mince the garlic finely so it blends into the coating rather than burning in larger pieces.
- Let the strips rest briefly after baking so the coating sets nicely.
Mistakes to Skip for the Crispiest Finish
Even easy recipes have a few little traps, but luckily they are simple to avoid. Here are the ones worth watching for.
- Skipping the flour layer, which can make the coating slide off more easily.
- Using wet chicken straight from the package, which weakens the breading.
- Adding too much oil, because that can make the coating heavy instead of crisp.
- Pulling the strips out too early, which leaves the center undercooked and the crust pale.
Nutrition Snapshot
Servings: 4
Calories per serving: 520
Note: These are approximate values.
Time You’ll Need in the Kitchen
Prep Time: 20 minutes
Cook Time: 20 minutes
Total Time: 40 minutes
Make-Ahead and Storage Tips That Actually Help
This recipe fits nicely into a busy schedule, which makes it even more lovable. You can coat the chicken up to 8 hours ahead and keep it covered in the refrigerator until baking time. Once cooked, leftovers can be stored in an airtight container in the fridge for up to 3 days. For longer storage, freeze the cooked strips in a single layer first, then transfer them to a freezer-safe container for up to 2 months. Reheat in a 375°F oven or air fryer until hot and crisp again, because that brings the coating back to life much better than the microwave.
How to Serve Them for Maximum Enjoyment
These strips are incredibly easy to build a meal around. Serve them with roasted potatoes, a crisp green salad, buttered corn, or a simple slaw for balance. They are also fantastic with marinara, ranch, garlic yogurt sauce, or honey mustard. For something a little more filling, tuck them into wraps with lettuce and tomatoes, or slice them over pasta with a squeeze of lemon.
Smart and Tasty Ways to Use Leftovers
Leftovers never feel boring here, which is always a win. Slice the strips and stuff them into a toasted sandwich with lettuce and a creamy spread. Chop them over a Caesar-style salad for extra crunch and protein. Tuck them into a wrap with crunchy veggies, or dice them and use them in a grain bowl with rice, cucumbers, and a tangy sauce.
Extra Tips to Make Life Easier
Sometimes the smallest details are the most helpful, especially on busy cooking days.
Season in layers: A little seasoning in the coating mixture makes the final dish taste fuller and more balanced.
Use a rack if possible: It helps air circulate underneath, which improves crispness.
Cut evenly if using breasts: Similar sized pieces cook at the same pace, which prevents dry bits.
Serve right away: The coating is at its crispiest when the strips are freshly baked.
Make It Look as Good as It Tastes
Presentation matters, especially with a dish this golden and crisp. Pile the strips onto a white platter so the color stands out, then scatter a little chopped parsley over the top for freshness. A few small dipping bowls on the side make everything feel more inviting. You can also add lemon wedges for brightness and contrast, which makes the whole plate look lively and fresh.
Fun Variations Worth Trying
Once you have the base method down, there are plenty of ways to play with it. That is part of what makes this so fun to keep in rotation.
- Spicy version: Add 1/2 teaspoon cayenne or red pepper flakes to the crumb mixture for extra heat.
- Herb-forward version: Mix in extra dried basil, oregano, and parsley for a greener, more aromatic coating.
- Lemon garlic version: Add 1 teaspoon lemon zest to the breadcrumb mixture and serve with lemon wedges.
- Extra cheesy version: Increase the parmesan to 1 cup for a richer crust.
- Air fryer version: Cook at 400°F for 10 to 12 minutes, flipping halfway through, until golden and cooked through.
FAQ’s
Q1: Can I use chicken breast instead of tenders?
Yes, absolutely. Just slice boneless skinless chicken breasts into even strips so they cook at the same speed.
Q2: How do I know when the chicken is done?
The safest way is to use a thermometer. The center should reach 165°F.
Q3: Can I make these in the air fryer?
Yes. They turn out wonderfully crisp in the air fryer, usually in 10 to 12 minutes at 400°F.
Q4: Can I prepare them ahead of time?
Yes. You can bread the strips earlier in the day and refrigerate them until you are ready to bake.
Q5: What dipping sauces go best with them?
Marinara, ranch, honey mustard, garlic yogurt sauce, and spicy mayo all pair really well.
Q6: Can I freeze them after cooking?
Yes. Cool them fully first, then freeze and reheat in the oven or air fryer for the best texture.
Q7: Why is my coating falling off?
This usually happens when the chicken is too wet or the coating is not pressed on firmly enough.
Q8: Can I make them gluten-free?
Yes. Swap the flour and breadcrumbs for gluten-free versions and keep the rest of the method the same.
Q9: What side dishes work best with this meal?
Roasted vegetables, fries, salad, coleslaw, or even mac and cheese all make great pairings.
Q10: Can I use pre-grated parmesan?
You can, but freshly grated parmesan usually melts and crisps better in the coating.
Conclusion
Crispy Garlic Parmesan Chicken Strips are the kind of meal that feels instantly comforting and a little exciting at the same time. They are crunchy, juicy, deeply savory, and easy enough for a weeknight without feeling ordinary. This one’s a total game-changer when you want something reliable that still feels special, and once that first tray comes out golden and fragrant, you will see exactly why it earns a repeat spot at the table.
Print
Crispy Garlic Parmesan Chicken Strips
- Prep Time: 20 minutes
- Cook Time: 20 minutes
- Total Time: 40 minutes
- Yield: 4 servings 1x
- Category: Main Course
- Method: Baked
- Cuisine: American
- Diet: Low Lactose
Description
Golden baked chicken strips coated in garlic, parmesan, and crispy panko for a juicy inside and crunchy, savory crust. Perfect for dinner, dipping, wraps, or meal prep.
Ingredients
- 1 1/2 pounds chicken tenders
- 1/2 cup all-purpose flour
- 2 large eggs, beaten
- 1 1/2 cups panko breadcrumbs
- 3/4 cup finely grated parmesan cheese
- 4 cloves garlic, minced very finely
- 1 teaspoon Italian seasoning
- 1 teaspoon paprika
- 1 teaspoon salt
- 1/2 teaspoon black pepper
- 2 tablespoons olive oil
- 1 tablespoon fresh parsley, chopped
Instructions
- Preheat the oven to 425°F. Line a baking sheet with parchment paper and place a wire rack on top if available.
- Place the flour in one shallow bowl. Beat the eggs in a second bowl. In a third bowl, combine the panko breadcrumbs, parmesan cheese, minced garlic, Italian seasoning, paprika, salt, and black pepper.
- Lightly grease the wire rack or parchment paper.
- Pat the chicken tenders dry. Coat each piece in flour, dip into the beaten eggs, then press into the breadcrumb mixture until fully coated.
- Arrange the coated chicken strips on the prepared baking sheet. Drizzle lightly with olive oil.
- Bake for 18 to 22 minutes, flipping once halfway through, until golden and crisp and the internal temperature reaches 165°F.
- Let rest for 2 to 3 minutes, then sprinkle with chopped parsley and serve warm.
Notes
- Use freshly grated parmesan for the best flavor and texture.
- Do not overcrowd the pan or the strips may steam instead of crisp.
- For air fryer cooking, cook at 400°F for 10 to 12 minutes, flipping halfway through.
- Leftovers reheat best in the oven or air fryer.
Nutrition
- Serving Size: 1/4 of recipe
- Calories: 520
- Sugar: 2 g
- Sodium: 980 mg
- Fat: 24 g
- Saturated Fat: 7 g
- Unsaturated Fat: 15 g
- Trans Fat: 0 g
- Carbohydrates: 25 g
- Fiber: 1 g
- Protein: 47 g
- Cholesterol: 185 mg